Electric Portuguese Chopper

Bobocop

Member
Local time
11:45 AM
Joined
Jan 29, 2009
Messages
32
This is my electric chopper build.
I started this with not much money to spare (not working at the moment)
but I wanted an electric bike, I wanted a chopper with a wide back wheel.

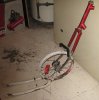
I started searching for a cheap motor, my plan was to make a chain drive (motors are cheaper) but then I came across an e-bike (on the Kijijji website here in toronto) that the front end had caught fire (ignition switch) and the owner was selling it for $50 with no batteries (he had sold them)

I didn't know anything about hub motors, but it was 36 volts so i decided to buy it, since i was looking for a 24 volt, I thought this would be more powerfull.

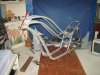
Next, I searched for a wide back wheel and came across a stingray bike selling for $45, (also on the Kijijji website) You can't get just a wide rim for that price, (and there's none to be found).
I figured I could use the rear wheel, forks, peddles, chain etc, for my build, so I bought it.

Here is a pic of the e-bike i bought.
And a pic of the stingray.
 

Attachments

  • Scooter Before 400.jpg
    Scooter Before 400.jpg
    43.9 KB · Views: 421
  • Pacific Chopper.jpg
    Pacific Chopper.jpg
    102.6 KB · Views: 421
The first thing I had to do was try to get the wide back wheel from the stingray onto the small hub motor rim, (or it couldn't be a chopper, with a 12" rim)
I did merge them, (as you can see in the photo of the e-bike in my first post), so the build went on. (more on the merging of the rims later)

I started by chopping the e-bike up and using the back end with the springs as a starting point.

Then I started to build the rest of the chopper frame, I used some galvanized tubing that my perants had left over from when they built some sort of canopy for their grape vine in thier back yard.
remember, i'm trying to build this as cheap (money wise) as i can.

For the tube bending (some of you might laugh, But it works great) I welded a scrap bike rim and a couple of forks together, I removed some spokes so it wouldn’t dent the tube.

I used the fork neck off the stingray bike.

(I'm trying to put the pics under the explainations, but i guess i can't so the pics will be at the bottum of the posts)
 

Attachments

  • Frame 01.jpg
    Frame 01.jpg
    84 KB · Views: 325
  • bender01.jpg
    bender01.jpg
    72.7 KB · Views: 319
  • Frame 03.jpg
    Frame 03.jpg
    51.1 KB · Views: 316
  • Frame 04.jpg
    Frame 04.jpg
    51.2 KB · Views: 312
The forks,

I'm combining the forks from the stingray and the e-bike (the ones that i bought)
I left the stingray forks length, which is 28", then i cut the e-bike forks to 12", just enough to keep the suspension and to slide into the stingray forks, (as to make a stronger joint).

The diameters were off, so they didn't fit tight, i had to find a bushing, but that was ok because i wanted it a little longer anyway.
so i cut a piece of tube off a scrap bike that slid nicely into the stingray forks and the e-bike forks slid nicely into that.

Then i cut the dropouts off the top piece of the forks (stingray forks)

Those stingray forks are some heavy duty forks, it took me awhile to cut and grind off the access of those dropouts.

I only have a drill to do most of my work, i use it also for grinding.
one thing i like to do is put 2 grinding pads back to back, this way i can get in to hard to get places (grind by pushing or pulling)


Here's how the forks came out.
after grinding, i applied primer and some automotive spot putty to get rid of the grinding marks, and cover the welds (I don't like the welds to show that much).

I hated to put all that chrome to waist so i left the top half of the forks untouched, i'll figure something out to put where the chrome and paint meet in order to make it look better.
 

Attachments

  • forks01.jpg
    forks01.jpg
    43.8 KB · Views: 302
  • forks03.jpg
    forks03.jpg
    35.1 KB · Views: 287
The battery box,

Here i'm trying to make the box flow with the frame, i'm using very light wood, the kind they use for cottage wall paneling, for $5 you can buy 5 - 3" x 16 feet strips at home depot,
I also picked up some shorter strips (wood) for free at home depot, the ones they use to pile bundles on top of each other, their all over the place, if you ask they will let you have them.

I decided to do the seat (make it flow with frame) at the same time as i waited for the battery box glue to dry, the battery box bottom will be thicker as it's going to support the batteries from moving.

In order for the batteries to fit, Incase I use SLA's, (untill I can get a lighter pack) the box had to be at least 6" wide.
that ment that the box had to stick out of the frame a bit (I don't like that)

Here's the battery box, (pic below)

Here's the seat,
I was surprised how cheap the vinyl was ($5 a square yard)
(pics Below)

I am going to make a smaller box right under the seat for a 12 volt pack (maybe nicad) to run the lights, horn etc.
so in order to get at it i added a hinge to the seat so it can open up to have access to the battery
(pic below)
 

Attachments

  • Frame 05.jpg
    Frame 05.jpg
    107.7 KB · Views: 355
  • batbox 01.jpg
    batbox 01.jpg
    35.8 KB · Views: 309
  • batbox 02.jpg
    batbox 02.jpg
    38.3 KB · Views: 339
  • seat 01.jpg
    seat 01.jpg
    41.6 KB · Views: 292
  • seat 02.jpg
    seat 02.jpg
    46 KB · Views: 304
  • seat 03.jpg
    seat 03.jpg
    69.3 KB · Views: 284
I didn't like the way the battery box stuck out of the frame.

And i needed to add some kind of support for the kickstand and trailer hitch at the back of the bike, (near the rear hub axle)
The kickstand and trailer hitch are going to be one unit (more on that later)

Anyway, what I decided to do is add another tube running from the front to back, not only does it make the bike look better (I think)
But it also makes the frame stronger, and it gives me the support at the back for the kickstand/trailer hitch.

Plus, if I'm not happy with the hub motor after the build, these extra tubes can also support a chain drive motor just in front of the rear wheel, to help the chopper up hills.
(pics below)

Inside the top 4 tubes is where my controller and wires are going to hide.

The wires for throttle etc. will come in through the front opening of the tubes.
I drilled a hole on the inside of each tube to fish the wires through.

Also, I welded a bolt (as you can see in above pic) for the ground wires.
I'm going to use the frame as a ground for the lights etc. this way i don't need to run all the grounds up to the battery.
 

Attachments

  • Frame 10.jpg
    Frame 10.jpg
    94.4 KB · Views: 294
  • Frame 11.jpg
    Frame 11.jpg
    90.7 KB · Views: 305
  • Frame 12.jpg
    Frame 12.jpg
    91 KB · Views: 301
  • Ground.jpg
    Ground.jpg
    71 KB · Views: 288
Last edited by a moderator:
I made the side panels to close it all in.
I'm using that same light wood that i used for the battery box
(pics below)
neck 01.jpg

I had some of the vinyl left over from the seat so i decided to cover the inside with it.
neck 02.jpgneck 03.jpgneck 05.jpg

The top panel will be held down with screws

neck 06.jpg

Just needs a little spot putty and smoothing out

neck 07.jpg
 
Last edited by a moderator:
I wish i could put the pics right under the explanations, but I can't (or I don't know how) so, as I said earlier, the pics will be at the bottom of the posts.

More on the build soon.
 
Last edited:
'Also, I welded a bolt (as you can see in above pic) for the ground wires.
I'm going to use the frame as a ground for the lights etc. this way i don't need to run all the grounds up to the battery.'


dude...you don't want to ground the frame with a hub motor
it grounds the forks on each side of the motor and it will just vibrate (like it is trying to run both directions at once)
did it once trying to wire a tail light, almost fried the controller till we figured out what was wrong
 
dude...you don't want to ground the frame with a hub motor
it grounds the forks on each side of the motor and it will just vibrate (like it is trying to run both directions at once)
did it once trying to wire a tail light, almost fried the controller till we figured out what was wrong

Thanks for the advice (I didn't know that with hub motors)
But I'm not using the motor battery pack for the lights etc.
I'm using a separate 12v nicd pack for that,
so instead of running the headlight, signals, horn etc. ground up to the pack, I'll just ground them to the frame.

The hub motor is going to run on a separate 48 volt pack
 
Last edited:
Back
Top