$5 Home Depot headlight revisited

Status
Not open for further replies.
I gotta apologize Sarge. I never saw posts 20-30 and this whole time thought you forgot to post instructions. I hope I didn't frustrate you with my stupidity. For some reason I didn't get a notification of any updates to this thread until after I had posted the pic of the light on my bike. Again, totally my fault. Heading to get the materials for the tail light right now.
 
Never an issue- you have two electrical systems, one AC and one DC. The AC is grounded to the engine... even if you rubber mount the engine, the chain connects it to the frame of the bicycle electrically as well as physically, so forget about isolating the AC of the magneto. Your negative for headlight, tail light and brakelight all congregate on the negative DC hookup of the hotbox... or the 6 volt battery system should you choose to run one (more on that later). Your positive output goes to head and tail positive and to one post of the brakelight switch (next transmission), the other of the brakelight switch posts to the light in question.
I figure the more I explain this system, the less likey somebody is to mess it up and the less frustrations encountered. Anybody else feel they're out in left field, pipe up and I will guide you home.
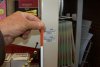
BTW- 4 1.5 volt "AA" batteries of the rechargeable variety seem quite capable of powering the lights with the hotbox as a tricklecharger... I will have to see if the hotbox can harm the batteries...
 
Headlight DIY

SDC100014-1[1].jpgSDC100063[1].jpgSDC100053[1].jpg''''''I have the Pat Pending of that invention sgt.""""':whistle:

Naaaaa,just kidding sgt.:Dyours is more developed than mine, mine is simple.
 
have the Pat Pending of that invention sgt.""""':whistle:

Naaaaa,just kidding sgt.:Dyours is more developed than mine, mine is simple.[/QUOTE]

Ya know, whatever works- yea, I spend a little more time fussing over 'pretty'... but yours shines just as bright. You DO want to paint the PVC- they rot in sunlight.
Thought- do one of these with the full length of the endcap, switch inletted to the BOTTOM... and a vacu-formed chimney hood (like on a pre-WWI gas headlight) glued to the top and done up in high-quality brass paint.... eh?
 
Great work Sgt.,

Might work for me since I am electronics illiterate and don't know my way around a circuit. Since you are making a tutorial for those of us that are electrically challenged, I would recommend that you let others know that capacitors hold electrical charges and they maybe shocked if handled improperly. I know that you'd need a large capacitor from a computer or television to due serious harm. Just my 2 cents.

Here's a Wikipedia on a Diode Bridge for those who'd like to know more about the circuit:
http://en.wikipedia.org/wiki/Diode_bridge

Keep up the good work,

Chris
AKA: BigBlue
 
Rechargeable led flashlight

sgt. I dond have the time to paint it remained in the prototype phase, because the base can not stand the vibration, but change it for this rechargeable flashlight is, LED, have zoom and works quite well.
 

Attachments

  • SDC10007 (3).jpg
    SDC10007 (3).jpg
    58.4 KB · Views: 659
sgt. I dond have the time to paint it remained in the prototype phase, because the base can not stand the vibration, but change it for this rechargeable flashlight is, LED, have zoom and works quite well.

Hmmm... looking at the photo- that's the remains of the mount sticking up from the front brake? Er... yes, that does seem a bit flimsey... I ought to do a tutorial about the mounts as well... as I am away from shop and materials when I write, I need to jot down critical dimentions as well as photos of the mounts without anything on them so I can post
 
Yes that's the remains of the mount sticking up from the front brake.
 
Note to all- this sticky has been delayed due to several real-life issues. Nothing earth-shattering, simply supremely annoying. Further information will be posted this month, I promise
 
Brake light switch

OK, here we go- part one. I will start with several images of the componants as they appear in an ACE Hardware store. The tubing and the orange fiberglass rod will be enough for several units, so you might want to go in dutch with several other fellows or figure manufacturing. MIND YOU- there is a maunfactured brake handle pair with built-in switches that I got for $22 ($11 per handle)- they seem quite sturdy and reliable, so you MIGHT want to go that route-
but here's the Old Sgt.s' take on the subject...
 

Attachments

  • brake switch 104.jpg
    brake switch 104.jpg
    40.9 KB · Views: 590
  • brake switch 106.jpg
    brake switch 106.jpg
    64.8 KB · Views: 554
  • brake switch 108.jpg
    brake switch 108.jpg
    56.5 KB · Views: 562
  • brake switch 109.jpg
    brake switch 109.jpg
    68.7 KB · Views: 547
Status
Not open for further replies.
Back
Top