have fun with that
")
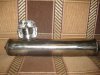
welding 0.8 stainless is no fun, plus it cracks if its not completely immersed in argon. ie, welding in a glovebox... theres a reason i only made 1 stainless pipe, ever.
the specific alloy in use plays a part...
if he works at the laser cutters, that saves a fair wack. local company quoted me over $200 for 20 pieces in 1mm gal. me supplying metal and dxf files. real competitive over here...
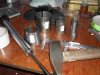
it isnt as easy as it sounds "hammering to shape". sure, works if determined but its a lot of work. better to have lines etched into them for folding on, the more bends the better. you need a special panbrake but thats no major issue. way easier than trying to produce conical sections with a ring roller etc
the metal stretches and deforms and the perfect profile is no longer so perfect once joined together.
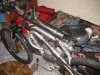
then making sure each and every weld is square and round (ha ha!), making good header joins so it doesnt vibrate to pieces, blah blah blah yarda yarda.
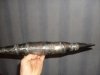
ive done enough to think its stupid and hydroforming is the way. or some type of spinning system, like they do trumpets etc. but the same problem arises. welding each section together. its a lot of work! (and if you get someone else to weld it up... expect around 200 or more for that little job. at least 3 hours. if theyre any good...
the pressure is well within a pressure washer with 10,000psi or so on tap.
sure, therell be some wasted bits of steel as one gets the fine details right but what jag said there was basically the procedure i was thinking of... even with variations of 5-10% from calculated... the differences should be consistent for a given material at a certain thickness at a certain pressure. not that hard to calibrate for.
im planning on getting if not a whole pipe in one go, close enough to the mark to make the one or two sectional welds a lot quicker. youll note most factory pipes are done this way, either hydroformed or stamped, and then seam welded only. very quick and cheap.
at least doing it freeform (no mold) allows for even faster simpler changes to dimensions.
you could even try making prototypes from plastic sheet or doped tissue paper and seeing how they inflate with air... possibly. worth a shot...