R
rod
Guest
here ya go darren
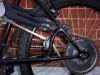
i cut the tube out of a cheap metal chair leg so it already had the bends
check the angle of your cuts by putting the tube in position on the bike
i made 2 c shaped clamps out of 2mm plate and welded them to the ends of the pipe.
i made the sloted plate out of 4mm steel i sat the pipe/clamp assembly
on the bike marked out were to put the plate took it of tacked the plate in
position put it back on the bike i put an adjustabe wrench on the plate and
got it running square with the chain side to side and up and down took it
off and welded the the plate on painted it black droped it on the floor
painted it black again and put it on the bike
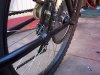
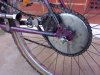
if you have a close look you can see the top clamp is level with the top of the chain it was too close and i had to shift the rear wheel over about 2mm
something to think about when you looking where to put your clamps just about anywere except were i put the top one on mine
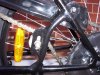
the other chain idler i made from an old rear deraileur and i made the mount
using the hand press at work (i work in a press shop)
i like it becuase i don't have to worry about chain tension all the time but i don't think the spring will last too long its done about 400kms and the arms not as tight as it was but no problems with bending the deraileur is made of stainless steel
i used the round nut off a bike tube on the bolt holding the cog
it fitted onto the original cog bolt on the deraileur (i love it when a plan comes together)
i cut the tube out of a cheap metal chair leg so it already had the bends
check the angle of your cuts by putting the tube in position on the bike
i made 2 c shaped clamps out of 2mm plate and welded them to the ends of the pipe.
i made the sloted plate out of 4mm steel i sat the pipe/clamp assembly
on the bike marked out were to put the plate took it of tacked the plate in
position put it back on the bike i put an adjustabe wrench on the plate and
got it running square with the chain side to side and up and down took it
off and welded the the plate on painted it black droped it on the floor
painted it black again and put it on the bike
if you have a close look you can see the top clamp is level with the top of the chain it was too close and i had to shift the rear wheel over about 2mm
something to think about when you looking where to put your clamps just about anywere except were i put the top one on mine
the other chain idler i made from an old rear deraileur and i made the mount
using the hand press at work (i work in a press shop)
i like it becuase i don't have to worry about chain tension all the time but i don't think the spring will last too long its done about 400kms and the arms not as tight as it was but no problems with bending the deraileur is made of stainless steel
i used the round nut off a bike tube on the bolt holding the cog
it fitted onto the original cog bolt on the deraileur (i love it when a plan comes together)
Attachments


Last edited by a moderator: