Jackshaft DIY Jackshaft / Freewheel / Shift Kit

: grin5:
Attached Files GEAR-TRAIN-1W.pdf (1.26 MB, 18 views)

The drawing we are currently working with is attached.

Drawn by me.
Authored by all contributors to this post.

THERE IS NO ASSOSIATION TO SBP HERE.
THIS WILL BE A DIFFERANT DESIGN THAN SBP.
IT WILL BE AN ALTERNATIVE DIY JACKSHAFT / FREEWHEEL.:unsure:

I am curious to see what you are going to do that is different from the SBP design. If the jackshaft is mounted to the engine with plates and the freewheel is on the pedal crank you will just be copying their design. All the math in the world won't change that so you will have to come up with something fairly innovative to differentiate yourself.
 
Diy Jackshaft Design Differencec

To some degree i agree with you.
However just because 2 things look alike dosen't mean they are even close.
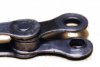
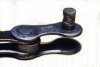
Like the 2 chains. Diff. materials diff properties.

The components that make up the drive trains are standard.
In that it takes the combination of components the make the drive train.

That is like saying all bikes are the same.
There all bikes
They all have the same kind of parts.

But we know there not the same.

:geek:SO WHAT IS SO DIFF HERE????

#1 Sprag Clutch + adapter + any crank = Freewheel
(not the white industries freewheel)
SPRAG CLUTCH.

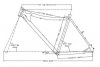
#2 JACKSHAFT / Bearing type / Shaft Type / Location / Gear Ratios
Haven't made it there yet but we are gonna do something about that high torque load on the freewheel. Which will reduce the torque throughout the whole system. BTW we won't affect the final output speed either.
Only tune it to where we want it to be.

#3 Plates
We will use high strength plate with Block type Bearing Mounts.
They will be similarly attached to the motor.
However the mounting to the seatpost will be changed.
We will aslo use stiffeners in between the plates.

#4 Fully published
PARTS LIST, CALCULATIONS, WORKING DRAWINGS, 3D MODELS INSTRUCTIONS, ECT.ECT.ECT
(with all that anyone including my grandma could get all the parts needed and also will be encouraged to make there own changes, after we complete this project anyone will be able to view this thread, and create there own bolt on kit.)

#4 looks
We will make it all look very pleasing. To our own taste.

#5 END Result
Anyone who makes an effort here can learn a **** of alot.
Anyone not interested in learning can use our work to get what they need.
The actual data can be used to compare shift system quality based on real info. Apples to apples. That is if you know what the other kit is made of.:whistle:

AND OF COURSE ONE WONDERFUL SHIFT KIT BUILT TO LAST.:D:D
 
Surly Instigator Jackshaft Setup

Ok here is some action to get things rollin again.

THE FRAME:
Surly Instigator
Check this baby out.
I plan to use it for my winter build.
Not cheap $400.00 but tough as ****.

THE DRAWING:
Now we have some actual dimensions to work to.
This is a preliminary sketch.
I will complete it later.

THE FUN:
Now we can go figure those chain tensile stresses.

I will post the data soon.
Sometime TODAY / TONIGHT

:D:D:D:D:D
 

Attachments

  • SURLY-INSTIGATOR-DRIVE.pdf
    135.4 KB · Views: 430
  • INSTIGATOR MAIN PAGE.pdf
    141.5 KB · Views: 378
  • instigator_geo.jpg
    instigator_geo.jpg
    14.9 KB · Views: 486
  • INSTIGATOR FRAME.pdf
    137.7 KB · Views: 395
Chain Stress Motor to Jackshaft

Ok here is the first one.

Very interesting:whistle::whistle::whistle:

It seems the 10T sprocket is not reccomended for our system.

1/2 pitch chain.

The permitted pressure in the chain joint is over the reccomended PSI.

and the level of safty in the chain joint is 1.00

should be greater than 1,00

See attached File.

This is the leading cause of chain stretch.

Chain "Stretch"
Cyclists often speak of chain "stretch", as if the side plates of an old chain were pulled out of shape by the repeated stresses of pedaling. This is not actually how chains elongate. The major cause of chain "stretch" is wearing away of the metal where the rivet rotates inside of the bushing (or the "bushing" part of the inside plate) as the chain links flex and straighten as the chain goes onto and off of the sprockets. If you take apart an old, worn out chain, you can easily see the little notches worn into the sides of the rivets by the inside edges of the bushings. With bushingless chains, the inside edge of the side plate hole that rubs against the rivet has a smooth radius instead of a sharp corner. This probably contributes to the greater durability of bushingless chains.
 

Attachments

  • 40-10T-18T.pdf
    68.1 KB · Views: 342
  • chain_wornbush.jpg
    chain_wornbush.jpg
    13.4 KB · Views: 438
  • chain_wornpin.jpg
    chain_wornpin.jpg
    16.6 KB · Views: 468
Chain Stress Analysis

Ok for all thoose paitently waiting......
Here is my opinion of an optimized drive train for this system.

See the 3 attached files.

Very efficcent.
Notice we loose very little HP from begining to end.

However at the gear reduction in the motor we go from 2.2 down to 1.52 HP.
thats about 1/3 of the power.

I wonder if we could modify this and gain some HP back?
I guess i'll be analysing those too.

Have a good night.

Lots more to come.
 

Attachments

  • 40-11T-24T-MTR-JCK.pdf
    62.6 KB · Views: 468
  • 40-14T-40-jck-frw.pdf
    62.6 KB · Views: 384
  • 40-38T-32t-jck-rear.pdf
    62.7 KB · Views: 369
Horsepower Statement

I TAKE BACK THE HORSEPOWER STATEMENT.

Seems to me things don't add up here.

Horsepower is constant throughout the system.
They say the HT 48 cc motor rates 2.4 nm torque @4500 rpm 2.2 HP.

2.4 Nm @ 4500 rpm = 1.52 HP

The tag on my motor says 1.95 HP.

Shoulda looked there first.
 
horsepower chain stress

PLEASE NOTE THE HP USED IN THE CALCULATIONS.

Going up to 1.95 HP makes that combination of sprockets not so good for the chain.

Thoose pins will wear.
 
I would be worried with an 8T, but in practical use a 10T or even a 9T has not shown excessive wear in 2 years of fairly rugged use. I think your calculation is very conservative (nothing wrong with that) and for sure chains are maintenance items to be checked frequently.
 
Yes you are correct. they should be a little conseravative.
Iv'e only had my bike a couple of months and i broke a chain once.
The pin pulled through the side plate of the chain.
I'm sure it was a result of the chain trying to come off the sprocket due to loosening up.

Bad things happen when the chain jams everything up after it lets loose.
Imagine locking up the rear wheel at 30 or 40 mph.

Not a pretty thought.

So under normal operating conditions things are ok.
But like i said before.....
The unexpected will bite you.

Better to shear the key than break the chain.

The actual 10t sprocket itself isn't the problem.
The sprocket combinations and distance from one to the next causes excess pressure on the chain joints.
IE pins.

Now we can't do much about the 10T because of size and space restrictions.

Lets see what we can find for a higher strength chain of the same size.:geek:
 
Effects Of Chain-joint-pressure

Durable roller chain construction. When conveyor belts
must be replaced, it is usually because of chain wear, not
from heavy loads or high impacts. Chain wear is caused
by the relative motion (rubbing) of the parts within the joint.
Mayfran has greatly reduced chain wear by proper design
and construction of the chain and belt sections.
This design causes relative motion to
occur evenly along a larger section of the pin, distributing
pressure and reducing wear.
Some other manufacturers' conveyor chains concenrate f
orce on a small area of the pin. This increases joint
pressure which leads to chain wear and reduced chain life.
Because joint pressures are inversely proportional to chain
life, Mayfran developed a design to distribute pressure more
evenly.
 
Last edited by a moderator:
Back
Top