OCC Stingray Build...migrane inducing already!

Status
Not open for further replies.

Sandman

New Member
Local time
5:19 PM
Joined
Sep 30, 2010
Messages
12
Ok, first off I have to post pics later, as I don't have a converter for my memory card at this time.

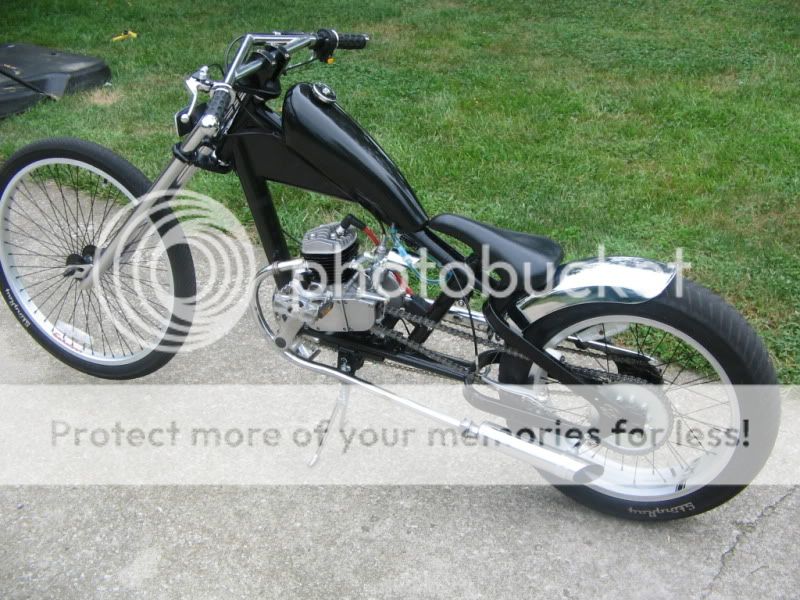
Well, I have 2 OCC Stingray frames I got for about $80 and I thought I was getting a deal. I have 1 set of wheels for them, and they are from an old moped which had drum brakes. Those are working just fine and I have tested the bike without the kit on it. Once I attempt to put the kit on is when I run into problems moving it over.

Engine:Baseline 66cc kit, not sure of exact manufacturer.

The engine, when centered, does not have enough clearance on the left side. It is about 1/4-1/3 in off. The pedal hits it. I purchased the engine mount from LiveFastMotors and only the lower left hand side is out of line. I tried calling them but they said to bend my pedal crank out, which on one this beefy I don't see how that is really possible. I have seen there are other OCC builds out there and was wondering if anyone else has run into this problem, and if so how exactly do I remedy it?

This kit has been giving me nothing but problems, and I have sunk a bit of money into it, this is the second frame it has been on and this time it doesn't even fit! The other issues I have with it can be solved easily enough, the chain is too short and the exhaust doesn't have enough clearance from the pedals, but with the engine like this I can't even pedal. I would love to get some help before I just scrap this whole MB concept for now, which is a shame as it was a blast when it ran on the old frame. (Note it is the frames that keep giving me problems, not the engine, it is fine :) )
 
hmmm, if i was at work with the 120 ton press, bending a crank slightly would be, um...... how do you say easy?

well, im not! and neither are you!

angle grinder? even though.... 1/4 inch is a lot to remove...

um...look around on other bikes for a wider crankshaft or cranks with more offset etc etc etc...

my mates crank hit his engine, slightly.

mine had over half an inch clearance either side...

his is more a racer with mtb wheels and brake mounts. narrow. flimsy.... meh.
 
I have read mixed things about the livefastmotors occ engine mount...these very reasons that you list.
I used barry's mount (off e-bay) and even tho you have to drill holes in the frame to put the mount on, it works EXCELLENT.his mount off sets the engine to the left so the chain clears the 4" wide rear tire. but it doesn't offset it so far that the crank hits the engine.
my left crank is close to the engine side cover, but it doesn't hit, and it never has. i did have to remove the left pedal and put a washer behind it. the pedal stud was just touching the side cover because the pedal screws into the crank too far. a washer spaced it out so that the stud comes out flush on the back side of the crank.

as for your exhaust, you will have to either spend some coin and buy barry's custom made pipe($75.00) that is specifically made to fit this frame, or...build your own pipe. (which is what i did). I bought a chrome long pipe with muffler off e-bay from boygofast for like $33.00. then i cut the flange off (where the pipe mounts to the engine). then i took the stock kit pipe, and cut the pipe off of the muffler. this will give you a longer length of pipe with the flange welded on. you will need to cut and shape the 2 ends of the pipes so they meet together at a slight angle away from the engine, and then weld the 2 peices of pipe together. you need to check, double check, and triple check the crank clearance at the pipe BEFORE you weld it fully. trial and error, and a lot of mocking up and measuring. it takes time but it's a lot cheaper than $75.00 for a pipe that is painted flat black with no muffler on the end. welding chrome is a bad idea, but you can come up with something to go over the welded area to hide it....which is what i did. the long pipe in unmodified condition will not fit...it will hit the cranks because of where the curve is in the pipe. by welding on the enxtension for the stock pipe, ot pushs the bend further towards the front of the bike, so the bend in the pipe will go around the cranks and under the frame.
bbbbbbb.jpg

bbbbb.jpg

cc.jpg

even tho it looks like there is no baffle in my muffler, I put the stock baffle up inside the muffler housing to hide it.
ccc.jpg


as for bending your crank arm...good luck with that, they are VERY beefy. you can get away with griding the back side of the crank to clear the engine, there is plenty of meat on these cranks, so 1/4 inch won't make a difference.
as for your chain being too short...yes, it will be too short. I found a guy on e-bay that sells lengths of chain (like an 8 link peice) for around $5.00. much better than having to buy another complete chain in my opinion.

you will run into several things when trying to put one of these engines on an occ frame. there is not one part that will bolt right on, with the exception of the throttle handle...every part will have to be modified in some way to make it right, and to make it all fit together.
but, for me, barry's mount was the easiest part of my occ build. it was the only part that i could literally just bolt on, but i did have to modify the engine mount tubes on it. my engine has the big front mount that is made for a bike with bigger diameter front downtube. so i had to weld a bigger diameter pipe on the front of barry's mount (over the smaller diameter pipe that it comes with) to make my engine actually fit the mount.

have you mounted your rear sprocket yet? you didn't mention that part, but it sounds like you are going to use front and rear moped rims?
won't that look funny considering that the frame in the back is really wide to accept the 4" wide occ rim?
if you are using the stock 4" wide occ rim, be prepared to modify the bolt holes in the engine kit sprocket so it will actually bolt to the rim.

chop5.jpg
 
Last edited:
Actually, both front and rear tires are 20 in moped tires, both have drum breaks and the rear has a 36t sproket as part of the hub, I don't really need the offset at all lol, but I do not know anyone who can weld (or drill into the frame if I could avoid it) so I have to buy a mount, and they are all offset.

To make this bike servicable it seems I need the following.
1. Mount from Barry
2. Exhaust from barry (they look better and are cheaper to boot!)
3. #41 drive chain
4. Chain Tensioner (I was thinking the spring return that livefastmotors has)
5. Spray paint and Varnish to go over the front fork (taken from **** if I know what, it was custom fitted on as it has some very beefy shocks on it) and maybe the body itself, I havn't decided.
6. Some good epoxy (if I am painting the whole thing I am going to fill in a serious ding in the frame by sanding it down and use some epoxy to get the shape of the frame back.)

Edit: This bike is going to run come **** or high water, I love riding these mopeds. With how much trouble I have gone through to get 1 to even work properly this will run if it is the last thing I do!
Edit 2: Added pictures, excuse the quality they are from my cell phone
Photo 1: A general pic of the whole bike
Photo 2: Where the pedal crank hits the engine
Photo 3: The dent I am trying to fill in
Photo 4: Rear tire hub
Photo 5: Front Forks
 

Attachments

  • bike1.jpg
    bike1.jpg
    47.8 KB · Views: 452
  • bike2.jpg
    bike2.jpg
    42.5 KB · Views: 463
  • bike3.jpg
    bike3.jpg
    34.2 KB · Views: 430
  • Bike4.jpg
    Bike4.jpg
    17.8 KB · Views: 441
  • bike5.jpg
    bike5.jpg
    57.5 KB · Views: 730
Last edited:
well, if you buy barry's mount you will either have to drill the frame, or have someone weld it to the frame because there is no other way to mount it.
if you don't need the offset, then any mount you find for this frame will not work, because they are all offset for tire/chain clearance. they are designed for the bike with the 4" rear tire and that's why they are offset like that. the only thing i can think f is to get 2 peices of pipe(like on the mount) and have them welded to the frame so the engine is centered how you want it, or buy some steel plate and tubing and have someone copy the mount you have without the offset. but again, this would require buying the steel, and paying someone to weld it together...hoping that it comes out right.

i was under the impression that you were putting this engine on an occ bike with all of the original occ equipment.
you paid $80.00 for this frame and another frame?
wow...i got my occ bike as pictured (minus the engine. seat and gas tank) for $25.00.
another $130.00 for the engine kit,$30.00 for the mount, another $7.00 for the west coast chopper gas tank, about $4.00 worth of bondo to fill the tank welds, $6.00 worth of silver solder and flux to seal up the holes and seams in the tank, $4.00 for the gas cap, $20.00 for paint and clear coat on the tank, $5.00 for extra chain links, and $33.00 for the long pipe.
so i have roughly $260.00 in my bike, not counting my labor and all the hand built parts that i made.
i got an offer of $1,000.00 for it, but that was just an offer...not cash in hand.

if you think barrys pipe looks better than mine (not sure if that's what you meant) then go for it. it is a straightpipe with no muffler made out of steel tubing that is spray painted flat black...and it costs $75.00 to boot. maybe you meant that his pipe looks better than the stock kit supplied pipe...i'm not sure.
but since i have access to a welder and i love to make parts & peices, i can not justify paying that kind of money for a pipe, especially when i am able to make a nice looking, chrome pipe for a lot less.

chain tensioner: i made my own and it's hidden out of sight. it literally didn't cost me a dime because i had the parts laying around from another project. it works better than the the stock tensioner (which is a peice of **** and is ugly as ****).

if you are going to try and use epoxy to fix that big dent in the frame i woulod consider doing the final layer with bondo. maybe fill the majority of the dent with the epoxy (not sure how well that will work) but if you put bondo on as a top coat, it will be much easier to sand smooth and it will hold paint better than the epoxy will.

spray paint and varnish for the forks? varnish???? why would you use varnish over paint?

if you are going to try and build an occ m.b., you need to take your time, look at EVERY part and try to figure out how to make it all work. mock everything up to twek/ modify parts to make sure it all fits and works, then dissassemble it and put it allback together tight. working with these frames and h.t. engines, NOTHING is "plug & play". you will need to modify / make parts no matter what.
 
Last edited:
Sorry, was a bit off when I wrote that. I was meaning clear coat and not regular varnish, as I do like having a nice finish and not just having it be a flat color. From what I can see of barry's mount it isn't as offset as the mount I got from livefast and that should work. My livefast mount is about 1/2 in off, of being center with the rear wheel, so if it clears the pedals on both sides a 1/8-3/16 in offset from clutch to rear tire shouldn't put too much added wear and tear. I can drill 2 holes for the mount without too much worry, I just don't want to compromise the strength of the frame more than I have to. And I have never worked with bondo, what is it like?
 
Bondo aka body filler which is a polyester material. You mix the bondo, which the about the same consistancy as thick pancake batter, with a cream hardner. Once you add the hardner you have about 5 minutes to apply the bondo to the area and smooth it out. You must follow the directions and get the right measurement of hardener for the amount of bondo that you want to use. You have to use a squeegee type of spreader that is specifically made for spreading bondo. try to cover as much of the area as you can, but do not put it on too thick. Putting the bondo on in nice thin layers is the best way to do it. If you try to fill a huge deep area all at once, the bondo will not fully cure, which will make it crack and fall off later on down the road.
Let it dry for about an hour or so, and then start sanding. it's easy to sand it and shape it. start with 100 grit paper to knock down the high spots and get rid of the roughest areas. Add more thin layers as needed sanding between each layer, and remember to always add more layers that you actually need because you will be sanding most of it off to make it blend back into the surrounding area. Work your way down to about 600 grit sandpaper paper to get it all sanded smooth.

One of the keys to making bondo dissapear under the paint is to feather the edges of it out. apply more bondo that what you need (apply it a few inches beyond the repaired area) and sand the outermost edges of it to be paper thin so it blends in with the surrounding area. you should be able to run your hand over the area and not feel any transition from the metal to the bondo. Your hands can "see" more than your eyes can. sometimes if it looks good enough, it may not be. let your hands be your eyes. it is very much like doing spackle or plaster on a wall to repair a damaged area....same concept, but a much tougher material.

if you have never messed with bondo, it takes a lot of practice and experience to get the hang of it.
if you want it to look perfect, you should probably practice on some scrap peices before you try to put it on the frame. Once it's on, the only way to get it off is to grind it off. (which makes a HUGE mess because the dust can get as fine as baby powder, and it will get EVERYWHERE.)

Here's a pic. of one of my gas tanks with bondo applied over a weld that I ground down.
This the gas tank before I did any work to it. Notice the big weld that runs all the way around the front of the gas tank. the weld is approx 1/4 inch wide, and it protrudes about 1/8 inch.
tank7.jpg


Here's the same gas tank. I used a grinder to grind down the weld into a "V" shape (I escentially ground the weld into a valley with the grinder) and then I filled the valley with thin layers of bondo to build it back up. See how wide the bondo is? the width varies from about 1 to 2 inches to cover the 1/4 inch weld and a couple of low areas in the metal. There was also a small dent in the top that I filled in. At this point I have not yet sanded the bondo smooth, i have only sanded the roughest, highest spots down. I cut the hole for the gas cap with a dremel and a cut off disk.
054.jpg

055.jpg


Here's the same tank with some primer sprayed over it. See how the bondo dissapears, and you can not see the edges of it? It all blends in with the surrounding metal and it becomes invisible under the primer. (the tank in the background is a motorcycle tank for size comparison)
2tanks.jpg


Here's the same tank, painted, clear coated and buffed out. The weld that was there is no longer visible, and the bondo allowed me to re-shape / smooth out the front edge of the tank simply by sanding the bondo. Black paint is the hardest to hide bondo under. Normally, if you have a bad bondo job, black paint will make bondo really stand out. Black paint will emphasize the bondo, so if it isn't 100% smooth and if the edges are not feathered out good enough, black paint will make the bondo stand out like a sore thumb. If you have a bad bondo job, you can try to hide it by painting the part with a lighter color, like white.
tank6.jpg


here's another tank that i did that is the same type of tank. I did the exact same thing to this tank as i did to the black one, I just used a different color paint on it.
newtank3.jpg

newtank2.jpg

newtank9.jpg
 
Last edited:
I also noticed my rear brake cable is about 6 in too long, how would I go about shortening it and not ruining the cable?
 
measure the cable and go to a bike shop to buy one that is shorter ?
you can try to shorten the cable by cutting it, but the outer cover will not be any good if you cut the crimped on end off.
 
Status
Not open for further replies.
Back
Top