I thought this thread might make a good " sticky thread" to be permanently posted at the top of this specific forum if the moderators agreed. It would be a thread totally devoted to things that need to be done/ checked before running a new engine :
1. Clean out gas tank because it may have metal filings in it and install a inline fuel filter.
2. Dont use the stock method for shutting engine off. Purchase a switch and hook it inline on the blue wire/ hot wire from cdi to engine and use that to turn engine off/on
3. get a torque wrench and double check the head bolts. Mine shoulda been at 17 lbs and they werre only at 12 lbs torque
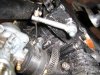
4. make sure all bolts on carbereutor are tight. One of my bolts that holds the bottom bowl on was very loose
5. make sure intake gasket properly fits carb exhaust port and engine intake...if not, cut it for a better fit.
6. ditch the chinese spark plug and get a ngk-B6HS
7. gap it at .020 so theres a bit stronger spark
8. put small lockwashers on the 2 bolts that hold the carbereutor intake flange to the engine intake
9. recheck all nuts/ bolts after 1st tank of gas.
10. make sure to provide a support/fastener to the muffler to the frame instead of relying on the 2 small exhaust bolts to hold the muffler suspended in the air.
Does this sound cool ...or does anyopne else have things to add ? I figured it would be very convenient to have these important procedures listed all in one thread so all newbies could easily find it/ read it.
1. Clean out gas tank because it may have metal filings in it and install a inline fuel filter.
2. Dont use the stock method for shutting engine off. Purchase a switch and hook it inline on the blue wire/ hot wire from cdi to engine and use that to turn engine off/on
3. get a torque wrench and double check the head bolts. Mine shoulda been at 17 lbs and they werre only at 12 lbs torque
4. make sure all bolts on carbereutor are tight. One of my bolts that holds the bottom bowl on was very loose
5. make sure intake gasket properly fits carb exhaust port and engine intake...if not, cut it for a better fit.
6. ditch the chinese spark plug and get a ngk-B6HS
7. gap it at .020 so theres a bit stronger spark
8. put small lockwashers on the 2 bolts that hold the carbereutor intake flange to the engine intake
9. recheck all nuts/ bolts after 1st tank of gas.
10. make sure to provide a support/fastener to the muffler to the frame instead of relying on the 2 small exhaust bolts to hold the muffler suspended in the air.
Does this sound cool ...or does anyopne else have things to add ? I figured it would be very convenient to have these important procedures listed all in one thread so all newbies could easily find it/ read it.
Last edited: