Ryobi 31cc clutch removal

Status
Not open for further replies.
I guess you are right I got my engine for $5 so what am I worried about? 150 miles is a lot and it is still kicking. I think I will following your design and get rolling while I work on the other method. Thanks again.
 
Hey i took my muffler off to clean it but now exhaust fumes come out the outlet, a lot actually comes out the end of the muffler as well but also out of where the two meet. Ive got it as tight as i can, could i cut up a piece of thin rubber the same as what the gasket is and put that on there as well so it properly seals it? Im thinking of using cut up heat shrink.
 
7-17-08
Hi, BrendonV
On my Ryobi 31cc engines, there's a muffler gasket that is a large, "L" shape and it appears at first glance as if it is made of metal. But, on closer inspection, it is a muffler gasket material.
If your engine was not leaking at the exhaust port before you took it apart, and now it is leaking there, it seems possible you forgot to replace the gasket or have it in wrong or something like that.
The gasket material is pretty thick and that might explain why you can't tighten it up enough to get a good seal since the bolts are too long without the gasket in there to take up space.
If you can't find the gasket, whatever you use to replace it will have to withstand high temperatures.
If all else fails, you could just get shorter bolts, too.
I hope this helps.

Steve G.
Grants Pass, Oregon
 
yeh i got the gasket in but maybe not in right, ill check it later. I got my two new 10T sprockets, now i gtg to the tip and try find two 50T bmx sprockets. The two 10T if your wondering i got em from the back gear changer on my old mountain bike, cleaned em up and they look brand new.
 
Whenever I have to remove anything that involves keeping the motor from spinning I just use a pair/set of "Vise Grip Chain grip pliers". They are commonly used for pipe fitting and such and work great for stabilizing the flywheel. All you have to do is remove the magneto assy (2 screws), and then wrap the chain around the outside of the flywheel, adjust the tension and lock em down. be sure to check the gap between the flywheel magnets and the pickup on the magneto so you can reset it properly afterwards.

Squid
 
great idea!

7-22-08
Hi, Squidman,
Thanks for the great idea. I'll keep it in mind.
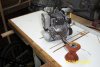
On the Ryobi engines I've been working on (4 of them so far), the flywheel is hidden under a plastic housing and there's no way I can think of to wrap something around the flywheel. You can't get the housing off because the clutch is stopping it from coming off and you can't get the clutch off because you can't stop the crank from spinning.
You either have to slip a flat screw driver in between plastic vent holes and in between flywheel vanes or, somehow, stop the piston/crank from moving. If you grab the crank with vice grips or something, you'll score the shaft and that's not a good idea. You can wedge a screwdriver in the spark plug hole and onto the top of the piston but that puts a piece of metal in the cylinder and I'd prefer NOT to do that, if possible.
By far, the best way I've found is to put some penetrating oil on the shaft at the threads on the clutch and let it sit a while. Then, move the piston to BDC and cram some soft, cotton rope into the cylinder until you can't cram any more in. I use a small, phillips head screwdriver or a pencil if one if handy to cram the rope in.
Then, grab the clutch with a pipe wrench and slowly spin it off (CCW on all my Ryobi engines). If you are patient enough to let the oil work long enough(that's a problem for me!), it just spins right off as soon as the piston runs into the rope.
Then, you pull the rope out. Don't use nylon rope since it would melt and make a mess! Any little pieces of cotton fiber will just burn up.
I've done it this way many times and it's worked perfectly every time.
On lawnmowers, there's a flywheel wrench for this that is perfect. But, again, you can't get to the flywheel on these Ryobi engines. That's why I posted the tip.

Steve G.
Grants Pass, Oregon
 
Seabillco,
The engine I have used the chain vise grip technique on was a 30 cc Ryobi cs30 weed whacker and I had no problems with getting to the flywheel. perhaps there is a difference in the two motors? I too have set my MB up on a "pivot system" thereby eliminaying the need for the clutch. With mine I used a Urethane "bow stop" from the front of a boat trailer for my "drive wheel" and have found that it is alot easier on the tire treads than the steel one i used on my first motor. ( I am on motor #4 now due to shearing the keyway off two and over heating the flywheel magnets on the other) The urethane shows very little wear after about 200 miles and counting. Sorry for the confusion.

Squid
 
clutch / drive spindle

Hi, Squidman37 (great name!)
I'll take a picture of one of the Ryobi engines and get it up here tomorrow and maybe you can help me see how to get a grip on the flywheel on these little engines to get the clutch off more easily. I sure like the engines so far. I've got about 300 miles on 2 of the engines with no problems yet.

On the urethane boat wheel as a drive spindle...
How do you attach the wheel to the engine's crank?
I've been using a BMX peg that happens to have the 3/8" with 24TPI threads that is also on all 4 of my Ryobi engines. I've only got 2 of them, though, and I am having trouble finding a 3rd for my current project (a 4 stroke 26.2 Ryobi).
I'd sure like to find a supply of drive spindles and, if they were easier on the tires, that would be a major bonus!
Again, thanks for the great feedback. It sure helps to get more ideas!

Steve G
Grants Pass, Oregon
 
Seabillco,
As for attatching the urethane bowstop to the crankshaft. What I did was grind the existing crankshft end to a point and then used a 3/8 16 x 1 1/2" bolt that I cut off and ground to a point also and then welded the two pieces back together, with 100% penetration, (yes I do have 20 yrs welding experience) which made the crankshaft long enough to protude through the end of the bowstop. next I took two 3/8" fender washers and drilled 4 holes 90* apart on a 1 1/8" bolt center, next I transfered these holes to the bowstop and drilled them all the way thru. Next I welded 8/32 nuts on the washer closest to the motor and also welded 8/32 nuts on one end of the all thread (so i could tighten them) then I welded a 3/8 16 nut on the washer that was going on the outboard end of the bowstop. I had to add some bronze bushings to the existing hole in the bowstop to bush it down from 1/2" to 3/8". after running the all thread thru the bowstop and tightening them, all I had to do was screw the bowstop onto the lengthened crankshaft and fit it into my motor mount ( note the bearing on the outboard side of the mount) and then put a nylock nut on the end to hold it all together. See my pics and if you need more info I will be happy to share it.

Squid
 

Attachments

  • DCP_0431.jpg
    DCP_0431.jpg
    86.1 KB · Views: 611
  • DCP_0432.jpg
    DCP_0432.jpg
    74.3 KB · Views: 574
  • DCP_0429.jpg
    DCP_0429.jpg
    65.1 KB · Views: 563
Status
Not open for further replies.
Back
Top