Sun EZ Sport CX (24 speed) w/RS 35cc

A few notes about the front strap.....

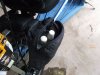
I knew ahead of time I was going to look for a saddlebag setup, so instead of using the strap from GEBE, I cut a 2" wide strap out of aluminum, drilled 5/16" holes, including an extra hole to zip tie my INSURANCE policy shock absorber. (pic 1)

Take my word for it, that little tip works if you hit a pothole and the front strap comes loose. I've driven troublefree for days not even knowing it was loose, just because of those zip ties....


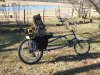
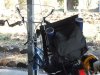
The 35cc Robin Subaru, because of the oil pan, has to sit vertical, pretty much straight up, from the axle.

The 33cc Tanaka's can be leaned back farther from the seat, like it does on Rocinante.

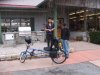
Pic 3 is a pair of his and hers Schwinns I built in November, note the Tanaka is tilted back.

If you are going to do that, the easiest thing is order 2 straps from GEBE, because they are so beefed up nowadays, bolt them together and whoola, there's your extra few inches of clearance.


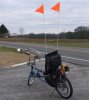
Back to the Rucio build, (pic 4)....

As I noted, I'm using an old wheel (btw, the tube that went flat was NOT a punctureproof, it was a $6 slimer, that has been remedied)....so I skipped all those spoke ring/rear wheel steps.

Even so, I knew I was going to use 4 axle washers, 2 on each side, and when I put the engine on, then looped the belt on the wheel and got that all lined up, adjusted my brake shoes.....it ran flawless from the get go.
 

Attachments

  • recumbent 026.jpg
    recumbent 026.jpg
    58.7 KB · Views: 691
  • 2008_1012mostlybikes0009.JPG
    2008_1012mostlybikes0009.JPG
    110.6 KB · Views: 640
  • 2008_1129hisherschwinn0001.JPG
    2008_1129hisherschwinn0001.JPG
    107.2 KB · Views: 608
  • recumbent 028.jpg
    recumbent 028.jpg
    102.9 KB · Views: 717
Simplified, step by step nowadays, here is the order in which I do my installs:

Throw away the $1 inner tubes, hang the 16 gauge rear wheel for my fence art (it's now nearly a quarter mile of rear wheels).

1. Snap on the spokering, THEN ziptie the spokes, put on the sprocket. STOP work on the wheel*.

2. *I have a dummy wheel/spokering that I slip in the slots, to see if any frame crimping is necessary. IF you wait on putting on the tire/tube, you can use your wheel, (step 1).

3. Fit on the steel blanks, paint them, do the 357mm mounting, dry fit the engine with belt on and front strap attached.

4. Put your wheel back in the slots, I always start with 2 washers on each side. Loop the belt around it, checking where it sits in the small drive gear.

You are looking for two more things, besides the drive gear- that the spoke ring definitely clears the frame, AND that the chain does NOT touch one of the 5mm bolt heads on the blank.

You can also spin that rear wheel, check belt tension, make sure you have it centered within margin of error (not too much bounce on the tension lever).

By waiting to put on the tire/tube, you figure out washer spacing on the axle, you can also make preliminary brake shoe adjustments.

5. Once you are satisfied, wheel/belt tension/spacing......you can even crank the engine if you like. IF the bike is suspended in the air, its so easy to look at the brakes, see if major washer adjustments on the brakes are necessary.

6. Put the rubber gasket over the spoke ends, either use 4 layers of electrical tape or that special tape they sell at bike shops to cushion those spoke ends. That rubber gasket will pierce and flatten your tire one day, but plan ahead, cushion them, and that won't happen.

7. IF the spoke ring is centered, add a drop of super-glue to each notch.

8. Put in the punctureproof tube and tire liner.

9. I never attach the kill switch for the first few days, just zip tie it to the front strap, out of the way, use the choke to kill the engine. The kill switch needs a little beefing up too, and Rucio still isn't connected up, I'll take pix of those modifications later this week. (Basically it is a bit of electrical tape and a drop of hot wax.)

Often I break-in the 2 cycles on one of my bikes, doing those miles of throttle variations, then move them to the customers bike, already having a few tankfuls of fuel run through them. It makes no sense for me to mess with the kill switch until the customers bike is ready to roll. By breaking in the 2 cycles myself, I pretty well know the customer will gain increased speed and mileage performances.
 

Attachments

  • 2008_1129hisherschwinn0004.JPG
    2008_1129hisherschwinn0004.JPG
    50.7 KB · Views: 610
Last edited:
Yesterday the weather finally cooperated, afternoon in the mid 60's, winds 10-20 mph, so I got about a 7 hour chance to show it to friends, maybe an 80 mile run out of Rucio. (I've been limited to 15 mile loops around the house, enough to change the oil twice during the break-in.)

Hey recumbent riders
, if any of you have done long rides on a bent, please let me know HOW, because after 75 miles, I got that dreaded tingly right elbow.

It's a fun ride, I'm sure I'll get better adjusted when Spring arrives, but having the arms extended all day yesterday makes me wonder if I'll have to limit Rucio to local round trips, and continue to use Rocinante on the overnighters.

For sure, Rocinante's wide handlebars, even when the basket is loaded, seems to have more stable steering, like when trucks whizz by, as opposed to the recumbents "closer together" grip.

Pic 1 is where we left off, Pic 2 is adding the wings for the saddlebags, Pic 3 is adding the bags and a front fender.

I found the saddlebags at a horse saddlery $25, nylon with plastic lining inside. I sprayed them heavy with silicone waterproofing, liberally used long zip ties to secure it to the wings and bikeframe.

Then on the back of the seat, I attached a third carrybag I picked up long ago at Goodwill for $1, it has the label "Enfamil", so it must be a black diaper bag. It sure is handy, 5 separate compartments and velco flap.

Part of yesterdays ride was to pick up 3 punctureproofs and pennants for the trike build I'm doing next, Pic 4 is where I let Josh, my bike guy, take Rucio for a spin. HE WANTS ONE, especially likes how quiet the R/S 35 is!! Pic 5 was just a random spot, about 30 miles from the house.

Looking at Pic 5, you can see the long distance limitations.

Without a basket means I need to build a trailer, and Jack & I have a single wheel design in mind. My new pup tent will fit behind the seat, atop the wings, but still I would be minus my backpack. A trailer would answer all my problems, for sure

That "elbow tingle"? I'm going to buy an elbow brace next time in town, see if THAT is the answer.

But the second problem for long distance is the foam seat, which would absorb the occasional wet weather. I have to design some sort of plastic cover for the seat.

I'm going to do another experiment with the faring, there must be a way to get that thing higher.

And I'm going to practice loading up the thing, with tent/tools, see what I can dangle inside the frame, get some sort of system in mind.

There is a 4 day funkified-bluegrass festival that I go to each Memorial Day, and I plan on riding Rucio there, basically because I'm staying in one spot & won't need the trailer.

Don't get me wrong, the ride is FUN, the 4 stroke sips gas, hills are a breeze.....

But I don't think it is the best choice for a newbie, best to experience regular cruiser or mountain bikes, then do a recumbent once you've got some experiences, can do some comparisons.

I might move the Tanaka over to the bent, see how THAT works, being able to slip a wire over the throttle and run wide open.

__________

Side note: I gave Jack my old 2005 J & B catalog, he found something in there that isn't in the new one. It was at the bike shop yesterday, waiting to be picked up.

It's a $45 seat back, fits on the seat post, sits behind the saddle, about 12"-15" tall. WISH I TOOK A PICTURE OF IT, I would have bought it on the spot if it wasn't special ordered.

When Jack tests it out, I'll give a review.
 

Attachments

  • bent 001.jpg
    bent 001.jpg
    116.8 KB · Views: 893
  • janbent 002.jpg
    janbent 002.jpg
    58.2 KB · Views: 662
  • janbent 003.jpg
    janbent 003.jpg
    146.6 KB · Views: 643
  • janbent 006.jpg
    janbent 006.jpg
    90.9 KB · Views: 629
  • janbent 008.jpg
    janbent 008.jpg
    54.2 KB · Views: 587
Last edited:
Paul,
here's a couple cargo ideas for ya. :unsure:

there's a lot of room under the seat, that won't interfere with pedaling or the chain.

bags.jpg b bags.jpg bmo bags.jpg

You definitely need your 'cruise control', so you can alternate which arm you use to steer. That alone, should help your elbow. Try one of those icyHot elbow patches....Shaq likes 'em!!
 
Not all Bents are set up so you have to have your arms straight out like that, particularly those with under seat steering. But I would say those require a bit more "getting used to".
I hope an elbow brace will work for you.
 
Paul,
here's a couple cargo ideas for ya. :unsure:

there's a lot of room under the seat, that won't interfere with pedaling or the chain.

You've given me an idea (I'm as notorious a recycler as you)....I bought one of those 10 X 10 awning/party tents for $99, a storm bent part of the foldup frame, and I stapled the tarp up as a wind break on part of the shop.

Which leaves the most important part, the BLUE (to match the paint) zip up rectangular carrying case, gathering dust on a shelf. I'll bet it will fit perfect, under the seat and tied along the tube.

It's all a matter of getting things stowed away for camping, some items are used daily, some are just emergency items, never used.

I've been keeping Pringles cans, thinking I could weatherproof them, paint them blue, to keep up with those rarely used emergency things, like spare tubes, canned air and extra flashlight/camera batteries.

Alaskavan: Not all Bents are set up so you have to have your arms straight out like that, particularly those with under seat steering. But I would say those require a bit more "getting used to".

You guys get a hat tip for that fancy steering...I think there may be a way to toggle bolt some handlebar extensions on the ends, gain maybe a foot more space between my hands, which would add to the sense of front wheel stability.

The wider the handlebars, the better the feel out in the wide open, for me anyway. In town, doing slower speeds and more stop signs, it doesn't seem to be a big deal.
 
The wider the handlebars, the better the feel out in the wide open, for me anyway. In town, doing slower speeds and more stop signs, it doesn't seem to be a big deal.

How about replacing your handlebars with some old-school style apehangers?
the come in a variety of sizes. 35" wide X 18" tall.... you can find them taller, shorter...your local bike shop guy can probably locate some for you.
 
Well, when it got light enough I ran out to see if that zip up carry-bag would work, and of course it was longer than I remembered when I put it on the shelf.

Still, I think some cutting and sewing might make it do-able, at least turn it into some kind of zip up tubular/sausagy dealio that I could tie in that dead space above the pedals.

I mentioned how those saddlebags were plastic lined, what they really are called are "horn" bags that dangle over the saddlehorn/shoulder.

I found that squarish-plastic jar at a store, empty of beef jerky, and I cut off the top. It holds 2 mouthwash bottles full of spare gas, prevents spillage. With those two mouthwash bottles, I should have at least a 150 mile riding radius.

As you can tell in Pic 3, vegetable oil bottles also make for good spare gas containers, but the mouthwash bottles are the easiest to pour out of, a lot better than soda bottles.
 

Attachments

  • gas 001.jpg
    gas 001.jpg
    80.8 KB · Views: 648
  • gas 002.jpg
    gas 002.jpg
    66.6 KB · Views: 623
  • gas 003.jpg
    gas 003.jpg
    53.4 KB · Views: 599
Well, we're getting there....

Pic 1 is "throw away the instructions" on the faring installation.

To raise the top edge a few inches, I was able to move the two brackets up to the top of the handlebars.

Throw away those plastic bolts/wingnuts that come with the kit too. Get metal ones a 1/2" longer, and do a bit of wrestling, whoola.

(Pic 2 is a reminder of the result using the original instructions, about 2-3 inches too low for maximum effectiveness).

I mentioned somewhere how I painted two Pringles cans, in pic 3 I used the two bracket holders on the back of the seat. Coating them in acrylic didn't stop paint chipping, so I wrapped a few layers of heavy clear packing tape around them.

I haven't figured out what I'd carry in them on a long interstate trek, but probably "emergency"/rarely used items in one, tent gear (flashlights/insect repellent etc.) in the other.

When I moved the Pringles cans to the back of the seat, that cleared up the two bottle carriers on the handlebars, 1 is for water, and in the other I took a Parmesan cheese bottle, the one with the flip up lid, to carry some $3 reading glasses, pens, & business cards to hand out to interested folks.

If I ever get into the cell-phone fad, that cheese bottle could hold the unit.
 

Attachments

  • trike 002.jpg
    trike 002.jpg
    119 KB · Views: 605
  • bent 003.jpg
    bent 003.jpg
    117.5 KB · Views: 769
  • trike 009.jpg
    trike 009.jpg
    95 KB · Views: 585
Last edited:
Not all Bents are set up so you have to have your arms straight out like that, particularly those with under seat steering. But I would say those require a bit more "getting used to".
I hope an elbow brace will work for you.

I'm seriously thinking about putting the 4 stroke on a Thousand miler in April, does anybody have a serious road trip thread with this engine??

I'd like to hear how the oil held up, what changing the belt gear would do, what is a reasonable goal per day, mileage wise.

So, I have the 2 blue matched pringle cans, and today I emptied a one pound tin of coffee creamer, with could be ties in frame, up above the front sprocket.

Then, as I was studying below the seat, noted a plastic coffee can, 2 in fact, could be lashed under the seat....hold all the sockx, sandals, and private bitz.

ProbleM ? My can's are red, and I've never bought blue coffee in my life. Plus the red top on the creamer clashes with the paintjob and the parmesan bottle's green top.

I won't need lights, Rucio is a Christmas tree, a rolling crash of the pallette.

I'm was thinking of painting the engine cover blue, but what the he**, mellow yellow is just another bulb.
 
Back
Top