
G
Ghost0
Guest
I just finished my initial test using a tuned pipe from Davesmotors that was designed for a 47cc Pocketbike. Here are the details.
Set up:
26" Mt. Tek Boulder Mountain bike, 17" seat tube
70cc "Happy Time" motor
44t sprocket
Engine is stock except for matching the intake and exhaust manifolds to match the head.
The Pipe:
fd94x Chrome Exhaust Pipe w/Silencer for 47cc Pocketbike.
Installation:
Not being a welder I tried to keep it simple and do things that others could do. My initial plan was to cut the stock "Happy Time" pipe. Turn it over, pointing up, and attach the new pipe with silicone tubing and hose clamps until I got it tuned, eventually welding it. The frame I am using is so small, that was not an option but may be for other frames. My solution was to use 1" copper fittings and pipe.
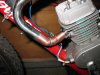
I purchased a 1" female to female 45 degree elbow and a 1" male to female 45 degree elbow. I also purchased 1 ft of 1" tubing. Using the exhaust manifold supplied with the pipe, I had to grind it a little to match the exhaust port on the engine, I stuck the 2 45 degree fittings together and on to the exhaust manifold, see Manifold pic. It is amazing the amount of angles that can be achieved by twisting these three pieces. You should be able to align things up the way you want.
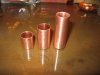
I then cut three different lengths of pipe to be able to adjust the overall length of the expansion chamber to get the desired results. See adjustment tubes pic. Also view the Short Pipe and Longer Pipe pics to get the idea.
I used an old trick I learned from Karting on how to keep the pipe from falling apart without welding. I used a retaining spring, see Spring Mount pic.
Finished Assembly:
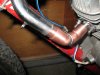
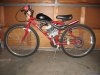
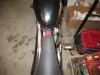
It all went together fairly easily and looks pretty cool on the bike, see Finished Bike pic. Now after looking at that pic I am sure you are wondering how badly my leg is burned. Well actually not at all. The pipe tucks nicely to the frame, see Bike Profile pic. If you had a larger frame, and I am sure all of you do, there would be more mounting options and you would probably gain even more room around your leg area. As it is, I may fab a heat shield using some ducting tin, sheet metal screwed into the pipe with some washers to space it away from the pipe.
Results:
I started my test with the middle sized tube giving me the option of going shorter or longer. When it first fired up I noticed a much different exhaust note, much more of a pop-pop-pop than the sputtering sound of the stock pipe. I thought wow if it is this loud at idle I may have a problem with the neighbors. After letting the bike warm up, I opened her up. Wow what a difference. The popping sound went away and it accelerated hard and overall not much louder than the stock pipe.
The acceleration was much improved but it still wanted to fall on it's face at top end. In that case shorten the pipe. The theory is that the shorter the length of the expansion chamber the faster the pulses move between the engine and pipe which is better suited for higher RPM. The longer the pipe, the better suited it will be for low RPM. So I went to the shortest tube I had. The results were not as expected. Not only did it lose some acceleration but made no improvement in top end. My theory on this is that these "Happy Time" engines, as I have read and now concur with other members, are ported, carbureted and ignition timed to max out at a certain RPM. So unless you are going to change those things I suggest trying to maximize the engines inherent powerband.
Using the 44t sprocket I will suggest an increase of about 4 to 5 inches longer than the pipe comes. This equates to the two 45 degree elbows and a 2 1/2 inch piece of straight pipe. I would use about the same for down to maybe a 38t sprocket.
Overall I think it was well worth the $35 for the pipe and $10 in goodies from the hardware store. A couple of tips and notes. To minimize exhaust leaks when using the spring retention method, I used a tapered end socket to put a slight flange on the male ends of the fittings. The copper fittings have a little play in them to allow for solder flow. This will just tighten them up. As far as how long the copper will last. Only time will tell but it is looking good so far.
Set up:
26" Mt. Tek Boulder Mountain bike, 17" seat tube
70cc "Happy Time" motor
44t sprocket
Engine is stock except for matching the intake and exhaust manifolds to match the head.
The Pipe:
fd94x Chrome Exhaust Pipe w/Silencer for 47cc Pocketbike.
Installation:
Not being a welder I tried to keep it simple and do things that others could do. My initial plan was to cut the stock "Happy Time" pipe. Turn it over, pointing up, and attach the new pipe with silicone tubing and hose clamps until I got it tuned, eventually welding it. The frame I am using is so small, that was not an option but may be for other frames. My solution was to use 1" copper fittings and pipe.
I purchased a 1" female to female 45 degree elbow and a 1" male to female 45 degree elbow. I also purchased 1 ft of 1" tubing. Using the exhaust manifold supplied with the pipe, I had to grind it a little to match the exhaust port on the engine, I stuck the 2 45 degree fittings together and on to the exhaust manifold, see Manifold pic. It is amazing the amount of angles that can be achieved by twisting these three pieces. You should be able to align things up the way you want.
I then cut three different lengths of pipe to be able to adjust the overall length of the expansion chamber to get the desired results. See adjustment tubes pic. Also view the Short Pipe and Longer Pipe pics to get the idea.
I used an old trick I learned from Karting on how to keep the pipe from falling apart without welding. I used a retaining spring, see Spring Mount pic.
Finished Assembly:
It all went together fairly easily and looks pretty cool on the bike, see Finished Bike pic. Now after looking at that pic I am sure you are wondering how badly my leg is burned. Well actually not at all. The pipe tucks nicely to the frame, see Bike Profile pic. If you had a larger frame, and I am sure all of you do, there would be more mounting options and you would probably gain even more room around your leg area. As it is, I may fab a heat shield using some ducting tin, sheet metal screwed into the pipe with some washers to space it away from the pipe.
Results:
I started my test with the middle sized tube giving me the option of going shorter or longer. When it first fired up I noticed a much different exhaust note, much more of a pop-pop-pop than the sputtering sound of the stock pipe. I thought wow if it is this loud at idle I may have a problem with the neighbors. After letting the bike warm up, I opened her up. Wow what a difference. The popping sound went away and it accelerated hard and overall not much louder than the stock pipe.
The acceleration was much improved but it still wanted to fall on it's face at top end. In that case shorten the pipe. The theory is that the shorter the length of the expansion chamber the faster the pulses move between the engine and pipe which is better suited for higher RPM. The longer the pipe, the better suited it will be for low RPM. So I went to the shortest tube I had. The results were not as expected. Not only did it lose some acceleration but made no improvement in top end. My theory on this is that these "Happy Time" engines, as I have read and now concur with other members, are ported, carbureted and ignition timed to max out at a certain RPM. So unless you are going to change those things I suggest trying to maximize the engines inherent powerband.
Using the 44t sprocket I will suggest an increase of about 4 to 5 inches longer than the pipe comes. This equates to the two 45 degree elbows and a 2 1/2 inch piece of straight pipe. I would use about the same for down to maybe a 38t sprocket.
Overall I think it was well worth the $35 for the pipe and $10 in goodies from the hardware store. A couple of tips and notes. To minimize exhaust leaks when using the spring retention method, I used a tapered end socket to put a slight flange on the male ends of the fittings. The copper fittings have a little play in them to allow for solder flow. This will just tighten them up. As far as how long the copper will last. Only time will tell but it is looking good so far.
Attachments


Last edited by a moderator: