New Problem, U guys sick of this amateur yet?

wrightmor

Member
Local time
5:38 PM
Joined
May 29, 2008
Messages
46
Location
NE TN
I finished assembling my bike. That's the good news.
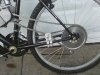
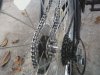
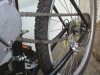
The bad news is the back wheel refuses to turn. I can't even use it as a bicylce, let alone motor. back wheel is locked. (just got return call from seller- he says I need to make clutch tighter. I thot about that already, but he insist the problem is there- I'll have to play with it).

Also I dropped the little pac-man washer out of the carb and didn't see it until I was putting my tools up. Seller said I need to replace that or it won't work.

Maybe when I put to practice what seller told me - he called after I started this post - every thing will be cool. hope so.

Like one of you told me earlier on another post. Think of all the time I am going to save when I go for that second motor!

MBC EDIT: THIS THREAD HAS BEEN MOVED AND RENAMED
 
Last edited by a moderator:
Rock it back and forth, does the top part of the (motor) chain get taut then the bottom? Wheel should roll a couple inches due to chain slack if the motor is locked up.

We have to decide if it's the motor locked up or something in the rear wheel. For example the chain might be sliding off the rear sprocket, that'll lock 'er up real good.

You can take the spark plug out; then the motor will turn over much easier. This will help verify your chain works etc. Also manipulate the clutch lever at the motor to take the cable out of the equation.
 
Last edited:
Rock it back and forth, ... Wheel should roll a couple inches due to chain slack if the motor is locked up.

We have to decide if it's the motor locked up or something in the rear wheel. For example the chain might be sliding off the rear sprocket, that'll lock 'er up real good.

You can take the spark plug out; then the motor will turn over much easier. This will help verify your chain works etc. Also manipulate the clutch lever at the motor to take the cable out of the equation.

Thanks! those are good test.

Rolling back and forth, sure enough I get a couple of inches of rotation. The chain does get taut at top then at bottom as I reverse my attempt to roll the bike.

Taking the clutch cable out of the equation did nothing for me.

Taking the spark plug out allowed me to roll the bike freely. However the chain slipped off the sproket on the wheel as I advanced the bike forward. I reversed and manuevered the chain back on the sproket but it simply repeated the coming off sproket trick when I tried to advance again. Only with the spark plug removed was I able to get any movement at all to speak of. The chain derailing may be a second problem that is waiting to manifest itself when I get motor unlocked.
 
Sounds like 2 issues there.

1/ Your clutch isnt disengauging properly, so that will lock up the engine and wheel with engine compression, hence why it can roll without the plug in (no compression). I found with mine I had to clamp the arm over a little with a G clamp before tightening up the cable ferrule.

2/ If the chain is coming off, then you have an alignment problem between the engine sprocket and the rear sprocket on the back wheel, can you take a picture of the back of the bike showing the chain as fitted? And also one showing the sprocket fitted to the back wheel?
If so attach them to a reply and we might be able to get you rolling :)
 
Good news about the clutch problem. It was a "newbie" problem. My clutch arm had about a 45 degree play. I didn't know I was to force it inward until Simon said something about a g-clamp. I thot if he can do that I should be able to push it without hurting it. That one's solved. bike moves freely except for chain.

attached are 3 shots of how I attached chain to possibly help u help me. Thanks again for your input.

about that "pac-man" washer that fell out of the carb before I put the spring plunger assembly together. Does that little washer go inside the little copper tubing cylinder (meaning disassembly of the spring and plunger assembly - groan!) or does it simply rest on the floor of the carb underneath the little copper tubing. the slot would allow the plunger to fit and there is a little recess in the tubing that lets the washer fit right cozy. I think i know ur answer. It's probably the groan factor. Fact is the little bugger fell out before I could see where it came from. And once again, the instructions assume I know what I'm doing. There is no detail.
 

Attachments

  • Bike chain.jpg
    Bike chain.jpg
    81.6 KB · Views: 406
  • Chain and sprocket.jpg
    Chain and sprocket.jpg
    85.6 KB · Views: 447
  • Chain and sprocket 2.jpg
    Chain and sprocket 2.jpg
    80.1 KB · Views: 373
Last edited:
You may also want to turn your sprocket around. I notice that you have the dished portion of it set to the outboard of the bike. Turn it around so that the dish is toward the center of the bike. That should also improve alignment.
 
You may also want to turn your sprocket around. I notice that you have the dished portion of it set to the outboard of the bike. Turn it around so that the dish is toward the center of the bike. That should also improve alignment.

Hey, if that will get me out of this predicament. But wouldn't that put the teeth and the chain into my spokes? Right now they both are threatening my chassis. paper thin distance between my chain and the bike frame. But I called the seller b4 installation asking about the direction of the sprocket and the installed version is per his instruction. Wonder if I could just tighten the sprocket a little the way it is. I get almost a full revolution before the chain pops off the bottom of the sprocket inward.
 
I suprised you didn't get an instruction booklet with the kit, the sprocket is the wrong way around and the bolts are not tight, check photos of peoples bikes here, shiney side out, dished side in.
Here is a copy of sprocket installation from my booklet.


STEP 4

Thread the nine bolts through the sprocket and use the half moon backing plates on the inside. Tighten all nine bolts moving across in a star fashion and a little at a time to allow for an even pull down. Once the sprocket is tight spin the wheel and check that the sprocket runs true. Deviation can be no more than 1.5mm both ways. Any side-to-side excess deviation can be corrected by spinning the wheel and then tightening the sprocket where needed in order to get correct alignment. Make sure bolts are tight. Notice that concavity or indentation of teeth of the rear sprocket is inward towards spokes. This helps keep the chain closer to the inside of the wheel and spokes and allows for better clearance of the rear stays of the bicycle frame.
 
Well, Phil, it looks like I've got my work cut out for me. I did get instruction manual. Here's what it says regarding sprocket:
"Mount the sprocket to the rear wheel as shown (one photograph at not too good of an angle). Do not over-tighten and make sure the sprcket is exactly perpendicular to the axis of the wheel. Reinstall the rear wheel."

I think i should have shopped around more. Better instruction manuals would probably be worth any diff in price I might have had to pay.

But I even called the guy and he told me flared side out. Go figure. Well, it's back to the old drawing board. Thanks for ur help. To me, taking the rear wheel off was about the most difficult part of the whole operation. I've got the multi-speed sprocket on the other side and liked to never got it all back like it came off. But I want to ride. And I will just enjoy the ride more knowing the experience it cost me.
 
Back
Top