Exhaust Holes for Exhaust Bolts Stripped

pessen

New Member
Local time
9:20 PM
Joined
Feb 17, 2009
Messages
22
Location
Albuquerque, NM
Hey,

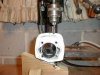
I have a HT engine that I bought from bikeberry.com. The engine is running great, the only problem I am having is that the holes for the bolts that attach the exhaust pipe are stripped.

I bought some J-B weld and tried to cement in bolts that I cut the heads off of, so that I could just put the exhaust pipe on and use lock-nuts to hold it in place. One of the bolts is holding fine, but the other one keeps coming out when the engine heats up after riding for a little bit. I think the force the exhaust pipe exerts on the bolt when going over bumps and such is causing it to come loose.

Anyway, just wanted to see if anyone has had this problem, and if you have found a good way to solve it. I am just frustrated cause my engine is fine, its just the stupid cheap metal they use strips way to easily.

Thanks,

Pessen
 
I had a exhaust (6mm) stud pull loose on my 80cc yesterday. Since the jugs are cheap (jug, gaskets, ship, $50.00) I thought I'd just order a new one and experiment on the old one..If it worked I'd keep it for a Sunday spare. First a larger hole size of 7 X 1 drill bit "B" a 7 X .75 drill bit "D" or a 5/15 X 18 bit "F" should all work. Since I had both the 5/16-18 tap and a "F" drill bit I choose that. What I did notice was that the factory stud holes are NOT deep enough. Also that if you drill the hole accurately you will end up in the cylinder stud hole, this will lengthen the threads about 300%. Tap hole, clean cylinder and install, torque head on. The exhaust/intake studs can be inserted and will bind at the cylinder stud. Just remember that if you ever need to pull the jug that the intake/exhaust studs need to be backed off.

I'm going with 8.8 in the jugs and 5 on the exhaust/intake. There are a number of places that have all thread, but I've only found it in grade 5. Where are you located? I have another engine coming in (should be here Friday) first thing I'm going to do is pull the jug and drill and tap (twice a many threads for holding) exhaust studs and upgrade to a grade 5. I made a jig to do this out of a 2 x 6. You can drill the exhaust stud holes and tap all the way through to the head bolts...just remember if a need to remove the jug is needed the exhaust studs need to be backed off. Grade 5 for intake (no drill and tap) as there is not the strain on them as the exhaust studs.

By the way...I thought about and tried to cut threads on a #8 Grade 8.8 bolt with the head removed......Good luck.
 
Last edited:
I have tapped out my inside (closest to the frame) exhaust bolt twice now due to the same problem. Runs for a week or two, but just cant keep it tight. Thought about welding the pipe to the motor, but just haven't gotten up the nerve as I am planning to put the motor on a diferent bike. I will try A.F's theory of tapping into the block which I have not done for fear of going too far. I will try it this weekend and let every one know.
 
I have tapped out my inside (closest to the frame) exhaust bolt twice now due to the same problem. Runs for a week or two, but just cant keep it tight. Thought about welding the pipe to the motor, but just haven't gotten up the nerve as I am planning to put the motor on a diferent bike. I will try A.F's theory of tapping into the block which I have not done for fear of going too far. I will try it this weekend and let every one know.

If you are having trouble with the exhaust studs, it could be a result of an inadequate front mount. What does your front mount look like? If you are using a large tube adapter plate or some other flexible mount, the motor vibration will eventually shake your exhaust loose or break the studs.
 
HA! (loudly) I have a large front tube and couldn't keep the bolt through it. not to mention the lack of vibration felt without a bolt for the front mount. I ran very smooth with no front mount at all, but the leaning to the left was causing undue wear on the chain.

Right now I have a makeshift concept getting me by until I can have a mount made that doesn't require being bolted through the frame but rather around it. I am using 1/4 flexible, but stiff enough, belt material cut into a rectangle, bolted to the motor, with a u-bolt positioned about an inch and a half from the bottom bolts. Running smoother now, but merely a temporary fix. Another factor, is that I am using a high temp gasket material instead of an actual exhaust gasket, until i have the opporunity to pick one up.

Another solution would be to purchase on of the muffler clamps that can be found at various vendor sites. I just can't bring myself to pay more for the shipping than the product being bought. So I continue to "rig" the engine to the frame using various methods....(basically whatever I have lying around the shop)
 
NEWS....Even with a muffler clamp, due to the minimal threads that the exhaust studs insert, you can still strip the threads. My son is living proof.

Below is a jig I made to hold the cylinder in place. As you see the exhaust bolt hole if drilled on deeper will exit into the cylinder stud hole. As you see the drill is in the drill press lined up with the #6 hole, and I drew a vertical line through the drill bit and extended it past the stud hole. What I'm going to do is insert a stud (cylinder #8 stud) , locktite a 6mm Grade 5 stud the length I need (made from all thread) and thread down to the #8 stud and back it out 1/8 to 1/4 turn, just enough so the cylinder stud can move freely.

Now the intake is a little tricky...Although the strain on the intake studs are not as bad as the exhaust, much lacks as to how deep they drilled and taped the hole. What you will see in the following pictures is (Intake.1) that the intake stud will not do as the exhaust. In picture (Intake.2) you will see the drill press stop as the drill bit rests on the bottom of the intake stud hole. Notice that I can drill deeper (to the stop nuts) thus gaining almost 4 new threads. Picture (Intake.3) shows the depth...the distance between the cylinder wall is the same as the distance between the cylinder wall and the cylinder (#8) stud. What you see is a brand new head I got in today from SBP, and I'm about to drill and tap the holes before instillation.
 

Attachments

  • Exhaust.1.jpg
    Exhaust.1.jpg
    98.5 KB · Views: 1,074
  • Intake.1.jpg
    Intake.1.jpg
    97.2 KB · Views: 1,123
  • Intake.2.jpg
    Intake.2.jpg
    102.9 KB · Views: 1,008
  • Intake.3.jpg
    Intake.3.jpg
    99.2 KB · Views: 1,154
Thanks for the pics. The next time I have the muffler off, I will drill out the holes a little deeper to see if it helps any. It really hasn't been giving me any problems lately, and if it starts to loosen up while riding I have all the tools necessary to tighten up the bolts. Will definitely give it a try though.
 
The JIG is cut at a 72 degree angle (same for both intake/exhaust... I drilled three (3) holes completely through the wood, made a cut out so I could bolt the cylinder to the jig.

Picture below.
 
HA! (loudly) I have a large front tube and couldn't keep the bolt through it. not to mention the lack of vibration felt without a bolt for the front mount. I ran very smooth with no front mount at all, but the leaning to the left was causing undue wear on the chain.

Right now I have a makeshift concept getting me by until I can have a mount made that doesn't require being bolted through the frame but rather around it. I am using 1/4 flexible, but stiff enough, belt material cut into a rectangle, bolted to the motor, with a u-bolt positioned about an inch and a half from the bottom bolts. Running smoother now, but merely a temporary fix. Another factor, is that I am using a high temp gasket material instead of an actual exhaust gasket, until i have the opporunity to pick one up.

Another solution would be to purchase on of the muffler clamps that can be found at various vendor sites. I just can't bring myself to pay more for the shipping than the product being bought. So I continue to "rig" the engine to the frame using various methods....(basically whatever I have lying around the shop)

When someone uses a rubber front mount, a flexible mount, (or have no front mount), they might say it runs "very smooth". So they assume that they reduced the vibration. In reality, the motor is vibrating more since there is no solid mount at the front to restrain it. You just can't feel the vibration anymore. With the engine shaking more, the exhaust is going to be the first thing to fail. A solid mount to a heavy frame provides the mechanical impedance needed to actually reduce vibration. Unfortunately, instead of parts shaking and breaking on the motor, you will now find parts on the bike (fenders, chain guards, tank mounts, etc.) starting to fatigue from the transmitted vibration. I have a very solidly mounted motor and have never had any problems with any of the stock studs, exhaust, or motor mounts. I don't even use the exhaust strap that came with the kit. But I have had to beef up the tank mounts, fender mounts, and rack mounts which all developed cracks after less than 300 miles.

You can squeeze the front mount with a c-clamp to fit between the motor studs and then file the rear motor mount to match the included angle of your frame tubes. You can also file the front motor mount but that change is permanent where is the rear mounting block can be replaced if needed. Nest the motor securely down into the frame V. Use longer studs and secure the front mount directly to the flattened tube. If you do this, it may eliminate the problems with your exhaust shaking loose.
 
Last edited by a moderator:
Can I just JB weld a muffler straight onto the cylinder of my bicycle engine because they are stripped out in the muffler holes
 
Back
Top