ua2pants
Member

If you are having problems like i've had with the pawls of the freewheel breaking on your shift kit, then I have a solution for you!!!
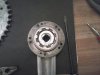
In the picture above, is the SBP Standard Freewheel for their shift kit installed with my sprockets. One of the pawls inside snapped and made the other two inside inoperable. If you are having the same problem or know anybody else, please direct them to this post.
I will say now that this does take a little bit of time to complete and you must be sure to follow these instructions to the letter!!!
If you have a warranty on your part, by all means use that. If however you don't want to deal with shipping and waiting, do what i've done.

In the picture above, I have the standard freewheel from SBP and a ACS BMX Freewheel (box for freewheel in a coming picture with all specs).
You will also need some type of tool (sorry if I can't remember the name of it at the moment) to remove your freewheel from the crank arm.

Just another picture showing the tool needed with the box, a close up of the box coming in another picture.

All specs are shown here.

These are the tools i've used to successfully remove the freewheel from the crank arm. Use whatever tools you have to get the job done.

The bolt, washer and nut were used to hold the tool onto the freewheel as just using a wrench and the tool is extremely difficult as it likes to slip away from the freewheel. I tightened up the nut until it was only snug. DO NOT OVER-TIGHTEN THE NUT OR YOU WILL BE UNABLE TO REMOVE THE FREEWHEEL!!!

Remove your freewheel as shown, they all turn counter-clockwise.

After removal, use a socket and wrench to remove the sprockets from the freewheel. I used a 5/16" socket.

Showing after removal of the bolts, washers and nuts from the freewheel.

Once you remove the components from the freewheel, put it back on to the crank arm to make taking the freewheel apart.

The two small holes on the inside ring are what your going to remove. Use a punch or screwdriver (as i've done) and hit the tool of choise Counter-clockwise to remove the ring. REMEMBER, ON THIS FREEWHEEL IT IS COUNTER-CLOCKWISE TO REMOVE THE RING. This is important as the other freewheel internals are CLOCKWISE.

Once the ring is off, go ahead and dump out all the parts. The part shown above is the only part we're going to salvage aside from the bearing rings (2) and shims (5).

This is a picture of the pawls and the one that broke. SBP uses 3 pawls inside of their standard freewheel.

A better picture of the broken pawl.

Now go ahead and open the other freewheel up using the same steps as mentioned above. Put it on the crank arm, and remove the ring, the internals (springs, pawls inside ring and outside ring are all we're going to want. You can discard the sprocket portion as it is not needed.

Just showing the loose bearings that are also not needed, but hold on to those as they may be handy later on down the line.

Using the internals from the BMX freewheel, insert it in this order. Ring bearing facing upward, Springs for pawls, then the pawls themself.

With the ring bearing at the bottom, you can press the 4 pawls in while gently sliding up the ring bearing. This is important as it will hold all the pawls inward to make it easier to insert the outside ring into the sprocket adapter.

These are the pawls and springs from the BMX freewheel. Much more heavy duty.
Part two of this thread is coming up once this one is permitted by an admin.
Stay tuned!!!