Silver Slant- Let the smoke out...

I've rebuilt plenty of 4-strokes, and old Chevy small blocks with some pretty deep grooves. Most got honed, new rings and sent. The ones I know of are still running. I don't know much about what's normal, or considered abnormal for an aluminum head 2-stroke bike engine with 250 miles on it. The rings, looked ok, and the lands we're clean.
I put it all back together, and it rode ok other than a vibration/rumble at low/mid power that seems to go away with rpms. Only shows up at that certain rpm area. That's new. I'm guessing the wrist pin bore, but I'm no expert.

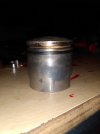
This is what I could get for pics with this phone.
 

Attachments

  • IMG_20220806_011919898.jpg
    IMG_20220806_011919898.jpg
    93.7 KB · Views: 132
  • IMG_20220806_012200133.jpg
    IMG_20220806_012200133.jpg
    89.4 KB · Views: 143
  • IMG_20220806_012434243.jpg
    IMG_20220806_012434243.jpg
    109.6 KB · Views: 125
  • IMG_20220806_012451502.jpg
    IMG_20220806_012451502.jpg
    98.3 KB · Views: 124
  • IMG_20220806_012517186.jpg
    IMG_20220806_012517186.jpg
    108.8 KB · Views: 133
  • IMG_20220806_012949090.jpg
    IMG_20220806_012949090.jpg
    57.3 KB · Views: 107
  • IMG_20220806_013419143.jpg
    IMG_20220806_013419143.jpg
    126.9 KB · Views: 141
Here's a pic of the build.
Just another Kent Bayside. I need to replace the metal fenders with plastic. The front mount is already cracked. We call ber "Black Betty".
 

Attachments

  • IMG_20220725_212521490.jpg
    IMG_20220725_212521490.jpg
    145.5 KB · Views: 120
  • IMG_20220725_212548110.jpg
    IMG_20220725_212548110.jpg
    130.9 KB · Views: 116
  • IMG_20220725_213351210.jpg
    IMG_20220725_213351210.jpg
    109.9 KB · Views: 129
I did have a head gasket leak. I went to take off the head bolts, and two studs came out with them
When you put it back together with the new jug, the 2 bottom gaskets and a new head gasket, remember to do the following.

1 - Use some blue locktite to secure the four studs into the bottom half of the motor.

2 - Make sure if using the acorn nuts that the flat washer is on the bottom, then the spilt ring lock washer, then the acorn nut.

3 - Snug them down by hand if possible first.

4 - Start tightening the acorn nuts in an "X" pattern until you have all four of them to 144 inch pounds. (AKA, 12 ft pds)
Get an inch pound torque wrench at Harbor Freight as they are about the cheapest, and incrementally, at about 35 inch pounds at a time with
the final time being at about 4 ot 5 inch pds to finish the job.


5 - Remember that everytime the bike is taken for a ride it heats up and cools down, (heat cycle), when totally cool, those nuts should be checked after everyride and re-torqued in an X pattern back to 144 inch pounds,(12 ft pounds)...The reason why is the aluminum threads and studs actually expand and contract during these heat cycyles making it appear that the nuts have come loose, Its actually the threading on the studs and lower half of the motor that are heat stretching on you.

This above proceedure is very important to perform as outlined above to avoid the problems that you have experienced already.

These studs will eventually settle in properly and will only need to be checked every so often thereafter.

Be sure in the final assembly to also grab some 2 cycle oil and lube those upper and lower bearings on the crank shaft and also a light coating of oil in the cylinder all around so you are not "dry" starting it as well.

6 - Get rid of the stock exhaust gasket that came with the engine kit and clean off any other "goop" that you may have tried along with it.

Use this Toyota Highlander O2 sensor gasket instead, available at Toyota dealership or also at autoparts stores such as Auto Zone, Advance Auto Parts, etc. Amazon.com.


When installing this gasket, you will need to slightly elongate the holes that go over the studs/bolts...I use a slightly largerbolt to do this through those holes.

You will notice that this gasket has some metal affixed to both sides of the gasket...The side that has the most metal is what goes against the exhaust pipe itself...DO NOT use any gasket sealers with this gasket.
 
Links to Amazon may include affiliate code. If you click on an Amazon link and make a purchase, this forum may earn a small commission.
I figured out what that whole incident was. The screw the keeps the flower nut from moving had fallen out and gotten caught between the drive and clutch gear. There was metal in the clutch cover, and grooves in the cover where it spun. I had to pry a slug of material out of the drive gear. Made the gear, and the magnet on the other side wobble, but I straightened out when I balanced the crank. I just drilled 15mm deep with a half inch bit on both sides like I had seen on YouTube. Made a HUGE difference.

Since then, I've pulled both fenders off of both bikes after a nasty ride over the handle bars. Looking back, it probably wasn't the smartest idea to build 3 bikes at once my first time. One isn't being used, but everything I've done has had to be done twice because I've had to do both bikes as we figure these things out.

So I got to crack the cases on both engines. Found some junk in both cases. Cleaned and oiled everything before putting them back together. I feel a lot better now though knowing that I put eyes on everything and went through the engines. There are some weak spots like the wrist pin bore on the connecting rod, but it's like 10 bucks for a new one. The magneto case had filled partially with water coming off the front tire while riding in the rain. Came about half way up the coil. I was able to remove the coil, the tape covering it, and dry it with a hair dryer. I didn't realize how fine the wire on the coil was. That was a somewhat delicate operation to get it all taped back up right without breaking anything.

These things can be a sure fire way to kill time until you get to know the ins and outs like anything else. There's a stupid tax attached, and I'm still paying my dues, lol. Having a blast though.
Once you have a good running bike, you can seal where the wires enter the case with brush on electrical tape to keep the water out. Use a small smear of gasket make on both sides of the gasket before you put the cover back on.
 
Since my last post.I've put another 150 miles on the bike. I've replaced a magneto due to a leaking seal, and had the carb jet back all the way out and fall into the float bowl. The cap on the NT carb that the throttle cable goes through popped off and the engine stuck at full throttle. I was able to push it back in and stop, but it was stripped and wouldn't stay in so I snapped a zip tie on it. Would probably last forever, but ordered a new carb. All easy fixes. Seems the stators don't like water, gas or oil. I've seen the video of a water hose being sprayed on the magneto, without the cover on, while it's running, but I don't think that's quite the whole picture and I'm not convinced. I think spraying cold water on insulated wire one time, and letting it dry might be fine. I think a coil in a closed case SITTING in water has more forces at play.


From what I can find here and elsewhere on the net, it doesn't look like we have many options as far as seals go. I've got an OEM set coming, but I'd Really like to find an upgrade.

Going to try out one of the thicker "Super Magnetos". I don't care so much about better voltage, I'd just like to try one with thicker wire that's sealed. Looking to bulletproof as best I can.


Anyone have any experience with those Stage 2 CDI deals with the keys? Seems like a lot of cash. The only difference I see on the rest of the available Magnetos is red wire and a different boot. Idk.


Thinking I'll buy another engine here soon, try bulletproofing it from the start and swap this engine to more of a trail bike.
That or rebuild it and put it on a bike for the wife.

Well, I guess the smoke is still in after all.

Peace.
Tav
 
So, the wrist pin bearing finally grenaded due to the connecting rod bore casting defect.
Blew metal all through the engine. I had just about forgotten about it and stopped worrying. The engine actually lasted a long time considering. Had to pedal a couple miles. Not too bad. I knew it wouldn't last forever. I really wanted to run it until it failed in some other way to really see how long an engine would last with our style of riding.
I'll rebuild it when I have time to crack the case, replace the connecting rod, clean the lower end out properly, and put it on another bike. Too much for now.

So, until then, that's all folks.

For now, I've already ordered another engine.
 
Back
Top