
...that I thought I'd share.
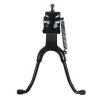
First, I don't know how I ever managed without a two-leg center kickstand. It's eliminated the need for me to borrow my friend's big, expensive Park Tools bicycle workstand. When in use, the kickstand holds the rear wheel about four inches off of the floor, allowing me to rotate the whole drivetrain and even remove the rear wheel. I just secure the front wheel to the floor with a bungee cord and two small dumbell weights. (You may wish to find your own method.)
If I need to work on the front wheel, I just rock the bike onto its back tire, secure it with the weights, and the front wheel is now about four inches above the floor.
Unlike with a fancy, waist-high workstand, I do have to crouch down to floor level to work on the bike. But that's not a big deal for me. Heck, with the dual kickstand you can even put the bike on a workbench or table for the same waist-high effect.
I also think that these center kick stands look great on a MB -- while in use or retracted. Look up "Sunlite Double Kickstand." I bought mine on Amazon.com for about $30.
Another tip to pass along: I've always thought that the rear drive sprockets on MBs (mine's a 56-tooth) kind of visually jump out at you. Not in a pleasant way! Kind of like a big, shiny pie tin. To make the sprocket more subtle looking, I cut a round piece of heavy black sheet plastic with an X-Acto knife and attached it to the sprocket with two-part spray adhesive (3M Super 77 or the like). You spray both the sprocket face and the round piece of plastic, and when each piece is dried to where it's just slightly tacky, you carefully mate the pieces. This is a very permanent bond. Just cut out the holes for your sprocket adapter bolts and center hole with your X-Acto, and you're done. Just make sure to put a flat washer under each sprocket adapter bolt because otherwise the plastic will wrinkle slightly when you tighten the bolt -- this way you're tightening onto the surface of the washer, not the plastic.
The heavy sheet plastic I used was cut from the cover of a three-ring binder. Find the kind of binder that has a good thick plastic covering over cardboard, and then find something round of the appropriate size to serve as your cutting template. I used a metal paint can that happened to be the ideal size. You can even get creative with binders in different colors and patterns; but for me, basic black was the right look.
I also gave my chain tensioner the same black-out treatment. It makes it look a bit less like part of an Erector Set!
Attachments
Last edited: