
D
Deleted member 30828
Guest
Since I started riding motorbikes, I've had to experiment with different chain tensioners. I wont go into much detail, but my bike has an abnormally large frame for a 26" bike, and the rear frame holding the rear wheel, flairs out wider than usual.
Because of this, the drive chain cant be cut to a perfect size to work proper without a tensioner, and the standard tensioner wont work on this frame. Even the aftermarket tensioner with the spring didn't work well. I needed an alternative tensioner method.
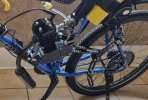
I finally found a nice alternative on Amazon (see pic 1). This tensioner (around $30) is a bracket that is supported at the bottom and rear of the frame. The kit came with a single wheel which can be moved higher or lower as needed, and the whole bracket can be bent a little to find the perfect angle. I really like this style tensioner and had been riding this for a while.
The only thing I didnt like was the top of the chain (being fed into the engine) would angle pretty low and close to the bottom of the chain, potentially rubbing together with the top of the wheel, if the chain isn't held tight enough by the tensioner.
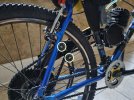
To fix this I found another 2-wheel tensioner method, which I now use and works great (pic2).
This method is using two wheels on the bracket...the top wheel feeds the chain into the engine at the perfect angle, and the bottom wheel holds the chain tight.
I also found they have kits with this 2-wheel method for sale, around the same price. Just thought I would post this for any with tensioner problems
Veterans feel free to comment with any suggestions.
Because of this, the drive chain cant be cut to a perfect size to work proper without a tensioner, and the standard tensioner wont work on this frame. Even the aftermarket tensioner with the spring didn't work well. I needed an alternative tensioner method.
I finally found a nice alternative on Amazon (see pic 1). This tensioner (around $30) is a bracket that is supported at the bottom and rear of the frame. The kit came with a single wheel which can be moved higher or lower as needed, and the whole bracket can be bent a little to find the perfect angle. I really like this style tensioner and had been riding this for a while.
The only thing I didnt like was the top of the chain (being fed into the engine) would angle pretty low and close to the bottom of the chain, potentially rubbing together with the top of the wheel, if the chain isn't held tight enough by the tensioner.
To fix this I found another 2-wheel tensioner method, which I now use and works great (pic2).
This method is using two wheels on the bracket...the top wheel feeds the chain into the engine at the perfect angle, and the bottom wheel holds the chain tight.
I also found they have kits with this 2-wheel method for sale, around the same price. Just thought I would post this for any with tensioner problems
Veterans feel free to comment with any suggestions.
")
