broken motor mounts

retromike3

Member
Local time
8:13 PM
Joined
Nov 23, 2008
Messages
409
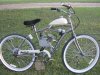
I have a used zoom cycle 80 (66cc) motor and I installed it on a different frame. Turns out that the seat tube was thicker than a stock set up,So I filed the seat tube mount wider so it would fit. Later it brakes and shortly afterwords one of my 6-mm engine studs brake.

I grab a hold of the other one with a vice-grip to unscrew it and it brakes of just about flush with the motor. Then I try an easy out on it and it brakes off before it moves at all.

So now I dremel the block flat and move down about five millimeters and drill a new set of holes and tap them so I can put some new 6-mm threaded rod in the new holes. I then built a new clamp out of square steel tubing with a notch cut out of it so it fits the wider seat tube I also reinforced the holes with some steel spacers made out of 6-mm tubing.

The engine seems to turn freely when I turn it over with a socket on the drive sprocket and I think I still have compression.

Is there any hope that this will last longer than the part that failed or am I just wasting my time? Any clues ?
:confused:
 
From what I've see on here, many bolts and mounts are broken from one of a number of reasons or some of them combined. First of all the OEM hardware is junk and needs to be replaced with grade 5 (metric 8.8). Secondly, the engine needs to be mounted correctly...by correctly I mean that the mounts to bike frame are flush (not in a bind). How I do this is to first mount the engine to the seat post tube first, then onto the front mount...(slideing the engine up and down to the correct spot is required) out of 5 builds I haven't seen one bike that an engine will fit properly and that leads me to make my front mount. 6mm studs in this trash cast aluminum needs to only be torqued to 50 inch pounds and not more. By torquing to only 50 inch pounds causes another problem and that is that the engine wants to rotate counter clockwise on the bike tubes... this can be corrected by making a brace that fits from the clutch cover to the seat tube. In the 20 engine mount studs that I've made and mounted I have not had the first problem out of anyone of them or the mount itself. I use lock tite, and two nuts on each stud, one being a self locking nut. A true correct fit is the key.

By the way, when removing any lock tite studs, heat needs to be used. I'd suggest a little heat anytime a steel stud is removed. In your case, lock tite may have been used in the original instillation.
 
Last edited:
engine mounts

The problem I had was that the frame had too wide of a seat post tube. I filed the seat post mount wider so it would fit and that's what caused the failure in the first place. The mount broke and it caused to much stress on the bolts and then they failed.

I built a new mount out of square steel stock and steel reinforcer tubes that I silver brazed together I will let you know how it works out.

Mike Frye -the bike guy
 
In the future if you have a bike tube that the mount won't fit around, I wouldn't worry about it. When you mount the rear mount the shoulder that touches the tube on both sides will be capable of supporting the engine. Like I said before, the key in mounting these engines is to make sure nothing is in a bind.

In the first two pictures you will see a rear mount that is too small for the tube. I would mount it as is before I enlarged the engine mount. This won't work with a mount larger then the bike tube.

Third picture is a modified front mount.

And lastly the bracket I mentioned earlier to keep the engine rotating on the bike frame.
 

Attachments

  • P1100868....jpg
    P1100868....jpg
    67.3 KB · Views: 315
  • P1100870....jpg
    P1100870....jpg
    67.7 KB · Views: 328
  • P1100782.jpg
    P1100782.jpg
    86 KB · Views: 320
  • support1..jpg
    support1..jpg
    143.3 KB · Views: 357
Nice mount.
I'll take some pics of the one i made today and post them later.
 
Thank you. The front mount was fabricated AFTER the engine was mounted by the rear mount, in this one. We placed the engine where we wanted it to clear the chain guard and have room at the top (spark plug), then made the mount. I had to put a curve in it to conform to the frame.
 

Attachments

  • HPIM2371.jpg
    HPIM2371.jpg
    207.4 KB · Views: 329
  • HPIM2371....jpg
    HPIM2371....jpg
    123.8 KB · Views: 328
Last edited:
mount

Looks good I wish I had thought that up first.

Maybe next time I will do that .


Mike Frye -the bike guy
 
well I would cut the section out that the motor mounts on take the seat off first though
and put a smaller tube down the seat post hole and weld it.
Sound like you need a new crankcase.
I was faced with a simular problem but the front mount the tube was too big so I used an older frame
 
re-tap mount

here they are. I rode them for about 2 miles today with no movement I hope they will keep working.

P.S. I just ordered a new slant head from Kings today just in case they fail. If not I will use the new one for a new frame I want to build up for a motorbicycle only.

Mike Frye-the bike guy:-/
 

Attachments

  • mount4.jpg
    mount4.jpg
    90.8 KB · Views: 320
  • mount 003.jpg
    mount 003.jpg
    86.9 KB · Views: 294
  • mount02.jpg
    mount02.jpg
    95.1 KB · Views: 333
Back
Top