Wyatt. A.
Well-Known Member
- Local time
- 12:03 AM
- Joined
- Sep 19, 2022
- Messages
- 318
I made a tank with nuts welded on, but it took soooo long. You have to get the nuts lined up perfectly and there's no room for play. That took days to get right. This way was soooo easy and it allows room for some play. It only took me a few hours.
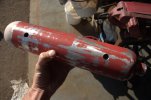
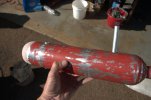
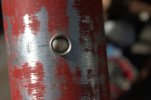
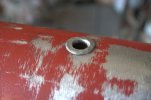
I drilled the holes and beveled the edges in the gas tank. I used 1/2" aluminum tubing that travels though the tank and is flared and spread at each end. Flare one end of 1/2" aluminum tubing, (or whatever diameter you choose to use), and cut length so it sticks out the other end of the tank about 1/8" - 3/16". JB weld under flare to seal around the hole. I used a ball bearing, ball peen hammers and a vertical bick, ( anvil hardy cone/mandrel). I put ball peen hammer in a vise to set one end of the aluminum tube on while I flared the other end to fill up the hole and beveled area. Use ball bearing to spread the tube to fill the entire hole in the gas tank. I assume if you did this well enough you wouldn't even need JB weld. Go back and forth and do both ends of the tube. Peen the flare all the way over to fill the beveled area.
Since there is a bevel you could grind the extra flare away to leave a nice finished look, and depending how thick your gas tank wall is... This was surprisingly quick and easy to do. Just go slow when working with aluminum to not crack it.
Next just drill holes through your frame and use some all thread to attach tank. AND... Fuel destroys epoxy, (and JB weld. I did a test), so unless you have some fuel resistant epoxy you're going to have to use a tank sealer like Red Kote or Por15 or something, which is what I was planning to do. I did this because the good flowing brazing rods are kind of pricey and I was planning on buying tank sealer anyways...
Now I just have to figure out how to put a gas cap and valve on it...
Ok, your comments are now permitted to take place...