First Time Build, GI inspired bike

Hopefully this is the right place to start this thread. I am building a bike that was inspired in part by the bike in this post here, and also the bikes here. However, I am not trying to build a complete replica, just something with that kind of flavor.

Here is what I have so far:

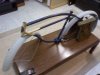
1950 Columbia 5-Star Superb frame (early Columbia WWII bikes had the curved bottom bar like mine, most had a straight bar, but again I am not being exact).

Correctish fenders that are a little dented up.

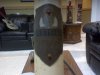
WWII Army surplus handlebars (the item that basically started this project off)

Old olive drab canvas handlebar bag

Reproduction Columbia rear rack (not found on army bikes, but needed to hold the....)

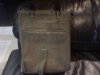
Old olive drab canvas saddlebags

Old olive drab mechanics bag (will hold tools/parts and be on the top of the rack. About the size and shape of a shaving kit).

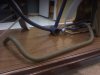
I was trying to think how I'd attach the bags, and I came across a bag of random hardware at an estate sale for $1.50. There were old sash window hangers in the bag and they will work perfectly. You can see them in the shot of the rear of the bags.

I haven't photographed the rack or handlebar bag, plus these are cellphone shots. I will use a proper camera as we move along.

edit: Forgot to mention that I got an old metal Russian Army canteen in a canvas holder. I am going to try to figure out somewhere to mount it and use it for reserve fuel. I'll stencil GAS + OIL on the can, just to be 100% nobody drinks it.
 

Attachments

  • 0519081812.jpg
    0519081812.jpg
    79.9 KB · Views: 743
  • 0519081811b.jpg
    0519081811b.jpg
    76.3 KB · Views: 534
  • 0519081811a.jpg
    0519081811a.jpg
    80.9 KB · Views: 555
  • 0519081811.jpg
    0519081811.jpg
    85.2 KB · Views: 533
  • 0519081810.jpg
    0519081810.jpg
    96.6 KB · Views: 860
Last edited:
Where did you get the canvas bags? SO COOL!

The saddlebag ones were on ebay i think. They claimed they were dispatch rider saddlebags, but I have no idea what they were really for. The handlebar one was from some army surplus place.

If you want cool saddlebags, check these out. Made for a bike, easy to fit if you have a rack, and cool. They describe them as "children's toy" saddlebags, but they look like they'd hold quite a bit.
 
Links to eBay may include affiliate code. If you click on an eBay link and make a purchase, this forum may earn a small commission.
Oh man I wish I saw those a few hours ago. I just bought a pair of these musette bags in olive drab. I've got a bunch of spare 1/4" peg board. I was going to cut some to fit in the bags so they stay rigid and don't get sucked into the wheel.
 
My project has changed a little. I found an entire Columbia bike, which is now the basis for my first build.

Anybody know if Cleveland Welding forks fit Columbia frames?
 
I took the newer bike and gave it a night time primer (I am sure that will look awesome in the morning, but I got impatient). The forks seem to work.

I have an engine arriving from Dax, but Fed Ex has it bopping around. Since I won't be around to sign for it, I will have to wait til it lands 25 miles away in a few days and go get it. It will give me time to figure out what I am going to do about wheels, I don't have any usable ones yet. I'd like to get a front with a drum brake, but I can't figure out where to buy one. I guess I could get a drum and pay someone to set it up.
 

Attachments

  • 3dfb_1.JPG
    3dfb_1.JPG
    36.5 KB · Views: 326
  • 0610080059.jpg
    0610080059.jpg
    100.8 KB · Views: 319
I got my motor kit. For starters, I was impressed how well it was packed. I saw some photos here of how some kits arrive, and this one was in good shape (save for some sort of liquid which melted a few of the foam peanuts onto some parts, but I cleaned that up. Also, the throttle has a small crack in one side of the housing, but I think that might not be a big deal).

My kit came with a one page instruction sheet in Engrish, so I searched out better instructions and have been following those from here. All has been fine and dandy except I have already assembled the rear wheel twice after finally figuring out I could grind the coaster brake dust cap. Since putting the sprocket on, I have read elsewhere that I should have put both rubber o-rings on the inside, or that you MUST put them both on both sides. I am tempted to leave it as is, since I am following those directions, but who knows.

When I was originally looking for wheels, I went to the local Trek dealer and they said they could order something. Later on, I passed a seedy looking little bike shop with wheels hanging in the window. I went in and the owner set me up with wheels, a chain, and a chain breaker. Finding that shop was probably the coolest thing about the build so far. (I did have to buy two front wheels because the first had an axle that was too fat for my old fork. I painted it before I realized it wouldn't work.)

Anyways, I tried test fitting the engine and it will not fit with the standard mounts. Now I am researching different mounting techniques. It seems that a metal plate in my kit with holes and a bolt through the center might be an extended mount. I'd rather not drill the frame, but if I have to, I guess I have to.
 

Attachments

  • 0616081353.jpg
    0616081353.jpg
    185.8 KB · Views: 331
  • 0616081354.jpg
    0616081354.jpg
    168.1 KB · Views: 284
  • 0616081355.jpg
    0616081355.jpg
    151.7 KB · Views: 303
If there is a fab shop down the road have them extend (FRONT ONE) it where your hole is drilled on the plate youd have to make then extend that with blocked square stock with ears and use your outside clamp on the inside with washers for space behind the stock half circle then go to ace hardware and buy the conduit or metal pipe v hangers with the double holed ears on each side and cut one in half then use that for your outside halfcircle clamp. then run bolts through those ears back to the overlapped square stock caps(ears).
 
Last edited by a moderator:
Added some pictures here.

Had my first ride today. It was very cool for about four blocks, then an exhaust bolt came off, and it got noisy. Then the engine wouldn't run, but fixed itself somehow. Then the clutch handle came completely apart and seems to have lost some internal piece, making it so the lock doesn't work and the clutch doesn't operate properly. So I guess I will have to find a better clutch handle.

It was a fun four blocks though.
 
Back
Top