GiantStone MB-Iguana

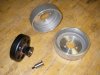
Yeah, thanks for fighting through my lack of conventional terms. I'm still kind of fumbling through the hobby. Due to budget restrictions, I'm not going to jump right into this kind of set up, but I do want to see the results so I can try it down the road.

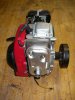
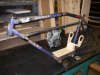
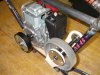
What do you think the main advantages of this new set up would be? This is going to be a beautiful bike.
 
Drivetrain Parts

The parts for the drivetrain have started to arrive. The first photo shows the HTD Clutch from Max-Torque and the two driven pulleys from Pfeifer Industries, an 88t for the jackshaft and a 96t for the rear wheel. Phots 2-4 show the clutch mounted to the motor. The design of this clutch allows it to be mounted with the driver inboard or outboard. I'm opting for the inboard position as it keeps the motor pretty centered on the CL of the bike. With the clutch mounted the overall width of the motor is 10&1/8in.

ocscully
 

Attachments

  • beltdrive 001.jpg
    beltdrive 001.jpg
    137.3 KB · Views: 1,136
  • beltdrive 002.jpg
    beltdrive 002.jpg
    85.8 KB · Views: 1,018
  • beltdrive 003.jpg
    beltdrive 003.jpg
    80.9 KB · Views: 1,104
  • beltdrive 004.jpg
    beltdrive 004.jpg
    84.1 KB · Views: 1,027
Last edited:
Spent some time today beginning the process of adapting/modifing the pulleys for the drive train. The pulleys as purchased from Pfeifer Indusrries are 40mm wide. So the first thing I did was to narrow them down to optimum width for use with a 25mm belt. Which means they need to be 29mm wide. Photo #1 below. Then I enlarged the ID of the 88t pulley to fit the Jackshaft adapter purchased from Viza Motors. I also stared making the adapter for fitting the 96t pulley to the Nashbar Single Speed Disc Hub. Photos #2-#4 are just showing the pulleys in place of the wooden mockups.

ocscully
 

Attachments

  • modifing 006.jpg
    modifing 006.jpg
    137.9 KB · Views: 1,042
  • modifing 008.jpg
    modifing 008.jpg
    119.6 KB · Views: 1,016
  • modifing 012.jpg
    modifing 012.jpg
    137.7 KB · Views: 1,033
  • modifing 014.jpg
    modifing 014.jpg
    118.9 KB · Views: 1,080
Adapter Fabrication continues

Spent a little more time on the lathe this morning fabricating the adapter for mounting the rear pulley to the disc hub. (Photos #1-#3 below) Photos #4-#6 show the Nashbar Single Speed Cassette Disc rear hub with the pully located using the new adapter. The photos also show the chain/belt tension adjusters. Tomorrow morning the two pulleys and their adapters will go to the mill and use the wonders of CNC controllers to plot and drill the mounting bolt circles for each piece.

ocscully
 

Attachments

  • adapter 006.jpg
    adapter 006.jpg
    96.4 KB · Views: 4,803
  • adapter 008.jpg
    adapter 008.jpg
    136.6 KB · Views: 821
  • adapter 014.jpg
    adapter 014.jpg
    140.7 KB · Views: 5,058
  • adapter 016.jpg
    adapter 016.jpg
    127.7 KB · Views: 4,812
  • adapter 017.jpg
    adapter 017.jpg
    128.1 KB · Views: 5,117
  • adapter 019.jpg
    adapter 019.jpg
    131.7 KB · Views: 7,602
How are the spokes going to clear the pulley? (From the pix it doesn't look like there is enough room) This is a great build, but I think you already know that.
 
Saga continues

Finished up the rear pulley adapter this morning buy drilling two sets of 6 holes ea. to mount the adapter to the pulley and then the whole assembly to the rear hub. (Photos# 1 & #2)

Then I spent some time fine tuning and modeling the engine mount/jackshaft mount in wood. (Photos# 3-#7) Photo #8 is a layout of the various jackshaft parts, and Photo#9 is a close up of the 20t driver and the 86t driven pulleys as they will be mounted on the jackshaft.

turkeyssr asked about the clearance between the rear pulley and the spokes. If all my calculations are correct there will be no problems. We'll know soon when I build up the rear wheel.

ocscully
 

Attachments

  • jackshaft 012.jpg
    jackshaft 012.jpg
    130.8 KB · Views: 839
  • jackshaft 014.jpg
    jackshaft 014.jpg
    138.7 KB · Views: 811
  • jackshaft 002.jpg
    jackshaft 002.jpg
    135.2 KB · Views: 783
  • jackshaft 005.jpg
    jackshaft 005.jpg
    139.8 KB · Views: 752
  • jackshaft 006.jpg
    jackshaft 006.jpg
    136.7 KB · Views: 833
  • jackshaft 007.jpg
    jackshaft 007.jpg
    140.1 KB · Views: 798
  • jackshaft 008.jpg
    jackshaft 008.jpg
    140.4 KB · Views: 864
  • jackshaft 010.jpg
    jackshaft 010.jpg
    93.4 KB · Views: 834
  • jackshaft 001.jpg
    jackshaft 001.jpg
    87.5 KB · Views: 806
Last edited:
Looks like it should be a very smooth, quiet drive system, plus it just looks good, thanks for the pics of the nashbar single speed hub, im picking one up soon.
 
Modeling the Tank

I spent some time this morning building a better model of the tank I hope to have made for this project. The Tank will be basicallyi a 3.5 in square tube cut to fit the opening between the top tube and straight bar. The first 3 photos below show the tank with flat straight sides from front to rear. The last 4 photos show it with a short taper at the front and a longer taper at the rear. I'm thinking the volume of the tank should be close to a gallon?

ocscully
 

Attachments

  • tank 001.jpg
    tank 001.jpg
    123.6 KB · Views: 805
  • tank 002.jpg
    tank 002.jpg
    100.5 KB · Views: 703
  • tank 004.jpg
    tank 004.jpg
    137.5 KB · Views: 662
  • tank 006.jpg
    tank 006.jpg
    121.8 KB · Views: 620
  • tank 005.jpg
    tank 005.jpg
    134.2 KB · Views: 649
  • tank 007.jpg
    tank 007.jpg
    129.6 KB · Views: 638
  • tank 008.jpg
    tank 008.jpg
    145.1 KB · Views: 653
Back
Top