
CARROT-The DESTROYER
Member
HOW TO BUILD A KILLER KULANA MOONDOG: - MANUAL
I created this manual to answer all the questions I had on my build. Hopefully, it will now answer yours as well in this one thread.
This manual contains some general build information, but it has been geared primarilly towards KMC applications.
I'm no expert in building bikes. I am just sharing what I learned on my build. Use this manual at your own risk.
The pics included should fall within the general reading order of this manual.
GENERAL KMC BIKE INFORMATION: - my own opinion on a 1 - 10 SCALE.
PROS:
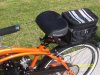
VALUE: - 7 - It's a good bike for the price. I have included some basic pics of different parts of the bike.
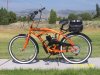
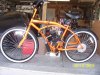
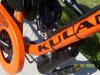
LOOKS: - 10 - The visual appeal is outstanding!! - One of a kind handlebars w/ original looks. Black rims w/ special spoke patterns. Paint the motor black to really make it look impressive.c-pic
BRAKES: - 6 - takes some adjusting, but can be done.
Best method to adjust the brakes: push the pads into the rim, adjusted taught. I used the adjustable barrel nuts on the brake levers to back them out, and was able to get a perfect balanced pull. - side pull brakes.
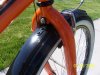
RIDE: - 6 - Good- fat tires work really well. I would recommend lowering the air pressure. I weigh 160 and the recommended PSI is 40 - 60. I found the best compromise for speed and comfort at 35 PSI. (tread pic included)
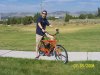
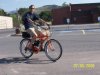
I am 6'3" and can ride this bike very comfortably - see my hideous pics.
SHIFTING: - 7 - uses a Shift Grip handle - very cool!! - will explain how to install in the build section. - The shifter tends to drop into the next higher gear every once in awhile - not that bad.
CONS:
THE SEAT!!!: - 2 - a very vicious person created this seat. Notice the upturned front. If your a guy, not good for bumps, use your imagination. c-pic. I purchased a bench seat - great choice!! - c-pic
THE RIMS: - 3 - poor quality - had my bike sent to Walmart via " site to store" - online, both rims were out of true. After using the brakes a few times, the paint on the braking portion on the rim wears off exposing the aluminum color.
PAINT: - 4 - rubs off by just a cable vibrating against it in one spot.
DE-RAILER: - 5 - works ok - needed to adjust mine to get it to work right with the shift grip. No real problems since. Very cheap quality - make sure you take good care of it - no abuse.
THE FENDERS: - 5 - Many posts state that they will suddenly crack and break off into the spokes and end your ride in a very dramatic fashion. I have not noticed any significant problems thus far. I ride my bike every day, and check it every day as well.c-pic
The solution: - silicone the fenders at the installation locations on the bike. I have also read to keep the bolts slightly loose w/ lock tight. - so they will not develop stress cracks when slightly loose - this is how I have mine set up.
SPROCKET GUARD: - 2 - very cheap clear plastic - mine was warped.
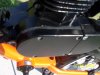
THE WELDS: - 5 - not good, not bad. This bike gets compared to the Schwinn Point Beach cruiser. I have seen both, and agree, the Schwinn does have bigger frame welds. I did not have any additional welding slag on my bike. And that is the other concern I have read about. - look for this if making an in store purchase. c-pic
OTHER:
ok pedals - good grip - cheap plastic
Although the Walmart website advertises the bike as a 15 speed, it's really a 7 speed. However, with the addition of a motor, the gears are more than sufficient.
I HIGHLY suggest you remove all regular nuts, and replace them with nyloc nuts. This will save many hours of tightening loose nuts due to vibration. As well as keeping you from being stranded or worse due to a nut working it's way free.
White wall tires are a pain to keep clean due to oil out the exhaust.
BUT - they look stunning when they are cleaned up.
I use brake cleaner - no residue - seems to work great, and not deteriorate the rubber.
If getting a bike monitor - get the Schwinn - the Bell will not work w/ the CDI.
THE BUILD SECTION:
Again, you should have received some form of instruction manual with your motor purchase.
I have designed this manual to be used in accordance with the install book- IOW - if working on the throttle lever in the actual build book, you should have already completed all the steps leading up to that point in my manual. - (of course not all retail manuals are going to be the same)
1 MOUNTING THE SPROCKET GEAR - No significant differences. - make sure it is perfectly straight.
2 MOUNTING THE MOTOR:
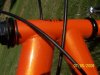
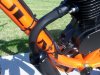
The back mount will work fine. I suggest you add rubber in-between the frame and the clamp. - c pic
To clear the chain guard, I mounted my motor 6 1/4" inches up the seat post frame from the bottom of the mount bracket. I had about a 1" clearance with this set up.
If using the chain guard, YOU WILL NOT be able to use the stock front mount set up. You will be too short to reach the support bar.
I used the "drill through the frame" method. Use a 5/16" bit to do this and locate a 4" long grade 8 bolt to install to the frame. You will need to get a piece of bar stock from any hardware store to fabricate a plate for the bolt to go through. c-pic
Many companies on this site sell an installation frame adapter hardware kit.
FYI: The motor mount studs are 6mm.
I created my own sprung front suspension mount to alleviate any vibration. If using the drill through method, I suggest you use neoprene washers on the top and the bottom between the frame and any spacers you use to minimize vibration. c-pic
3 CHAIN DRIVE: -take the gear cover off, take the chain apart first, and run it around the gear.
The chain tensioner should be perfectly straight up and down.
If you are using the fenders, you will be required to trim the rear fender back to allow clearance for the chain. I used a dremil to do this with no problems at all. c-pic
If you are going to use the motor chain guard, you will need to trim the fender higher than the location of the guard install point. c -pic. - figure this out first before cutting.
I had to cut a notch in my chain guard to go around the tire - may not be the case in all builds - c-pic.
Make sure the sprocket, tension wheel and gear are perfectly aligned. - CRITICAL.
4 CDI / ELECTRICS: - no major differences. I found the best place to install mine was in-between the two lower support bars. I was able to hide many wires for a cleaner look. I think it also looks really good there.
If you decide to mount at this location, you may be required to lengthen the black and blue wires from the magneto.
Don't use the clamps that came with your install kit. The tabs on the CDI are weak and will break eventually. I used heavy duty zip ties.
Make sure you seal the cover to the magneto to keep out water and moisture - I used windshield silicone - it's thinner and gets into tight locations better than regular silicone c-pic
Get rid of the yellow button kill switch - buy a $2.00 switch as seen in pic, dremil a space for it in the throttle handle, and make it a kill switch that connects to both sides of the BLUE wire. The yellow switch used w/ the white wire is notorious for creating a short which will eventually fry the magneto. = $30.00 + shipping to replace.
5 CLUTCH LEVER / CABLE INSTALL: I don't know if it's the bike design or the company I purchased my motor kit from, but my cable was too short. I added a custom pulley wheel to my build, but even when running it the correct way, it was too short. I purchased a longer cable for $2.00 at my local bike shop.
I included a pic to show where I installed my clutch lever - left side - under my brake lever.
6 THROTTLE HANDLE: - This one raises many questions due to the Shift grip - "how do I do this??" - it was simple. All you have to do is loosen the allan head screw that locks the shift grip in place, slide the shift system down the handle bar far enough to be able to fit the throttle handle on, and then tighten it back up. - that's it.
I included a good pic to show positions of my set up.
7 CARB - no significant differences.
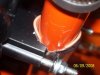
8 FUEL TANK: - no significant differences. - but - they tend to leak at the pep-cock valve - use Teflon tape when installing to prevent leaks. Although, I didn't use a typical gas tank, it will fit on the front bar w/ no problems at all.
9 EXHAUST: - not sure if it was just me, but mine hit the support frame. I attempted to use the bend method described in other posts, but I was not able to bend it far enough. I took it to the local welder, paid $10.00 to have the pipe lengthened and problem solved. c-pic.
In addition, many posts state to use a clamp to secure the exhaust pipe so it doesn't vibrate at the welds and crack. Mine were all heavy duty welded, no worries about this or need to have a silly clamp installed on my exhaust.
I am leaving all the fuel ratio and learning how to start and ride it stuff up to you.
Well, thats it. I hope this was both useful and insightful for your KMC build.
Most important, HAVE FUN!! - and enjoy your new ride!
Troy Fitz.
I created this manual to answer all the questions I had on my build. Hopefully, it will now answer yours as well in this one thread.
This manual contains some general build information, but it has been geared primarilly towards KMC applications.
I'm no expert in building bikes. I am just sharing what I learned on my build. Use this manual at your own risk.
The pics included should fall within the general reading order of this manual.
GENERAL KMC BIKE INFORMATION: - my own opinion on a 1 - 10 SCALE.
PROS:
VALUE: - 7 - It's a good bike for the price. I have included some basic pics of different parts of the bike.
LOOKS: - 10 - The visual appeal is outstanding!! - One of a kind handlebars w/ original looks. Black rims w/ special spoke patterns. Paint the motor black to really make it look impressive.c-pic
BRAKES: - 6 - takes some adjusting, but can be done.
Best method to adjust the brakes: push the pads into the rim, adjusted taught. I used the adjustable barrel nuts on the brake levers to back them out, and was able to get a perfect balanced pull. - side pull brakes.
RIDE: - 6 - Good- fat tires work really well. I would recommend lowering the air pressure. I weigh 160 and the recommended PSI is 40 - 60. I found the best compromise for speed and comfort at 35 PSI. (tread pic included)
I am 6'3" and can ride this bike very comfortably - see my hideous pics.
SHIFTING: - 7 - uses a Shift Grip handle - very cool!! - will explain how to install in the build section. - The shifter tends to drop into the next higher gear every once in awhile - not that bad.
CONS:
THE SEAT!!!: - 2 - a very vicious person created this seat. Notice the upturned front. If your a guy, not good for bumps, use your imagination. c-pic. I purchased a bench seat - great choice!! - c-pic
THE RIMS: - 3 - poor quality - had my bike sent to Walmart via " site to store" - online, both rims were out of true. After using the brakes a few times, the paint on the braking portion on the rim wears off exposing the aluminum color.
PAINT: - 4 - rubs off by just a cable vibrating against it in one spot.
DE-RAILER: - 5 - works ok - needed to adjust mine to get it to work right with the shift grip. No real problems since. Very cheap quality - make sure you take good care of it - no abuse.
THE FENDERS: - 5 - Many posts state that they will suddenly crack and break off into the spokes and end your ride in a very dramatic fashion. I have not noticed any significant problems thus far. I ride my bike every day, and check it every day as well.c-pic
The solution: - silicone the fenders at the installation locations on the bike. I have also read to keep the bolts slightly loose w/ lock tight. - so they will not develop stress cracks when slightly loose - this is how I have mine set up.
SPROCKET GUARD: - 2 - very cheap clear plastic - mine was warped.
THE WELDS: - 5 - not good, not bad. This bike gets compared to the Schwinn Point Beach cruiser. I have seen both, and agree, the Schwinn does have bigger frame welds. I did not have any additional welding slag on my bike. And that is the other concern I have read about. - look for this if making an in store purchase. c-pic
OTHER:
ok pedals - good grip - cheap plastic
Although the Walmart website advertises the bike as a 15 speed, it's really a 7 speed. However, with the addition of a motor, the gears are more than sufficient.
I HIGHLY suggest you remove all regular nuts, and replace them with nyloc nuts. This will save many hours of tightening loose nuts due to vibration. As well as keeping you from being stranded or worse due to a nut working it's way free.
White wall tires are a pain to keep clean due to oil out the exhaust.
BUT - they look stunning when they are cleaned up.
I use brake cleaner - no residue - seems to work great, and not deteriorate the rubber.
If getting a bike monitor - get the Schwinn - the Bell will not work w/ the CDI.
THE BUILD SECTION:
Again, you should have received some form of instruction manual with your motor purchase.
I have designed this manual to be used in accordance with the install book- IOW - if working on the throttle lever in the actual build book, you should have already completed all the steps leading up to that point in my manual. - (of course not all retail manuals are going to be the same)
1 MOUNTING THE SPROCKET GEAR - No significant differences. - make sure it is perfectly straight.
2 MOUNTING THE MOTOR:
The back mount will work fine. I suggest you add rubber in-between the frame and the clamp. - c pic
To clear the chain guard, I mounted my motor 6 1/4" inches up the seat post frame from the bottom of the mount bracket. I had about a 1" clearance with this set up.
If using the chain guard, YOU WILL NOT be able to use the stock front mount set up. You will be too short to reach the support bar.
I used the "drill through the frame" method. Use a 5/16" bit to do this and locate a 4" long grade 8 bolt to install to the frame. You will need to get a piece of bar stock from any hardware store to fabricate a plate for the bolt to go through. c-pic
Many companies on this site sell an installation frame adapter hardware kit.
FYI: The motor mount studs are 6mm.
I created my own sprung front suspension mount to alleviate any vibration. If using the drill through method, I suggest you use neoprene washers on the top and the bottom between the frame and any spacers you use to minimize vibration. c-pic
3 CHAIN DRIVE: -take the gear cover off, take the chain apart first, and run it around the gear.
The chain tensioner should be perfectly straight up and down.
If you are using the fenders, you will be required to trim the rear fender back to allow clearance for the chain. I used a dremil to do this with no problems at all. c-pic
If you are going to use the motor chain guard, you will need to trim the fender higher than the location of the guard install point. c -pic. - figure this out first before cutting.
I had to cut a notch in my chain guard to go around the tire - may not be the case in all builds - c-pic.
Make sure the sprocket, tension wheel and gear are perfectly aligned. - CRITICAL.
4 CDI / ELECTRICS: - no major differences. I found the best place to install mine was in-between the two lower support bars. I was able to hide many wires for a cleaner look. I think it also looks really good there.
If you decide to mount at this location, you may be required to lengthen the black and blue wires from the magneto.
Don't use the clamps that came with your install kit. The tabs on the CDI are weak and will break eventually. I used heavy duty zip ties.
Make sure you seal the cover to the magneto to keep out water and moisture - I used windshield silicone - it's thinner and gets into tight locations better than regular silicone c-pic
Get rid of the yellow button kill switch - buy a $2.00 switch as seen in pic, dremil a space for it in the throttle handle, and make it a kill switch that connects to both sides of the BLUE wire. The yellow switch used w/ the white wire is notorious for creating a short which will eventually fry the magneto. = $30.00 + shipping to replace.
5 CLUTCH LEVER / CABLE INSTALL: I don't know if it's the bike design or the company I purchased my motor kit from, but my cable was too short. I added a custom pulley wheel to my build, but even when running it the correct way, it was too short. I purchased a longer cable for $2.00 at my local bike shop.
I included a pic to show where I installed my clutch lever - left side - under my brake lever.
6 THROTTLE HANDLE: - This one raises many questions due to the Shift grip - "how do I do this??" - it was simple. All you have to do is loosen the allan head screw that locks the shift grip in place, slide the shift system down the handle bar far enough to be able to fit the throttle handle on, and then tighten it back up. - that's it.
I included a good pic to show positions of my set up.
7 CARB - no significant differences.
8 FUEL TANK: - no significant differences. - but - they tend to leak at the pep-cock valve - use Teflon tape when installing to prevent leaks. Although, I didn't use a typical gas tank, it will fit on the front bar w/ no problems at all.
9 EXHAUST: - not sure if it was just me, but mine hit the support frame. I attempted to use the bend method described in other posts, but I was not able to bend it far enough. I took it to the local welder, paid $10.00 to have the pipe lengthened and problem solved. c-pic.
In addition, many posts state to use a clamp to secure the exhaust pipe so it doesn't vibrate at the welds and crack. Mine were all heavy duty welded, no worries about this or need to have a silly clamp installed on my exhaust.
I am leaving all the fuel ratio and learning how to start and ride it stuff up to you.
Well, thats it. I hope this was both useful and insightful for your KMC build.
Most important, HAVE FUN!! - and enjoy your new ride!
Troy Fitz.
Attachments
-
 Troy's bike file_21.jpg163.3 KB · Views: 2,973
 -
 Troy's bike file_5.jpg162.8 KB · Views: 1,676
 -
 Troy's bike file_16.jpg149.9 KB · Views: 1,334
 -
 Troy's bike file_30.jpg149.9 KB · Views: 1,198
 -
 Troy's bike file_31.jpg107.6 KB · Views: 1,211
 -
 100_2076.jpg154 KB · Views: 1,506
 -
 Troy's bike file_9.jpg172.2 KB · Views: 1,145
 -
 Troy's bike file_14.jpg117.6 KB · Views: 1,123
 -
 Troy's bike file_28.jpg98.2 KB · Views: 1,151
 -
 100_2074.jpg59.1 KB · Views: 1,179
 -
 Troy's bike file_22.jpg105.7 KB · Views: 1,091
 -
 Troy's bike file_18.jpg104.5 KB · Views: 1,264
 -
 Troy's bike file_19.jpg73.9 KB · Views: 1,078
 -
 Troy's bike file_11.jpg113.5 KB · Views: 1,136
 -
 Troy's bike file_10.jpg153.3 KB · Views: 1,129
 -
 Troy's bike file_20.jpg119.4 KB · Views: 1,272
Last edited by a moderator: