Jesse James West Coast Chopper Bike Conversion

1968gtcs

New Member
Local time
4:08 AM
Joined
Mar 6, 2008
Messages
29
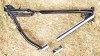
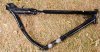
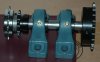
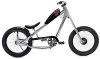
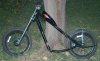
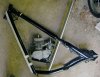
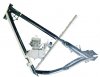
I've started chopping a Jesse James West Coast Choppers bike to mount an engine on it. I'm going to have to relocate the bottom bracket to the front of downtube and offset and inch or so to the to the driveside for my drive side jackshaft conversion. Engine will fit nicely between my crankset. Will have disc hubs laced onto original rims for front and rear disc conversion, have decided to use 4X pattern with black DT swiss spokes for original look. I'll take pictures along the way, along with the gas tank modification. Here is what I've done so far in the pics. I made an engine mount that will bolt onto an engine mount plate that is welded onto the down tube and seat tube. New seat tube will be notched and welded where I cut out old one. New bottom bracket, pillow block mounting plate(for drive side conversion), and front and rear disc tabs will be welded on. I'm going to internally route the brake lines and engine control lines for a clean look. Masking tape is on the last picture to serve as guides for my cutting and measuring. Mock up shows shows an engine position that i thought of, but i'll probably use the configuration that I've messed around with in photoshop.
 

Attachments

  • jessejames-stock.jpg
    jessejames-stock.jpg
    28.6 KB · Views: 57,907
  • JJ1.jpg
    JJ1.jpg
    178.4 KB · Views: 24,507
  • jj2.jpg
    jj2.jpg
    124 KB · Views: 19,325
  • jj3.jpg
    jj3.jpg
    58.1 KB · Views: 9,997
Last edited by a moderator:
where oh where did you find that tank?

machine looks wonderful - good luck with it

Jemma xx
 
Nice bike man, I really like the custom look. Here are a few pics of some choppy choppy I did today along with it welded back together. I sit my new bottom bracket on top just to take a pic, haven't welded it yet because I'm going to offset it and need to wait till I get my parts for my jackshaft welded on.
 

Attachments

  • JJbottom-chop.jpg
    JJbottom-chop.jpg
    165.9 KB · Views: 5,830
  • JJbottom-bracket-mod.jpg
    JJbottom-bracket-mod.jpg
    225.7 KB · Views: 5,964
  • JJbottom-mock.jpg
    JJbottom-mock.jpg
    168.7 KB · Views: 5,458
Last edited by a moderator:
JJ conversion

Looks great man. What type of Jackshaft? Where?

I'll be paying attention to this build. Awesome start dude!
 
It will be frame mounted with pillow blocks. I'm actually going to do it like i had in the first mockup picture I had so I can throw on a 4 stroke whenever I find a good deal on one and use the same jackshaft setup. Will post pictures of it when I get all the parts in for it. My calculations show that the bikes top speed will be 43mph. I'm anxious to see if they are accurate. My goal for the bike is to keep it looking very stock with practical upgrades for disc brakes and engine components. I'm going to try to keep the heat real low and keep all the stock decals on the tank when I weld it.<br><br>As for the frame cuts, I think they will be fine, I've been tig welding experimental aircraft frames(steel, al, and ti) for years, I think my welds will be good for a bicycle. My welds are perfect. But for those that don't have years of experience in tig welding, I wouldn't advise you to risk it. Do the cuts, tack it where you want it, and pay a good welder to finish it for you.
 
Last edited:
My parts finally came in.......I made a program in excel to output the number of teeth on each jackshaft sprocket in order to give me normal bicycle pedal power without engine running(to make it just as easy to pedal as if the engine wasn't on your bike.....this even factors in the added weight from the engine kit on the bike), along with the desired speed I want to achieve with the engine(just like if it was mounted on the non-drive side), plus I don't need a gimp freewheeling crank with this setup. The program factors in custom bike inputs, such as rear tire OD, engine HP curve, engine torque curve, final weight of bike with rider, and rear freewheel number of teeth if you want to keep you orginal one or will allow you to change it depending on your preference, and maximum desired angle incline before you have to start pedaling(customize it to your terrain that you are riding on). I had to machine one adapter on my lathe for this setup(maybe you can spot it), but the whole system is bulletproof. I'm making an adapter plate that will mount this onto the bottom tube of the frame near the rear wheel. The whole setup will add about 8lbs to the bike, but it will be well worth it. I have a little secret that I can easily add on later-on when I get my 4 stroke to make both power systems fully independent of each other(pedaling and engine), but you have to use an engine that doesn't require pedaling to start. Plus you can use this with a rear de-railer and have a very dependable multi speed system(illegal in TX) that is customized for your bike, engine, pedaling preferences, and weight. No more one size fits all sillyness. Only change needed to be made to bike is to offset pedal crank .75'' to the right. Normally this can be done with simple manual adjustments with your crankset. Since I'm going to weld a new bottom bracket on, before I weld it I'll just off set my bottom bracket .75 inch to the right and then it will look 100% stock to the naked eye.
 

Attachments

  • jacshaft-setup.jpg
    jacshaft-setup.jpg
    25.6 KB · Views: 5,462
Last edited:
Back
Top