
bakaneko
Well-Known Member
Hello, first off I recognize there are folks here looking to build the best and nicest MBs and then there are folks looking for a low budget ride or fun. This is for both for the low budget folks I hope this helps expand their range and for the purest hobbyist maybe they can create a better looking setup. Who knows. Let me start with the the reasons, describe the build, and then list out the limitations.
Reasons
- I want long or extremely long range depending on the gas efficiency and throttle usage
- No need to constantly worry about the gas levels depending on the gas container size; also container is not 100% opaque so you can see gas levels without opening cap
- I want to pump gas directly from the gas station pump into the bike without fear of using the high pressure gas pumps in a small tank above a hot motor... ie fire fear
- Stock gas tank is too small for the gas pumps (you get a lot of splashing...)
- I am a 2-stroke guy and it sucks to have to get gas, mix oil, transfer some to the stock tank; this eliminates that (pressure from gas pump is good enough to mix the oil)
Build
- Materials: Walmart, Home Depot, Menards gas containers for $8+ (1+ gallon), solvent proof sealant ($1), super glue ($1) - I used the cheapest sealant but please use better gas specified proof sealant
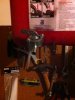
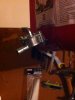
1. Drill a hole slightly smaller than your gas intake valve into the bottom of the gas container (see pic)
2. Connect the plastic tube to the output valve; use more tubing if you are not certain (I didn't do this step and it is hard to secure the tube after)
3. Screw in the gas value along with the plastic washer flush to the gas container
4. Apply a gas and water resistant sealant on top of the gas valve and set dry for specified time
5. Apply a second layer and use hard setting super glue as much as possible on top of that
6. Test valve for several days for leaks (I tested for 1 week)
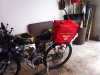
7. Securely affix the new tank to the rear rack of the bike (might have to elevate tank depending on your engine placement; I elevated it 4-5 inches with wood)
8. Implement an inward pressure valve at the top of the gas container (I did it at top of handle). The valve needs to only open inwards to relieve vacuum pressure. You can do this with a small hole and some plastic.
Limitations
- The connection to the valve is weak. In the stock tanks, it is in cased in metal. The way I place the valve on the rear rack limits the risk of anything hitting it. But, a more able person can build a casing around the valve
- Having this on your rear rack or anywhere is unsightly. I covered mine with a Toyota bag... I know it still looks like crap but I am sure more aesthetic coverings or casing can be made for cheap
- You will need a rear rack but I guess it is possible to mount in the middle of the bike or the front bar
So, I tested the valve for leaks for about a week and there was no leaks. I then ran the MB with the gas container tank for 20 miles yesterday. I wanted to run it more before posting but the temperature dropped here to 10F... I am using a 1 gallon tank but there are 2 and 5 gallon tanks and I carry oil in the right amount for the gas pump. I know there are some folks here that go on long endurance rides 100 miles+; I think this can really help. Here are some pictures.
Reasons
- I want long or extremely long range depending on the gas efficiency and throttle usage
- No need to constantly worry about the gas levels depending on the gas container size; also container is not 100% opaque so you can see gas levels without opening cap
- I want to pump gas directly from the gas station pump into the bike without fear of using the high pressure gas pumps in a small tank above a hot motor... ie fire fear
- Stock gas tank is too small for the gas pumps (you get a lot of splashing...)
- I am a 2-stroke guy and it sucks to have to get gas, mix oil, transfer some to the stock tank; this eliminates that (pressure from gas pump is good enough to mix the oil)
Build
- Materials: Walmart, Home Depot, Menards gas containers for $8+ (1+ gallon), solvent proof sealant ($1), super glue ($1) - I used the cheapest sealant but please use better gas specified proof sealant
1. Drill a hole slightly smaller than your gas intake valve into the bottom of the gas container (see pic)
2. Connect the plastic tube to the output valve; use more tubing if you are not certain (I didn't do this step and it is hard to secure the tube after)
3. Screw in the gas value along with the plastic washer flush to the gas container
4. Apply a gas and water resistant sealant on top of the gas valve and set dry for specified time
5. Apply a second layer and use hard setting super glue as much as possible on top of that
6. Test valve for several days for leaks (I tested for 1 week)
7. Securely affix the new tank to the rear rack of the bike (might have to elevate tank depending on your engine placement; I elevated it 4-5 inches with wood)
8. Implement an inward pressure valve at the top of the gas container (I did it at top of handle). The valve needs to only open inwards to relieve vacuum pressure. You can do this with a small hole and some plastic.
Limitations
- The connection to the valve is weak. In the stock tanks, it is in cased in metal. The way I place the valve on the rear rack limits the risk of anything hitting it. But, a more able person can build a casing around the valve
- Having this on your rear rack or anywhere is unsightly. I covered mine with a Toyota bag... I know it still looks like crap but I am sure more aesthetic coverings or casing can be made for cheap
- You will need a rear rack but I guess it is possible to mount in the middle of the bike or the front bar
So, I tested the valve for leaks for about a week and there was no leaks. I then ran the MB with the gas container tank for 20 miles yesterday. I wanted to run it more before posting but the temperature dropped here to 10F... I am using a 1 gallon tank but there are 2 and 5 gallon tanks and I carry oil in the right amount for the gas pump. I know there are some folks here that go on long endurance rides 100 miles+; I think this can really help. Here are some pictures.
Attachments
Last edited:
 Planning next build