
MikeJ
Member
Hi All -
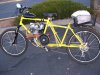
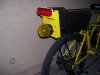
Thanks for your comments. Here are a couple of answers: The chain and the pivot... I suspect that if going over bumps during a hard pull, the chain will be pulled really tight when the wheel returns downward. To avoid snapping the chain or having the back wheel pulled out of place, I may have to place a spring loaded tension arm on the pulling side of the chain to lift it up and provide slack to the wheel after coming off the bump. I don't know yet what will work; probably a piece of steel with a little curvature in it to provide chain lift, yet allow the chain to slide sideways when changing gears. I may provide a surface of plastic like a half-moon-shaped cutting board for the chain to slide over during operation. Will it work? I have to try before judging. If this proves to be a real problem, I will simply remove the shock absorber and substitute the proper length of electrical conduit or steel water pipe; very easy to do.
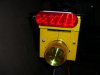
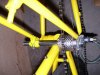
The pivoting shaft took quite a bit of work. In a quick summary: I cut away the bottom bracket housing of a third steel bike(from discard pile), split it, and added the halves to widen the bottom bracket housing of the second donor bike to just fit between the dropouts of the Mtn Tek bike. A 3/8 inch diameter bolt (8 inches long) from Ace Hardware and some thick wall spacers and washers (3/8 inch internal diameter, 5/8 inch outside diameter) act as a solid shaft for inexpensive 5/8 inch internal diameter bearings that just barely fit in the lengthened bracket housing when the nut on the end of the bolt is tightened down. (Use a Dremel grinding wheel to open the internal diameter of the three-piece housing; it does not take too much effort. I used MEK solvent and JB Weld on the bearing and housing surfaces to seal the bearings into place. Don't get sloppy with JB Weld!) The 3/8 inch diameter bolt just fits where the bicycle shaft fits. For max housing strength, I recommend hot welding the bracket housing assembly. The installed bearings can slide back and forth maybe half a millimeter on the compressed shaft while between the dropouts. This ensures the dropouts don't pinch the bearings when turning fairly hard on the nut of the axle. The additional housing width eliminates wobble when the wheel is rotating. The extending frame should pivot easily and not display signs of binding.
Long-winded explanation? Yes. Hard to envision? It sure is. But this assembly is not found at any bike shop, infomercial, or anyplace else. Each one will be as unique as they can be.
MikeJ
Thanks for your comments. Here are a couple of answers: The chain and the pivot... I suspect that if going over bumps during a hard pull, the chain will be pulled really tight when the wheel returns downward. To avoid snapping the chain or having the back wheel pulled out of place, I may have to place a spring loaded tension arm on the pulling side of the chain to lift it up and provide slack to the wheel after coming off the bump. I don't know yet what will work; probably a piece of steel with a little curvature in it to provide chain lift, yet allow the chain to slide sideways when changing gears. I may provide a surface of plastic like a half-moon-shaped cutting board for the chain to slide over during operation. Will it work? I have to try before judging. If this proves to be a real problem, I will simply remove the shock absorber and substitute the proper length of electrical conduit or steel water pipe; very easy to do.
The pivoting shaft took quite a bit of work. In a quick summary: I cut away the bottom bracket housing of a third steel bike(from discard pile), split it, and added the halves to widen the bottom bracket housing of the second donor bike to just fit between the dropouts of the Mtn Tek bike. A 3/8 inch diameter bolt (8 inches long) from Ace Hardware and some thick wall spacers and washers (3/8 inch internal diameter, 5/8 inch outside diameter) act as a solid shaft for inexpensive 5/8 inch internal diameter bearings that just barely fit in the lengthened bracket housing when the nut on the end of the bolt is tightened down. (Use a Dremel grinding wheel to open the internal diameter of the three-piece housing; it does not take too much effort. I used MEK solvent and JB Weld on the bearing and housing surfaces to seal the bearings into place. Don't get sloppy with JB Weld!) The 3/8 inch diameter bolt just fits where the bicycle shaft fits. For max housing strength, I recommend hot welding the bracket housing assembly. The installed bearings can slide back and forth maybe half a millimeter on the compressed shaft while between the dropouts. This ensures the dropouts don't pinch the bearings when turning fairly hard on the nut of the axle. The additional housing width eliminates wobble when the wheel is rotating. The extending frame should pivot easily and not display signs of binding.
Long-winded explanation? Yes. Hard to envision? It sure is. But this assembly is not found at any bike shop, infomercial, or anyplace else. Each one will be as unique as they can be.
MikeJ


 ).
).