New project idea

92ADCC1A-B599-414C-AD13-71896F4DC604.jpeg
6D78562A-C68B-48C7-B0DE-A8CF73F338CC.jpeg
30E513F9-00E3-4A4C-9BA4-571423267726.jpeg
6D78562A-C68B-48C7-B0DE-A8CF73F338CC.jpeg
30E513F9-00E3-4A4C-9BA4-571423267726.jpeg
It has been quite cold so I haven’t been riding my latest full suspension rig a whole lot, but I am very satisfied with it and I am continuing improvements and refinement.

I have a simple but excellent 12V lighting system, with bright lights front and rear. Yesterday I completed my brake light, rigging a bright red led to a simple 12V battery pack (4 AA batteries) to a simple switch attached to my rear brake lever. I soldered a metal spring and attached it to the throttle body with a small zip tie. I soldered a small metal washer and attached it to the brake handle. Another zip tie leads the washer to the spring when I squeeze. Simple and effective.

My financial situation is expected to be much better next year and my thinking is to buy a small motorcycle. But I have one more motorized bicycle idea:

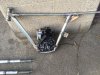
I have a 140cc 4 stroke, taken from a lawnmower. I intend to convert it for horizontal use, welding on a oil slapped and closing and opening some holes. Should be very reliable. Would have to grind the drive shaft down from 7/8” to 3/4” for a chain driving centrifugal clutch.

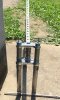
I just snagged a motorcycle triple tree stem for a few bucks! I have a couple of nice springs that will fit the big tubes needed for the project so I am foreseeing a kind of plunger tube within a tube. I can make that work by chopping a headtube off a derelict steel bike and welding it to a cafe racer frame of my own design.

Researching pieces, I see that motorcycle fork tubes are very expensive.

I’m thinking that I can rig all this up, add all lights and mirrors and get a motorcycle tag. Has anyone done this?
 
I had a really good day today. I think my internal springer fork is going to work. I have welded up a cap for each fork and I need to find a strong 1” compression spring for counterpressure. This is a rough fitting and test before I weld it up.
 

Attachments

  • 57AEC0B3-767A-4188-B5A2-D2F9CE63E85C.jpeg
    57AEC0B3-767A-4188-B5A2-D2F9CE63E85C.jpeg
    291 KB · Views: 238
  • 4B30D8EE-6182-4CE1-B777-DB6DFF679E85.jpeg
    4B30D8EE-6182-4CE1-B777-DB6DFF679E85.jpeg
    189.4 KB · Views: 223
  • AB540666-5911-4D1A-BA82-02779C7085FB.jpeg
    AB540666-5911-4D1A-BA82-02779C7085FB.jpeg
    280 KB · Views: 236
I had a really good day today. I think my internal springer fork is going to work. I have welded up a cap for each fork and I need to find a strong 1” compression spring for counterpressure. This is a rough fitting and test before I weld it up.
Looking great so far, but I have a feeling that it will flex unless the dropouts are very thick and stiff because an upside down fork lacks the arch brace connecting the lower legs. I have never seen any upside down fork that didn't have a bolt through axle.
Reminds me of the Brooklyn Machine Works full suspension BMX bike from the late 1990's that had an undamped upside down fork they made themselves for lack of a better option, although that was a single crown fork.
bmx.jpg
 
That’s a very cool bike! Yes, very much like my design. I need to find a 1 7/8” rubber dust boot before I can finish this.

Maybe I wasn’t clear or maybe the pics don’t show well. I am using those Unistrut angles with 1/2” holes welded to the thick tubing. Those things are unimpeachable - I can’t imagine how much force it would take to bend one even a millimeter.

Even with that, I am going to weld a thick 1/2” steel washer to the inside just to make sure there’s no play in the solid axle. I’ll use collars to lock them down on the outside of the forks.

If I have done this right, the fork will be pretty stiff. I have two offsetting springs that should hold it pretty steady.

Thanks for your input!
 
You could try to find an old dirtbike or motorcycle seat for it. Definitely a different look almost like an apocalypse bike or something. Reminds me of daryl dixon's bike even though I don't watch the walking dead anymore. I would have got an old motorcycle frame from a junkyard instead of starting from scratch but I hope it works out. You might have to do some reinforcing on that top piece of steel since its kind of holey. Would look much better with welds cleaned up and painted.
 
I am going to try to plate this. KY has a pretty open process for registering a custom, personal use motorcycle. With a 140cc motor, this will be a motorcycle. One of the catches is that everything must be new - no salvaged motorcycle parts. I’ll just have to order a seat and keep the receipts. I think I can plate it if it is non transferrable and can pass a safety inspection.

Thanks for the comments. This very rough! I haven’t even put the floppy sander to it yet. I’d like to get this front end done and do some testing so that it is good and safe. Man, I have worked so hard on this so far - this week alone I have put in at least 40 hours.
This is not a fast track project. I’ll get my transmission this week (TAV2 torque converter) and then I’ll have to make motormounts and figure out where to set the swingarm.

Seat, tank, headlight, turn signals, 12v battery, monoshock, chain, hub adapter, throttle body, etc etc etc. LOTS of things to get.
 
I show two pics of my progress: 1: the internals of my internal springer forks and 2) a rough fitting of my 140cc engine onto my very rough frame.

I am running into a design issue. I like how I’ve oriented the position of the motor but my loop design and the size of my newly arrived transmission makes it very difficult to attach the motor to the tranny. I am going to be very creative with my motor and tranny mounts - I may need to weld some tabs direct to the motor!

I have a great idea for my handlebars: raised clip-ons attached below the triple tree!
 

Attachments

  • 029205BC-79F2-4D53-BE87-3A49F4E0D021.jpeg
    029205BC-79F2-4D53-BE87-3A49F4E0D021.jpeg
    483.1 KB · Views: 246
  • 266A55B6-FE4A-409A-AD99-C30469D34E70.jpeg
    266A55B6-FE4A-409A-AD99-C30469D34E70.jpeg
    343.8 KB · Views: 252
Another good day today! I made a major goal of completing the motor and transmission mounts. I built a steel frame that allows the engine to be directly connected with the three natural threaded holes that held it into the lawnmower base.

I had no place at all to bolt the torque converter to the engine. In fact the engine had different surface levels so I welded tabs that had to be perfectly level to allow bolting through the holes. I have five good places to bolt up, so I feel very good about that.

One of the cool things here is that, while the engine and tranny are sandwiched against one another, they are not directly connected. I can bolt up the torque converter first then pull the engine in behind it.

All this is very rough mock up. I may add a stabilizing piece just to ensure zero movement or vibration.

Chainline is 2 1/2” to the left of centerline so I’ll fabricated a rear hub body of a bit less than 5”.

This coming week, I’ll finalize my rear swingarm piece.
10C5045D-7A3B-4CCC-804B-4436EEAF123B.jpeg
CC6F01FB-B7F2-494A-BA2D-C2A332115034.jpeg
 
As of today:

Front end is complete save dust covers for the front shocks (ordered and in the way).

Swingarm is finished (see the pic). I noticed a touch of warming as I welded it up. The 5/8” bushing that will link the swingarm to the frame was tweaked just a smidge so all is square. The result is that the right side dives a touch. No big deal should work fine. Super strong!

I cleaned out the crankcase, made new gasket and locked her up, adding oil and prepping to fire her up. Rigged a gas tank to the top frame and made several attempts to pull start. No go. Nothing. Carb should be fine. Have great spark. I think in my haste I failed to put the lifter cam in properly so... I’ll have to rain the oil, open the case back up and make sure I get that right. I have the crankcase breather tube unattached to anything but I don’t see that as a problem for starting.

Today I am hoping to complete welding of my front wheel hub. I have some disk brake adapters that screw into a freewheel thread so I am going to chop some freewheel threads off of old hubs and weld them to the hub for a super easy disk brake addition. I’ll do the same with the rear hub.
 

Attachments

  • D4ECC020-7808-4365-8FC9-AAA97DCA3DBD.jpeg
    D4ECC020-7808-4365-8FC9-AAA97DCA3DBD.jpeg
    425.7 KB · Views: 229
I thought I would be able to lock the engine onto the frame and fire her up this weekend, but I had some major problems.

I had a major overnight oil leak, so I drained the rest of the oil and broke the whole thing apart. One of the valve lifters was missing. I guess it had fallen out earlier and I put it on my bench.

Another big problem was the valve cam marker. It’s not well marked but I think I have the proper cam markers lined up.

I did complete the welding of my front wheel hub. I am going to weld some freewheel threads to that hub and use some screw on disk brake adapters that I got for just a few bucks.
 
I received my cafe racer seat in the mail today, so I am making adapters to fit it onto my frame.

I’ve welded up my two hubs and, after some polishing, I’ll be ready to build my wheels. The front hub is completely finished. I welded a freewheel thread onto a fat washer onto the flange. The brake disk adapter simply screws right into the freewheel thread. Perfect for the front end. I protected the threads while welding by covering them with aluminum foil. Worked pretty well.

For the rear hub, I will have to very patiently weld the freewheel thread on with one of the bearings inside the hub. I’ll put 2 bearings on the motor driven side, so I need to buy 5 sealed bearings in all. Spoke lengths are 236mm on the front, 238mm on the back. Using 24” wheels for this build.

Here are pics of my hub design:
 

Attachments

  • A21CC830-946F-4704-A5FD-75D6FA70B275.jpeg
    A21CC830-946F-4704-A5FD-75D6FA70B275.jpeg
    99.6 KB · Views: 204
  • 0A240C13-45CD-4D20-AC07-8E0417CBF0E8.jpeg
    0A240C13-45CD-4D20-AC07-8E0417CBF0E8.jpeg
    170.4 KB · Views: 201
Back
Top