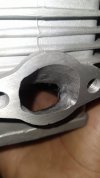
Got my phantom this morning and got to play around with it a bit. First impression seemed good. Ports were a bit rough around the edges but nothing crazy. One of the first things I noticed is the weird shape of the intake port... it didn't match the gasket at all, which also didn't match the reed assembly. Got everything matched up, and all seemed well. Skip ahead to when I have the jug and piston on, and I notice that the window on the piston didn't line up exactly with the intake port. I didn't measure anything or take a close look to see if I could tell the the intake port is really off center or not, but I'll check it tomorrow. The exhaust port, gasket, and exhaust matched perfect. One thing that caught my eye is how low of a duration the exhaust port seems to be, compared to how I port my 66cc cylinders, I did raise it slightly.
Anyway, after some smoothing of the casting flaws, I put the jug on. Only, it wouldn't go all the way down. I tried pressing it on there but no go, didn't want to budge. So, I took the head nuts and tightened it down, forcing the cylinder down into place. After that I measured my squish with the meteor ms460 and was surprised that it was probably over 2mm. I couldn't get an exact reading because the solder I have is 1mm thick.
So, I decided to take the jug off and check with no base gaskets... only the jug was stuck on there. I had to take a hammer and hit the studs for the cylinder to come off. That was a bigger issue than I realized. I drilled out the stud holes in the cylinder a bit to try to get more clearance and it helped. After some more fiddling, I realized that I could put the cylinder all the way down, and the bottom of the cylinder will touch the base gasket toward the intake side, but there's a huge gap on the exhaust side. I'm really not sure what's causing this. It could be that the stud holes aren't drilled straight, idk.
After that I wanted to split the cases to surface the case part to make sure it's flat, but I couldn't get the nut off that holds the clutch basket on, and I don't have an impact gun. I'm going to put it together as it is, because I can get it to mate together after the nuts are torqued down I think. I also don't know why my squish is huge, but I'm not going to mess with it any more. I put the studs back in with loctite and I'm gonna send it.
Aside from that, a washer seems to be missing for one of the bolts that hold the reeds on, and I didn't get an o ring with the carb (or maybe I did, and just haven't found it yet). The gas tank is really nice. Paint is excellent, no rust or crap inside of it.