Rhodes 4 wheeler, w/ Staton chain drive

Prob #1- the stalling is apparently a super-sensitive oil sensor, I'm supposed to:

a) find the instruction book
b) read the instruction book
c) circle the solution if the customer wants to snip the wire.

Prob #2 - finding a longer throttle cable locally.

a) called Gary's Small Engines, machine tells me he is mostly out of town in the winter.
b) phoned Greencraft engine repair, they tell me to call Gary
c) phoned Bennett small engine, they tell me to call Gary

Luckily, Rucio the recumbent, has a 120" cable with barrel end, tooooo long (it goes under the pedals). So I'll simply switch them.

Prob #3 - Friday was "go to town day", didn't get home till dark. Dave Staton had sent me 5 e-mail responses, (followed up by him calling me Saturday morning.)

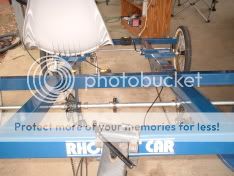
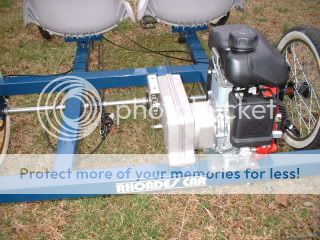
He told me NOT to drive the 4 wheeler until I brace that housing...that the base of the engine was not that thick, and if there was a sudden jolt, perhaps that base could crack.

His e-mail

Paul, You should NOT use the engine only to attach the kit.

The engine base will break in time and it could break very soon, the next time you drive it. I would NOT drive it again.

We made a mounting plate for the GX100 that had slots for the engine base and most important we made a slotted bracket to support the gear box to support the load on the output sprocket and not transfer the load only to the base of the engine.

The way you mounted it all the pressure is on the engine base and they will break and damage the engine. You also do not have any chain adjustment.

You need to use the two fulcrums on the gear box to handle the load - pressure on the chain.

David

I had already planned to brace it, before going to town I had measured the gap and looked for 3/4" square tubing to install under the chain gear.... & Dave told me over the phone not to leave any clearance under it.

Then Jack said he was going to bring a special kind of bit to elongate our mounting holes, supposed to do a better job than my drimel.

So, we will have chain adjustment ability.

Oh, and that ball at the end of the throttle cable? Another case of "instructionbookitus" according to another Staton email.....

Now cut off the "Ball end" off the inner cable. Place the outer cable to the engine using the conduit clip, bolt & nylock. Then run the cable thru the cable swivel. Leave about 2" extra of inner cable past the cable swivel then crimp the Alloy cable tip to keep the cable from coming undone or poking you.

How to shorten the 90" long cable. Cut the "ball end " off the end of the cable. Remove the "inner" cable from the outer casing. Measure the correct length of outer casing you need. Be sure and have large round bends, never sharps turns or sharp bends or the cable will bind. Cut the outer casing to the correct length, then install the inner cable from the end you cut. Place the "Barrel" of the inner cable is placed in the small black throttle lever or twist grip. With the inner cable sticking out of the outer casing, attach the outer casing to the engine using the conduit clip, bolt & nylock. Then run the cable thru the cable swivel. Leave about 2" extra of inner cable past the cable swivel & crimp the Alloy cable tip to keep the cable from coming undone or poking you.
 
Last edited by a moderator:
Monday, (yesterday) Jack brought back his super-set of bits, punches and files. Using the round file, we gave the 3 brace holes a little elongation (to add chain adjusting), then went to town looking for angle iron.

The 3 attachments show the 1 -1/2" x 1 - 1/2", cut to 23 inches, a small bit ground out to fit around the back part of the housing.

Once we had the hole drilled in the angle iron, bolt inserted to hold up the front/chain gear end, the bar was secured to the frame, front then back.

Painted, then dried with the hair blower, it looked like this:

2010_0202Image0007.jpg


Baby goats are hitting the ground (10 yesterday), so test driving time was limited, we both made a couple of half mile runs....everything seems to be smooth, with about the same amount of "play" in the chain as Jack's big Kawasaki.

to be continued.......with the chain guard finally installed.
 

Attachments

  • 2010_0202Image0004.JPG
    2010_0202Image0004.JPG
    69.3 KB · Views: 839
  • 2010_0202Image0005.JPG
    2010_0202Image0005.JPG
    104 KB · Views: 846
  • 2010_0202Image0006.JPG
    2010_0202Image0006.JPG
    123.6 KB · Views: 924
The weather and flood of baby goats has delayed uploading my final pictures, but it looks like a sunny day ahead.

Please send me some more pictures of the Rhoades Car after you have added the extra support.

Please set the camera on a lower setting so I can up load the pictures to the web site.

Thanks
David

We added the support bar last Monday, and I got in another 15 miles of test riding, with no problems.

2010_0202Image0007.jpg


Install tips & tricks (some of which can be applied to tricycle axles as well.)

The existing Rhoades axle is two sprockets, 7 collars, 4 bearings and various washers, and we are adding 1 more sprocket and 2 identical-type collars.

rhoadescar2007.jpg


1. Mark the position of the existing sprockets with a sharpie pen on the axle, so when you re-install them, they will line up in the right place the first time. (you aren't taking that axle all the way out, only about 2/3, enough to get the sprockets/collars in order.....)

2. Undo the two chains from the front sprocket, then zip tie them onto the rear frame. That way, when you re-install the axle, there will be NO chance of missing that "axle goes inside of chains". It would be maddening to have to redo that step.
rhoadescar2006.jpg


3. Staton warns you on the invoice that the Dicta sprocket is a VERY tight fit. Take some electric tape and identify the "RIGHT-DRIVE side" from the "free wheeling left side", so there is no mistake, which way is which.

4. To help you drive the VERY tight Dicta sprocket onto the axle, take the saddle off a bike seat post, it is a perfect fit to tap the sprocket onward.
rhoadescar2009.jpg


5. That sprocket and the two collars on either side stay loose, you aren't going to insert the keyway or tighten the set screws until the end of the install, right before you put on the master link onto the drive chain.

6. We used the flat plate provided by Staton to be our bottom mount. We drilled 3 holes all the way through the frame, to hold plate to bike. We drilled 3 more "countersink" holes in the frame, to fit the Allen's bolt heads, that hold plate to engine. We also Loktite Blued the Allen bolt threads.

rhoadescar2028.jpg


7. To give us that "chain adjustment" David spoke of, we elongated the 3 frame/plate mounting holes (only on the top) with a round file. It didn't take much rasping to get another 1/8" of play.

8. When you get the engine semi-tightened to the frame, and have cut the chain to size, use a wooden yard stick placed next to the drive gear, which gives you a straight measure, to center the VERY tight Dicta sprocket. There might be other ways to get the Staton chain straight, but a yard stick works out really well and is near-enough to precise.

9. The new stablizing bar is 1-1/2" angle, (painted blue), with only one hole in the front, which is the hole that matters. This 23" inch piece also required drilling 2 more bolt holes all the way through the frame, front and back.

I may think of an overlooked tip when I complete this post, but sunrise approaches, and sounds like more baby goats are on the barn floor.
 
Copied to the "4 wheelers for sale thread", looks to be a bargain....

Well, the customer came and loaded it up yesterday, the carport is clear for the next build (thankfully its a simple GEBE/Avalon installation).

I'll kind of wrap it up with pix, if you have specific questions, I may have taken a helpful photo.

Finished, ready for accessorizing:

2010_0209rhdcar0007.jpg


From the back:

2010_0209rhdcar0008.jpg


That front bolt on the attached angle bar:

2010_0209rhdcar0002.jpg


Those 6 holes, the larger ones are the countersinks for the Allen's head bolts:

2010_0202Image0006.jpg


Notice I had to grind out a tad, to fit under the housing toward the back (the nail points to where that stablizing front bolt will go):

2010_0202Image0004.jpg


Eyeball guesstimation was 125 mpg, and confirmed speed with the slowest 22 tooth sprocket was 15 mph on the flatland parts, 22 mph coasting downhills with the throttle off (and sometimes with the brake on !!). Faster than that is not advisable on our sorry*** country roads.

The customer is going to add a handle set up and footstraps for the passenger side, and he already has better seats salvaged from a fishing boat.

So, it can be done, and if you look for the Craigslist bargains, can be done a lot cheaper than this full priced example.
 
p.s. an amateur oil observation.

Like always, I change that oil before the customer picks it up, and advise him to do at least 3 "early going" oil changes within the first twenty tankfuls or so, which exceeds what the manual tells you.

2010_0209rhdcar0009.jpg


But I've got to say, that oil was sure thin and yellowish yesterday, moreso than on a Robin.

If I owned one, I probably would change it 5 times- 10w30 SF or better- in those early days.

(I'm gonna find a Honda 50cc thread to copy this part to.)
 
This is really interesting. I like the idea of a 4 wheel bike/car with a mb engine.

I am not sure, but I think TX only allows 3 wheels. Could someone make a tadpole trike for 2 people? Maybe if it had "jet fighter" seating it would work.


Can't you make any cable length you want, by using cable cutters and one of those brass cable ends made for clutch cables on Happytimes? Cut the length you want plus some extra, solder the end for safety, after installing the brass plug and screwing it down to make your length. You can modify V brake levers to use them by drilling a small hole for the cable to go through, or bending the cable a little and just pulling the brass plug into the cable end hold.
 
Back
Top