C
Cookie
Guest
It took me a while to find the but here it is from the motokruser site.....
Fri Apr 21, 2006 12:57 am
MK Member
Joined: 20 Dec 2005
Posts: 76
Location: SW Michigan
I know this isn't the most highly engineered chain roller guide but it works and it cost less than $10 to make. I would have liked to see how some of the ones on other bikes were made but I couldn't see them real well in the pictures I saw. Anyways here's what I did. This was meant to be a prototype but other than a little cleaning up and some paint I probably won't change it much since it works so well.
I started with a 1 1/8" el cheapo hardware store u-bolt, a roller blade wheel and bearings, a piece of 3/8 fuel line tubing, some nylon tubing, and part of a vibration damping clamp from McMaster Carr.
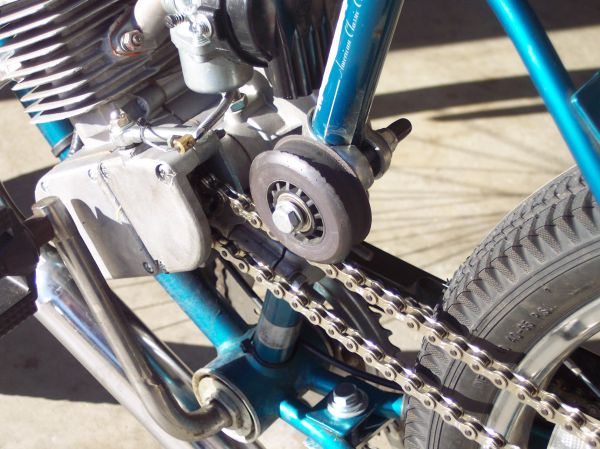
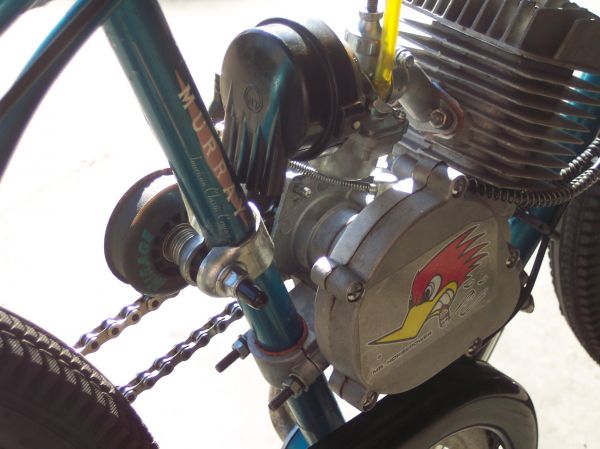
Here's a couple pictures of the finished roller
Here's some pictures of the various parts
I put a bolt thru the skateboard wheel and chucked it up in a drill press then cut the groove with some sharp tools. Q suggested that. I used a long u-bolt and cut the legs to the lengths I needed. I bought the set of wheels and bearings on ebay for next to nothing....$8 I think. ABEC 5 is a rating for bearings and it's pretty good. The I.D. of the bearings is 8mm which is less than 5 thousands of an inch bigger than 5/16". Since the u-bolt was 1/4", I put some 1/4" I.D. x 1/32 wall nylon tubing over the u-bolt. I only needed a piece long enough to support the inner races of the bearings when they were pressed into the wheel. The little piece of 3/8" steel gas line slipped over the nylon tubing and acts as a spacer between the two inner races of the bearings. You need to have that so that when you tighten the nut to hold the roller on you are only putting pressure on the steel spacer between the two inner bearing races. If you didn't do that the inner races would want to pull right out of the bearings when you tightened the nut. I also double nutted it so I didn't have to over tighten it. The green thing is half of a vibration dampner clamp that I had. It was a little small so I had to whittle on it a little with a die grinder. Here's a picture of the type of clamp that I used part of. It was $2.
If anyone makes one, you should not mount it so that it puts pressure on the chain. It should just guide it when it's tight. Being on the top (the drive side), the chain pulls tight when its working and you don't want to put too much load on the bearings.
Between taking care to align the sprockets and putting this roller on, the chain just rolls along real smooth now.
I'm going to use another wheel and bearings to make a tensioner roller and replace that cheap chinese one that came with the kit.
http://motokruisers.com/forum/viewtopic.php?t=473 <<<HAS PICS cOOKIE
Fri Apr 21, 2006 12:57 am
MK Member
Joined: 20 Dec 2005
Posts: 76
Location: SW Michigan
I know this isn't the most highly engineered chain roller guide but it works and it cost less than $10 to make. I would have liked to see how some of the ones on other bikes were made but I couldn't see them real well in the pictures I saw. Anyways here's what I did. This was meant to be a prototype but other than a little cleaning up and some paint I probably won't change it much since it works so well.
I started with a 1 1/8" el cheapo hardware store u-bolt, a roller blade wheel and bearings, a piece of 3/8 fuel line tubing, some nylon tubing, and part of a vibration damping clamp from McMaster Carr.
Here's a couple pictures of the finished roller
Here's some pictures of the various parts
I put a bolt thru the skateboard wheel and chucked it up in a drill press then cut the groove with some sharp tools. Q suggested that. I used a long u-bolt and cut the legs to the lengths I needed. I bought the set of wheels and bearings on ebay for next to nothing....$8 I think. ABEC 5 is a rating for bearings and it's pretty good. The I.D. of the bearings is 8mm which is less than 5 thousands of an inch bigger than 5/16". Since the u-bolt was 1/4", I put some 1/4" I.D. x 1/32 wall nylon tubing over the u-bolt. I only needed a piece long enough to support the inner races of the bearings when they were pressed into the wheel. The little piece of 3/8" steel gas line slipped over the nylon tubing and acts as a spacer between the two inner races of the bearings. You need to have that so that when you tighten the nut to hold the roller on you are only putting pressure on the steel spacer between the two inner bearing races. If you didn't do that the inner races would want to pull right out of the bearings when you tightened the nut. I also double nutted it so I didn't have to over tighten it. The green thing is half of a vibration dampner clamp that I had. It was a little small so I had to whittle on it a little with a die grinder. Here's a picture of the type of clamp that I used part of. It was $2.
If anyone makes one, you should not mount it so that it puts pressure on the chain. It should just guide it when it's tight. Being on the top (the drive side), the chain pulls tight when its working and you don't want to put too much load on the bearings.
Between taking care to align the sprockets and putting this roller on, the chain just rolls along real smooth now.
I'm going to use another wheel and bearings to make a tensioner roller and replace that cheap chinese one that came with the kit.
http://motokruisers.com/forum/viewtopic.php?t=473 <<<HAS PICS cOOKIE