
bamabikeguy
Active Member
Yesterday morning I got the yellow Ladies Retro-7 ordered last week on the road, was pleasantly surprised it wasn't "banana" yellow, I'm callling it Vanderbilt Gold since football season is starting.
I've built so many of this model that it has become pretty easy to get them right the first time, and I prefer to assemble using a new bike as opposed to retro-fitting a barn bike.
People bring up two wheeled contraptions, and I try to convince them to start fresh.
Picture 1 illustrates how when I order the bike, my 12 gauge rear wheel, punctureproof tubes/tire liners front and back have already been done by the bike shop, saves A LOT of hassle.
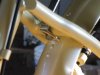
Pic 2 shows that frame-mounting is possible, theres enough room, I just want to see how I can use the existing two holes on each side, a future project.
Pic 3 is a bunch of things at one time.
In order:
1. I put the angle on the end of the strap, check the other four holes with the engine mount, re-bore if necessary, so I can adjust the engine tilt with no hassles later. This comes into play when switching from 10" gel saddle to 12" gel saddle, which most customers do.
2. Loosen the backbrake completely, since the bikeshop had it pretty well adjusted beforehand, I'll re-attach that cable right before I crank the engine.
3. Flip the half fender around. Later, after the bike is up and running, I might have to put a very small crimp in the bottom, where the chain in first gear position might touch the newly positioned fender.
4. Put the angle/strap and fender together.
Pic 4 is a closeup of the angle/fender. If I put the angle on the inside, I have better clearance of the tire. If I put the angle on the outside, I would have to crimp a bit on the fender hanger to get it to slide upward.
Angle INSIDE works best....
Pic 5 is my "two peices of tape" method of finding the best fit for notches/spokes. You see there are two positions that seem to have no spokes a tad out of alignment, (when you spin the spokering around, always one or two seem mis-aligned.) therefore zero chance of bending one that is a fraction out of line.
NOTE- this old dog learned a new trick from Myron in the 50th state, BLACK ZIP TIES !! Soap them up, do the 12/6/3/9 o'clock gapping procedure, whoola.
Pic 6 the bike (with an old engine mounted) is ready to accessorize with mirror and basket. Grind the ends off a hose clamp to hold the throttle, (I wrap a few layers of black electric tape on the foam first).
I put the kill switch on before the basket, and I take that front reflector off, attach to the front of the basket later.
I'm ordering that "geezer bike" in the last picture 7, pick it up next Tuesday. It has no fenders, will put that install in this thread also, since it might be my answer for a "step thru" frame for senior citizens.
I'm not sure of the model name, think it comes in gray and red, but the handlebars are curved like I prefer, it has 7 speeds, and I think costs $25 more than the Retro 7, which I get for around $250.
I've built so many of this model that it has become pretty easy to get them right the first time, and I prefer to assemble using a new bike as opposed to retro-fitting a barn bike.
People bring up two wheeled contraptions, and I try to convince them to start fresh.
Picture 1 illustrates how when I order the bike, my 12 gauge rear wheel, punctureproof tubes/tire liners front and back have already been done by the bike shop, saves A LOT of hassle.
Pic 2 shows that frame-mounting is possible, theres enough room, I just want to see how I can use the existing two holes on each side, a future project.
Pic 3 is a bunch of things at one time.
In order:
1. I put the angle on the end of the strap, check the other four holes with the engine mount, re-bore if necessary, so I can adjust the engine tilt with no hassles later. This comes into play when switching from 10" gel saddle to 12" gel saddle, which most customers do.
2. Loosen the backbrake completely, since the bikeshop had it pretty well adjusted beforehand, I'll re-attach that cable right before I crank the engine.
3. Flip the half fender around. Later, after the bike is up and running, I might have to put a very small crimp in the bottom, where the chain in first gear position might touch the newly positioned fender.
4. Put the angle/strap and fender together.
Pic 4 is a closeup of the angle/fender. If I put the angle on the inside, I have better clearance of the tire. If I put the angle on the outside, I would have to crimp a bit on the fender hanger to get it to slide upward.
Angle INSIDE works best....
Pic 5 is my "two peices of tape" method of finding the best fit for notches/spokes. You see there are two positions that seem to have no spokes a tad out of alignment, (when you spin the spokering around, always one or two seem mis-aligned.) therefore zero chance of bending one that is a fraction out of line.
NOTE- this old dog learned a new trick from Myron in the 50th state, BLACK ZIP TIES !! Soap them up, do the 12/6/3/9 o'clock gapping procedure, whoola.
Pic 6 the bike (with an old engine mounted) is ready to accessorize with mirror and basket. Grind the ends off a hose clamp to hold the throttle, (I wrap a few layers of black electric tape on the foam first).
I put the kill switch on before the basket, and I take that front reflector off, attach to the front of the basket later.
I'm ordering that "geezer bike" in the last picture 7, pick it up next Tuesday. It has no fenders, will put that install in this thread also, since it might be my answer for a "step thru" frame for senior citizens.
I'm not sure of the model name, think it comes in gray and red, but the handlebars are curved like I prefer, it has 7 speeds, and I think costs $25 more than the Retro 7, which I get for around $250.
Attachments
-
 2007_0822yellowbike0001.JPG76.7 KB · Views: 352
 -
 2007_0822yellowbike0002.JPG66.3 KB · Views: 340
 -
 2007_0822yellowbike0003.JPG71.1 KB · Views: 327
 -
 2007_0822yellowbike0007.JPG47.5 KB · Views: 307
 -
 2007_0822yellowbike0008.JPG89.2 KB · Views: 319
 -
 2007_0822yellowbike0010.JPG104.3 KB · Views: 347
 -
 2007_0818jaybday0001.JPG92.8 KB · Views: 338
Last edited:
 awesome, professional job, bama.