Vintage look headlight, turn signals, tail, brake

Getting there...

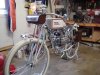
I have the whole thing wired up and have one task to complete.

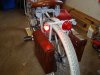
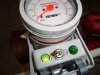
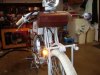
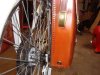
I now have front amber and rear red turn signals. They are very bright and easily, easily visible fron well over 50 feet away. In fact, they grab your attention...which is the point. Since self-canceling turn signals are a little much for me, I have indicator lamps on the turn signal switch housing.

I also have a working brake/tail lamp. When I turn the headlight on, the tail light comes on as well. The brake light works off of the brake handle (there is another post that describes how that works.

All of the lights are LED except the headlight, but maybe in the future. For now, I am using a 12v, 5 watt headlamp, but I do not ride at night. When it came down to it, I could not bring myself to ditch my speedometer housing/headlight.

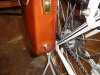
The last thing to do is to mount they leather cases, one of which is the battery box. Other than that, everything is done, wired up and wired stowed as much out of sight as possible. I will have pics when the cases are in place (this week?...but no bold predictions).
 
OK- the system is done, installed and working.

I got everything mounted Saturday afternoon after the yard work...then I spent Saturday evening and part of Sundat afternoon chasing a dead short whenever I turned the headlight on. This was made a bit more complex by the fact that I wired it so that when the headlight is turned on, it turns on the tail light as well.

Now I have front and rear LED turn signals, a brake light, a tail light and a headlight- all powered by a 7ah sealed lead acid battery.

A couple of added features. I added a switch to turn thr electrical system off. I also can charge the battery without taking the battery out (always best to open the case). I got a battery charger jack fron Radio shack and mounted it on the battery case so all I have to do is plug the charger into the jack on the case to charge. I can do that with the cutof switch off.

I also mounted the case on the other side to match.

I also found a neat brown roll bagg that I am mounting under the headlight. The whole thing looks even more vintage than ever.

Pics to follow soon.

One last thing before some extensive riding- a spring loaded chain tensioner. I will retain the standard tensioner for guiding the chain, but it will not be doing the tension duties.
 
Pics of the finished product

First, the turn signals...do you know how hard it is to get a pics of a flashing light when it it on? Took 7 tries on the back.

The first is the back of the bike, left turn signal. This pic also shows the tail light and my cases. The right case holds the battery and some of the lighting connections. All the wires in the case have plugs so if I need to remove the wiring harness or case, I can unplug the wiring.

The second pic is the turn signal switch and indicator.

The third pic is the front (amber) turn signal. It also shows my new tool bag, replacing the roll that used to be under the seat.
 

Attachments

  • DSC00511_1.JPG
    DSC00511_1.JPG
    236.6 KB · Views: 480
  • DSC00512_1.JPG
    DSC00512_1.JPG
    176.7 KB · Views: 424
  • DSC00514_1.JPG
    DSC00514_1.JPG
    228.7 KB · Views: 499
Thie first pic shows the back of the battery case. At the bottom is a jack where I can plug in the charger without removing the battery.

The second pic shows the front of the battery case. At the bottom there is a cutoff switch which shuts down the electrical system. I can still charge the battery with the switch off. There is also a fuse (currently 5A) in the case.

The third pic shows an overall view with the headlight on...but I will have to take some better composed pics after i clean the bike up.
 

Attachments

  • DSC00519_1.JPG
    DSC00519_1.JPG
    253.5 KB · Views: 414
  • DSC00520_1.JPG
    DSC00520_1.JPG
    241.3 KB · Views: 392
  • DSC00518_1.JPG
    DSC00518_1.JPG
    262.8 KB · Views: 428
First, the turn signals...do you know how hard it is to get a pics of a flashing light when it it on? Took 7 tries on the back.

The first is the back of the bike, left turn signal. This pic also shows the tail light and my cases. The right case holds the battery and some of the lighting connections. All the wires in the case have plugs so if I need to remove the wiring harness or case, I can unplug the wiring.

The second pic is the turn signal switch and indicator.

The third pic is the front (amber) turn signal. It also shows my new tool bag, replacing the roll that used to be under the seat.

Where did you find the case for your turn signal switch?
Elmo
 
Back
Top