Western Flyer?

G

Guest

Guest
What can you tell me about one?
Found one up the road for 35 dollars, not sure if the engine will fit it.
Looks to be from the 60's....
 
Thirty Five dollars is exactly what I paid for an early 1970's model, that didn't have a speck of rust. The frame seems as durable.

21_bikes_3433_1.jpg


It had the original leather seat. I replaced the tires and tubes, and if spoke patterns are important, (like for the GEBE spoke ring), there is a different pattern on those pre '70s bikes.

21_bikes_3399_1.jpg


All around comfortable ride, with out a lot of squeaks or creaks.
 
bamabikeguy said:
...if spoke patterns are important, (like for the GEBE spoke ring), there is a different pattern on those pre '70s bikes.

I don't understand... Every antique, classic, and vintage American bike I've messed about with has been a standard 3 cross pattern. My modern bike junk has also been standard 3 cross lacing. Could you elaborate on this for me?
Also, 35 is a good deal in the current market for a vintage middleweight Western Flyer...
I got my current one Western Flyer middleweight, late fifties/early sixties) for 25 and it was pretty rough around the edges to start with...
I'd go for it . :devilish:
 
As a really neo-phyte to bikes, I can only relay what someone more knowledgeable than I "told me".

When I first laid the GEBE spokering on the WesternFlyer spokes (this is BEFORE I started switching all rear wheels to 12 gauge) , three spokes missed the notches by up to 1/8" to 1/4" an inch, which would require "severe bend-age" to snap in.

I called Dennis, and he was the one who told me in the 1970's there was a "standardization done" on that basic spoke pattern, and if I swapped out rears it was irrelevant, but if I tried it on old classic wheels, I would have to do some hacksawing and super-gluing to make it reliable.

So, it isn't the pattern, but the measurements of the spoke holes that changed a few fractions.....
 
I got it today.
Funky handlebars.
I like the way they feel when adjusted so the ends point down and the goosneck is raised up a bit.
I does have the original leather seat too-nice! :D
The guy who had it put new gnarly mountainbike style tires on it.
 
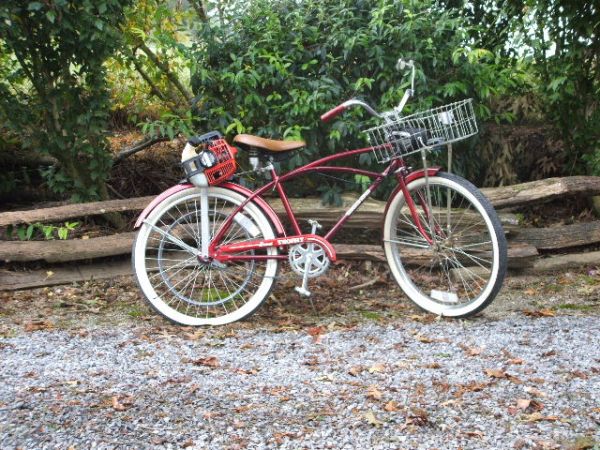
After a looong day of mowing and building on the "apartment", I sat down with the Western Auto Stores Western Flyer Grand Trophy and started putting it together.

First order of business was to throw away the "manual" that came with the kit, then second was to whip out the Dremel w/fiber cutting disk and mutilate that vintage fender so the chain would clear, did a nice job if I do say so myself.

Got the engine mounted and wired up, throttle mounted to the bars (after much gnashing of the teeth and using a half round file to ream out the plastic throttle part so it would fit over the bar end).

Removed, "SealAll-ed" and re-installed the intake to jug gasket/manifold and tightened it down. I didn't have to "mate the surfaces" they were pretty smooth.

Realized the kill switch wasn't hooked up, so I undid all my fancy tape job and stuck it in the blue wire connection and re-taped it all back up. I mounted it on the gooseneck, not the bars, just to be different. Left a loop of wire so when the bars turn there is no pulling or binding, may re-do that later.

All that's left is the clutch lever/cable/chain/ect, gas tank, exhaust and the rear sprocket.

About an hour and a half total so far. Thought it would take longer. :D

Not the prettiest girl at the dance, but she's sure got character.

Photos to follow..........
 
O.K., still not done, but I only have pieced together maybe four hours total time.

Today I opened up the mag side and cleaned all the crud/metal shavings/ect. out, opened up the gear side and put a tiny bit of lithium grease on the dry gears.
I stripped the exhaust stud before it ever got tight and so went to the auto parts store and bought some M6X1.00 mm pitch bolts, cut the heads off those to make studs, installed the "studs" with sleeve retainer/thread locker, and got the exhaust on.

Then the fun began and hasn't ended yet. I took the rear wheel off and found the bearings needed grease, so before I put the sprocket on, I opened up the guts to the rear wheel. Just as I had it all loose, daughter no. four yelled out the window to me; "Hey Dad!" I looked up and all hell broke loose. I dropped the whole works on the ground and made a bit of a jigsaw puzzle for myself. (been 30+ years since I had a coaster brake wheel apart) I said "I think I'm in over my heads here", to which she replied; "Yeah, but are you having fun?"

Well, yes, yes I am. :D

O.K., back out to work on it some more. I am not sure I know what I'm doing at this point, but I'll just keep going......
 
Back
Top