Whizzer gas tank

DadNamedSteve

New Member
Local time
1:23 AM
Joined
Jun 14, 2012
Messages
27
Location
Grand Rapids MI
I have a small dent in my whizzer gas tank. Does anyone have any ideas how to remove the dent without making it worse.

The attached picture is trying to show it but it may not be easly seen.
gas tank dent.jpg

Also does anyone know what can be done to make sure the fork does not hit the gas tank when turning?
gas tank hits fork.jpg


Thanks
 
I would suggest you take the tank to a body shop as they might be able to remove the dent by using a hammer inside the tank.

I had brackets welded [fork stops] to the frame on my 1950 Sportsman & 1950 Pacemaker to stop the fork from hitting the tank.

Show us more pictures of your bike as it looks really great. Is it a Sportsman?, what year?

Have fun,
 
Thanks for the response Quenton. If you have a close up of that bracket you welded I might try to do something similar.

My Whizzer isn't quite finished yet. I've been working on it all summer and have a few more things to complete before I try to fire it up. My dad bought back in the day when he 15 or 16 and its been in the family ever since. When he passed away, I decided to fix it up for my grand children to enjoy. I know I put a lot of miles on it each summer.

I don't think I could have done it without this web site. I'm not all that mechanically inclined but after seeing what others were doing it gave me enough confidence to go for it.

I stripped the paint and sanded the frame. I had to skimp on the paint job because I couldn't afford to have it done professionally, so I just used spray cans. Maybe next year I'll tear it down and have it done right.


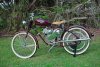
Here's what it looks like so far.
almost done.jpg

The first thing you will notice is that the black leather saddle is missing. I sent the pan off to a place in Florida to have it recovered and the "Whizzer" logo embosed into it. The orignal was in bad shape and would have looked out of place given the rest of the restoration.
waiting on seat.jpg

This is the front fork assembly where you can see the "Whizzer" face plate attached. I didn't do such a good job attaching the headlight but it is rock solid so at least it won't fall off. I bent the bracket so account for the angle of the forks.
front fork.jpg

This is a good picture of the 1949 Michigan Cycle plate. They don't normally title a moped in Michigan but because my father had the original title from back in '49 that indicated it was a motor cycle, when I took the title in to get it transferred into my name I was able argue successfully that they should give me a new title as a motor cycle. It may be the only Whizzer motor cycle in Michigan.
1949 cycle plate.jpg

This is a side view of the engine. I am planning on hooking up the echo tube exhaust pipe this weekend. I tore it all down and installed a new piston, rings, valves and gaskets. I even learned how to do the valve lapping from youtube. I tore down the carb and rebuilt it.
side view of engine.jpg

I found place in Muskegon MI that chromes small pieces and had the rear rack and the brake hubs re-chromed. The front fork and tank was already chromed but I sent them up there to make them look as good as the lobdel dimpled rim.
rear.jpg

You can see here the 5" drum brakes. I had the wheels re-spoked by a guy that owns a Schwinn place in town here. He got a kick of working on the old school stuff. They used ss spokes.
rear wheel assembly.jpg

I used the fuel filter but I don't know if I will need it. The inside of the tank is very clean.
fuel line and filter.jpg

This one shows the Sturmey-Acher drumb brake. I need to find a brake cable before I take it on the road.
front wheel assembly.jpg
 
Last edited by a moderator:
In case you haven’t figured it from the above pictures, it’s a 1949 Whizzer Pacemaker with the loop frame and J engine.

I know the Pacemaker isn't the most desired Whizzer from a collectors point of view but it has some sentimental value to me.

It was stored in a garage for 30 years so it wasn't like a "barn fresh" bike but not show room either, I found a picture on the internet of a similar "barn fresh" pacemaker that I plan on telling my grand kids is was what it looked like when I started, just so they appreciate all the hard work I put in to it.

Looking back on how hard I rode it when I was a teenager, I can now see the expression on my father’s face as not fear for my safety but for the safety of his Whizzer.
 
The Pacemaker series was a big seller at Whizzer from 1948 to 1952 [last known production year].


What a great looking Pacemaker!!!!!!!!!!!

I noticed the 5" rear brake and it wasn't standard on the 49, so it must have been purchased as an option. I have a 50 with the 5" rear brake and the more powerful "300" series motor, but I don't have the optional front brake.

I sent all my seats to a shop in FL [most likely the same shop] and think they are the best, expensive, but the best.

The bracket on your headlight is for the handlebar mount, however it should be very easy to make one like the original [if you need exact information I can measure the one on my bike if it would help].

Sure is a good looking Pacemaker! Keep us posted on the progress.

Have fun,
 

Attachments

  • Pacemaker1950.jpg
    Pacemaker1950.jpg
    131.2 KB · Views: 985
Quenton,

Any info on the headlight mounting bracket would be appreciated. Perhaps a closeup picture. I haven't seen it for sale so I may have to make one with some help.

The picture you posted looks to be perfectly restored 1950 Whizzer. I can only hope to come close to something like that.

Is that an auto clutch I see in your picture? So many things to spend my money on, so little money. This year's goal was just to get it up and running so that it wouldn't embarrass me too much if I were to ride it around town.

My grandson is not even one year old so I have some time. At some point I may start on another or buy one off someone thats ready to sell.
 
Last edited by a moderator:
Back
Top