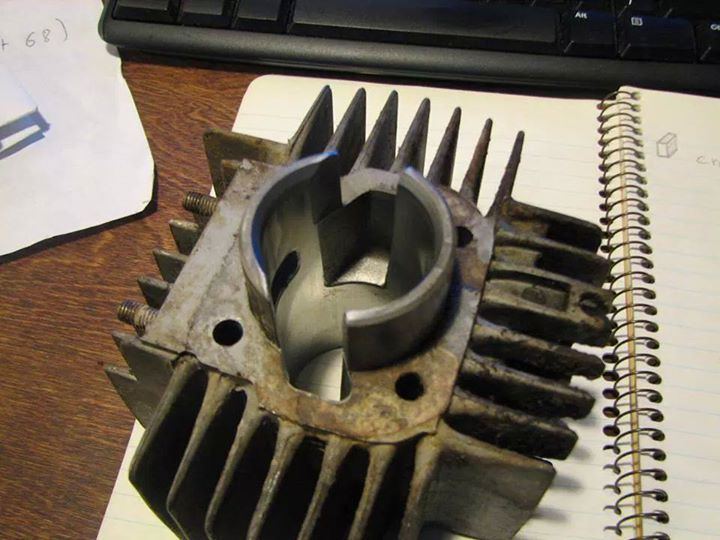
Widening the intake port at the bottom

Status
Not open for further replies.
Here you can see how I used jbweld to increase mating surface for my larger intake manifold. In the first photos I posted you can notice how I used it to widen the mating surface of the cylinder to carters at the transfer area.
 

Attachments

  • RIMG0514.jpg
    RIMG0514.jpg
    39.4 KB · Views: 617
  • RIMG0522.jpg
    RIMG0522.jpg
    47.3 KB · Views: 653
I have a small dremel setup that works on 30 volts. The tips in the picture are good for aluminum since they dont clog up. I used some diamond bits for making the oil passages in the upper end of the Yamaha Jog conrod. I had access to a special microscope for observing as you work. I made better quality passages with smoother edges than the factories do!
 

Attachments

  • KbJjO-8Ftr4.jpg
    KbJjO-8Ftr4.jpg
    52.6 KB · Views: 595
I just found a video on a camera that I thought was broken. I went out on a ride with a digital camera tied to my backpack and the backpack on my chest. I just made it out of town and was making my way towards the mountain and it started running really bad all of the sudden when I started filming. It would be a long time before I found the broken wire that was hanging on by the insulation and barely making contact. So the video is nothing to brag about. It's before I made the widened intake mod too. http://www.youtube.com/watch?v=47RBMaVD58Q&feature=youtu.be
 
as for cutting out transfer walls, it hurt bottom end slightly (the motor was strong anyway so bottom end is still very usable) but made incredible gains in the top end. I wouldn't do it on a daily driven bike without reeds, stuffed case, and a hell of an expansion chamber (which is what that motor has)but I'd do it in a heartbeat on a race bike.

that bike is still the only bike I've ever ridden that breaks 45 with stock gearing. it'll do some serious speed with a 34 tooth I think. hits nearly the same max rpm whether loaded or not
 
Last edited:
lazy, you sure aint :)

an informative post and once again confirming all my hates against these things...piston never uncovers transfers... theres no meat in there... the fins are too thin...its altogether best to attempt the casting of a new cylinder... ideally one retains that lil bit of cylinder wall and gives it more curve rather than sharp angles...

at the same time provide plenty of material in the top end for a well made spigoted head that actually does provide a squish band for once...

cant say ive ever heard of anodizing that can compare to nikasil or similar coatings...but if its cheap, lasts a few thousand...so what? run it til its worn, have a spare in stock, redo the stuffed one... anythings easier than chrome plating.

or the other option, if you DO cast something up... cast iron sleeve. bulletproof.

this is almost making me consider getting the timber tools out. seriously, a pattern cant be that hard...

keep it up :)


cheers butre ;)
 
Bert Rod in Miami does stock jugs with cast iron sleeves, but they're a bit too rich for my blood. I can't afford a lathe of my own for sure, but I sure can cast
 
puch
j952.jpg

some goped thing
px_e.jpg

and finally our beloved china girl
7igv.jpg


fine print: these aren't my photos. I just ripped them off facebook. I'd have never pointed my ports towards the exhaust like that
 
lazy, you sure aint :)

an informative post and once again confirming all my hates against these things...piston never uncovers transfers... theres no meat in there... the fins are too thin...its altogether best to attempt the casting of a new cylinder... ideally one retains that lil bit of cylinder wall and gives it more curve rather than sharp angles...

at the same time provide plenty of material in the top end for a well made spigoted head that actually does provide a squish band for once...

cant say ive ever heard of anodizing that can compare to nikasil or similar coatings...but if its cheap, lasts a few thousand...so what? run it til its worn, have a spare in stock, redo the stuffed one... anythings easier than chrome plating.

or the other option, if you DO cast something up... cast iron sleeve. bulletproof.

this is almost making me consider getting the timber tools out. seriously, a pattern cant be that hard...

keep it up :)


cheers butre ;)

Thanks Man! I will sure try. My wife and mother in law sure are understanding))) I keep the bike inside the apartment. But I'm the one that has to carry it up four flights of stairs everytime I take it out.
This engine sure does leave alot of work to be done, especially in preparing a new cylinder, not to mention "re-balancing" the crank. Big thanks to Jaguar on that too. Now it doesn't shake like a vibrational cushion. His low-mid rpm torque pipe deseign has sure made the thing work though. As soon as I get the reed valve setup and the new improved torque pipe made, I think it will fit me fine for it's purpoes. The only sketchy part is deepening and moving forward the transfers towards the intake side. It's possible to move them forward enough and not cross the ring pins path so that when you begin to deepen it nicely, you poke through the wall and have a hole in your cylinder. If you don't poke it through, it will still be kind of weak at that point. In terms of the uninvited small stone between the fins or the broken fin just at that spot. Otherwise, I can handle it all easily. The transfers carry risk though. I recommend trying techline coatings for any of your bikes. They have a dry lubricant coating for the piston skirts and surfaces that the bearings roll on(conrod and piston and lower pins). First the surface needs to be sandblasted with aluminum oxide of a certain size. I bought two special sized screens to get the properly sized fraction that was sifted between them. For a sandblasting box I just grabbed a cardboard box from the dump nearby and cut two holes for my hands and a hole up top to put a piece of glass over so I could see inside the box. Hung rags over the hand holes like curtains. It was a five minute jobber. Had to be done outside though. After washing with acetone, the DFL-1 coating is sprayed on with a little aerography pistol. The top of the piston is taped over so it doesnt get any on it. If you are going to put the ceramic thermal barrier onto the top of the piston, you should do it first, then you would tape off the skirts. Basically after the surfaces have been sandblasted and washed well with acetone, they cannot be touched with fingers or tape. So you will have to backtrack and wash carefully some off the surfaces that had tape on them if it was so. I put a thermal barrier into the inside of the head too. Keeps the heat from entering the piston and or head, keeping it in the air and exhaust. May increase exhaust temperature though. The coatings are baked on at like 150C for an hour. Not recommended for ovens you plan to prepare food in.

There is a new kind of anodizing like process, but it uses alternating current and special nano-particles in the bath. The coating is very strong and has supe slippery material inside of it. Supposed to be a full fledged quality coating. I hope they're still doing it when I get to that. I think you could have a nikasil coating proffesionally applied in Australia with no fuss or big price tag.
 
You guys are hardcore! I feel like I've done a complicated technical task when I wipe my chain off with a clean rag!
 
Status
Not open for further replies.
Back
Top