XR-75/Staton NuVinci Build

Okay, This project isn't near finished yet but I have been taking pictures at just about every step of the way. Heres a list of features that are going to be included on this build:
-Mongoose XR-75 dual suspension MTB, aluminum frame, steel rear triangle.
-Staton NuVinci drive with Mitsubishi TLE43 engine, half-lever left hand throttle/killswitch , right side NVshifter. Torsion bars.
-center handlebar mounted digital speedo.
-left handle bar end nashbar convex mirror.
-New aluminum nashbar Jaws pedals.
-double thick and slimed Bell innertubes
-Bell kevlar lined 26x1.75 road tires (thin but should allow this thing to be pedaled if need be.)
-Bottle and cage for extra fuel
-Bell comfort Gel seat (black)
-Finished and painted Staton hardware (gloss black to match rear triangle of bike.)
-Emaxi break levers with internal switches for brake light activation.
-Full lighting to New Hampshire moped standards. Enclosed in a soft (hard lined) black/silver lunchbox to be mounted to the left hand side of the Staton rack opposite the engine.
--55w Halogen headlamp w/ small rectangular enclosure and mounting hardware wired through a very efficient 12v turn dial dimmer switch to adjust brightness.
--A 7 LED taillamp that doubles as a brake light when wired with the Emaxi levers.
--Electrical master on/off switch and 12v battery gauge.
--5ah SLA battery.
--Charger port.
--Possibly an on the move charging system as well as I have a 1200mAh 12v power rectifier that I may be able to hook into a dynamo or DC brushed motor.
-All wires/cables to the staton rack are going to be run down (and through) the center of the frame and will be wrapped in spiral casing and zip tied clean and secure.


I would have this beast finished but I'm still waiting for the weather to get nice (clear and over 50F) so I can prime and paint the staton rack to match the bike. I've already done a lot of grinding and rounding to make the staton kit not appear as chunky. I have to say though this thing is rock solid. I've already mocked everything up and it should all fit together nicely. So here are the pictures. I have tons more but I've had to do the steps all out of order as I got the chance to do them so it would be more confusing to you folks than its worth.

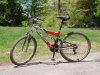
Pic1: The mongoose last summer after a muddy thrillride down a trail near my house.
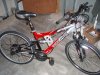
Pic2: Mongoose with NuVinci installed and cables run, torsion straps are backwards (was just measuring at the time) and heavy duty pedal chain.
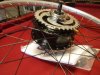
Pic3: NuVinci out of the box.
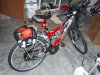
Pic4: Mocked up rack to make sure everything would fit and work well.
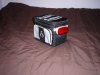
Pic5: Cooler electrical box. Front pocket (with penguin) has the dimmer, switch and battery gauge mounted into plastic underneath. Unfinished.
 

Attachments

  • P5230125.jpg
    P5230125.jpg
    145 KB · Views: 3,298
  • P2110074.jpg
    P2110074.jpg
    113.2 KB · Views: 4,633
  • P1280021.jpg
    P1280021.jpg
    78.8 KB · Views: 2,799
  • P204005g9.jpg
    P204005g9.jpg
    189.2 KB · Views: 4,773
  • P2090065.jpg
    P2090065.jpg
    62.8 KB · Views: 2,602
Last edited by a moderator:
It will be a comfortable ride with the dual suspension and it looks rock solid but will you have mudguards to keep yourself clean and dry and high rise bars so you can sit more upright. I get a sore neck if I ride a motorised bike leaning forward. I have a Mongoose NX7 MTB which has a similar riding position to yours and it's not motorised so I don't get sore pedalling but a motorised bike calls for more upright posture I find. It will come up really great when you paint the new engine struts.

I was thinking about mudgards. I saw some on Nashbar that I think I'm going to get with my next order. The only problem is the rear one attaches to the seatpost so I'll have to modify it to attach down near the rear brakes if possible, shouldn't be too hard to do. As far as the handlebars I'm going to use it as it is right now but I may invest in a long handlebar stem to bring it up a bit if it gets uncomfortable on my long rides. The seat is probably going to be lowered a bit anyways since I won't be needing full leg extension while motorized. I don't think it will bother me too much leaning a bit forward since I ride a sport touring bike and it has a similar riding position and my motorized Raleigh was the same way. But I'll see.
As far as the painting goes, I managed to prime all the mounting hardware and the Staton gearbox so it's all gray right now. It looks nice and smooth so I know the gloss black is going to come out very nice looking as long as I take my time and wait for good painting conditions. It's just been killing me to hang around looking at all the pieces just watching the weather for the best day to go outside and finish it up. I could do it in the garage and get it over with soon but I'd have to cover everything up in there. My Suzuki SV650s is a beautiful metallic teal color and I wouldn't want to mess it up with little black specs everywhere.
I have all my wiring hooked up and working great. I ran all the electrical wiring from the handlebars to the back with some black spiral binding thats usually used in automotive wiring. My electrical box is coming out just as I had planned. I got the rear running light working that goes full bright when I squeeze the brakes and a charging port so I can just plug my smart charger in rather than using alligator clips on the battery terminals.
I just went out to Sports Authority today to pick up a 22oz MSR bottle for extra fuel to be stowed at the bottom of the down tube. I've been reading about reserve tanks that work on the negative pressure the engine creates so I might plumb one of those in eventually but right now I like the idea of having the small fuel tank and topping up from a spare. It'll help when I want to run old gas out of the engine and replace with completely fresh fuel, especially when I have to put the bike away for the winter. It'll also help to distribute some of the weight to other lower parts of the bike rather than keeping everything over the rear wheel.
Once I have all the stuff painted and the rack set up I'm going to start on the mounting bracket/bumper bars to hold the battery box on and protect the engine and box in case I'm unfortunate to drop the bike. The mounting bracket will also be painted black and I'm hoping to cover the bumper bars with tough bendable plastic to protect the metal from dents and scratches. I'm also thinking about mounting a second bottle cage horizontally under the battery box for either a water bottle or a second spare MSR bottle (for those really long rides.)
I can't wait to fire the thing up and send you guys vids and pictures. I'll be sure to take a ton of angle shots and show everybody how I set everything up. My lighting system is the part I'm almost most proud of and I think every motored bike should have.
My next order from electricscooterparts.com is gonna include an 8ah battery (5ah is going on the chopper for now) and a push button momentary HORN switch to go with my 12v horn :) I just think I'll make peoples jaws drop even more when I "Honk Honk" when I'm buzzing by them.
It seems like I'm never going to be done with this thing but thats what I like about motored bikes. They're almost 100% your own creation.
Stay tuned for more. I'll post pictures as I make progress. And THANKS GUYS for all your inspiration, support comments.
 
Re the handlebars: Wouldn't it be cool if someone came up with some sort of quick release for adjusting the handlebar height? Set it at one height for sedate riding out to the trails, and set it to another when you get to the trails.
 
Considering how it's just a big screw that pulls a wedge tight with the upper parts of the fork I don't really think it would be that hard to do. All you'd essentially have to do was take a quick release from a wheel and replace the allen screw. If the QR rod was too long you could just add spacers, but I'm guessing just about any QR rod you'd find would be too short for a stem long enough to be useful in that kind of application. If everything did go together my only other concern would be if you couldn't get enough tension out of it and the handlebars would still slip from side to side. Interesting idea though van. Go from cruiser to racer in a minute. I'm really surprised nobody makes and sells something like that already.
 
Okay, the weather is finally nice enough around here to do some painting. I hung each piece up with bailing wire outside and gave them 2 coats of Rustoleum grey primer then 2 coats Rustoleum gloss black. I left the binding and adjusting hardware bare metal. I used washers where needed to keep paint from getting scraped off when tightening and adjusting. Today I worked on assembling a bracket to hold the electrical box and painted it. Once its installed I'll post those pictures and just about everything should be done on it in the next set of pix.

Don't mind the loose wires, once they're run back through the center of the frame (near the rear shock) they'll be spiral bound and neat. I'm hoping to have this running by the time my roads are all dried out.
 

Attachments

  • XR75paintedLeft.jpg
    XR75paintedLeft.jpg
    70.8 KB · Views: 721
  • XR75paintedRight.jpg
    XR75paintedRight.jpg
    86.4 KB · Views: 770
  • XR75paintedTop.jpg
    XR75paintedTop.jpg
    106 KB · Views: 893
Last edited by a moderator:
Finished

Here they are! I took these pics right after the XR75's maiden voyage around my back country roads. I'm very proud of this machine.
 

Attachments

  • xr75Handlebar.jpg
    xr75Handlebar.jpg
    119 KB · Views: 651
  • xr75headlight.jpg
    xr75headlight.jpg
    92.5 KB · Views: 688
  • xr75leftside.jpg
    xr75leftside.jpg
    166.2 KB · Views: 848
  • xr75rightsideangle.jpg
    xr75rightsideangle.jpg
    103.4 KB · Views: 756
She's a beauty

All your work has paid dividends and you have yourself a real goer. Is it lopsided to ride with the motor hanging off the side? I suppose it's like carrying one panier bag which I often do. There are mudguards made by TransAlp that look great on my Mongoose and catch all the mud, They really make the bike look great. Can't bear to think of your paintwork getting splattered Sir Jakesus. Is the rear hub geared? What spped will she do comfortably and I suppose she flies up steep hills. I think you've made me rethink about my own Mongoose NX7 hardtail. Many congratulations on your impressive achievement.
 
Lookin' good. A bike like that would be ideal for some of the back roads around here.
 
Yeah van I made her because we have some pretty steep off road trails and dirt roads that a straight geared system just couldn't handle unless you geared it really low and sacrificed all your top end.

John, The engine hangs off the right side but my battery box is on the left side of the gearbox which balances it all out pretty well. The only drawback is that it's somewhat top heavy but nowhere near uncomfortably so. I probably will take your advice on the mudguards if only just for looks and puddles so I don't get sprayed. I am pretty good about wiping my bikes down when they're dirty anyhow.

I'll keep everybody posted on problems or whatever in my staton/nuvinci review thread here http://www.motoredbikes.com/showthread.php?t=10230


Thanks for the nice comments, I know the staton kits aren't very popular here but I was looking for more utility than pure looks.
 
Nice build !,I am working on a similar setup,mainly for long trips& camping,NV hub,Staton drive,Mitsubishi TLE 43.It might be useful to read my post "installing NV hub,things to watch out for".With a steel frame you may not run into the problem I encountered,that is, of not having enough axial space on the axle to properly install the hub.
I found the V space between the stays on the left handy to mount a 2 qt auxiliary tank, using the vacuum method to transfer fuel to the engine, and am getting ready for road tests next weekend, hopefully.
It seems to me that your 12 V electrical setup is rather ambitious,the battery may be undersized for the 40 Watt head light.I have been looking into candidates for generators.The Sturmey Archer front hub generator/drumbrake has a lot going for it, but only supplies 3 Watts at 6 V ( more voltage at higher speed but 12 V output seems unlikely).It would be nice to get at least 6 Watts, 12V/0.5 A or 6 V/1 A.Fan motors from cars are a possiblity,I found a radiator cooling fan motor that can supply 6 V at 1 A at 2000 rpm.The challenge is to come up with a DURABLE friction drive system (I hate half-assed solutions to problems).The problem using these 12V motors is that they are usable only as 12V generators if run at speeds at least 50% above the nominal rpm(depending on the efficiency of the device).This may be feasible but is likely to affect durability.They are designed after all, for low cost,efficiency is important only to the extent that the thing does it's job, but does not go up in flames.JJ
 
Back
Top