
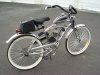
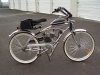
learned a lot from the "Red Peril" build .... the "Chrome Stallion" is much improved I think.
Pics highlight the bike plus special features like :
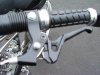
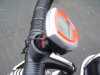
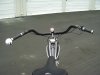
1. Black jacketed Harley handlebars
2. custom mounted speedo
3. modified clutch lever hold button that keeps lever fully depressed toward grip
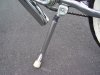
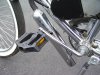
4. chrome bulk up jacket on kickstand
5. chrome jacketed extension on muffler for looks and throaty sound
6. really silent engine chain with no needed idler wheel
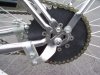
7. peddle tension is maintained with the idler wheel from engine chain
8. modified coaster brake arm and counter sunk hex bolts on sprocket to allow an inch of clearance from engine chain and tire whitewalls. (If you use whitewalls, chain clearance to protect against rub PLUS grease splash is even more critical than using blackwalls. My opinion is at least a full 3/8ths away from sidewalls is necessary to stop both problems.)
9.Selected bike was especially picked for the springer front end looks and operation.
10. Easy on the butt 12x12 Back Trails saddle.
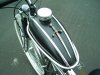
11. custom tank trim with Excaliber sword medallion (my thanks to Jim Bakker for this one !)
Other features are the 40 tooth sprocket which I think outperforms the 44 tooth and lets you avoid the 36 toother which I tried and removed due to lack of any real torque on this bike. The bag rail has thru bolts into the rear bobbed and lifted fender which greatly sturdies it up to almost motorcycle rigidity. The standard trick of rubber mounted thru bolts on the gas tank to eliminate the shoddy look of those straps was used on both builds. The bulked up chrome gascap is just one of those billet style oil cap covers sold in all auto parts stores. The shortened gas throttle cable to end the over curve and over length was done by clipping off the barrel insert at the throttle sleeve, feeding cut cable onto a (nerf? durp?) ...heh, whatever those barrel n screw ends are called , then dremeled to cut off the screw top and turn into a barrel insert for the sleeve slot.
Pics highlight the bike plus special features like :
1. Black jacketed Harley handlebars
2. custom mounted speedo
3. modified clutch lever hold button that keeps lever fully depressed toward grip
4. chrome bulk up jacket on kickstand
5. chrome jacketed extension on muffler for looks and throaty sound
6. really silent engine chain with no needed idler wheel
7. peddle tension is maintained with the idler wheel from engine chain
8. modified coaster brake arm and counter sunk hex bolts on sprocket to allow an inch of clearance from engine chain and tire whitewalls. (If you use whitewalls, chain clearance to protect against rub PLUS grease splash is even more critical than using blackwalls. My opinion is at least a full 3/8ths away from sidewalls is necessary to stop both problems.)
9.Selected bike was especially picked for the springer front end looks and operation.
10. Easy on the butt 12x12 Back Trails saddle.
11. custom tank trim with Excaliber sword medallion (my thanks to Jim Bakker for this one !)
Other features are the 40 tooth sprocket which I think outperforms the 44 tooth and lets you avoid the 36 toother which I tried and removed due to lack of any real torque on this bike. The bag rail has thru bolts into the rear bobbed and lifted fender which greatly sturdies it up to almost motorcycle rigidity. The standard trick of rubber mounted thru bolts on the gas tank to eliminate the shoddy look of those straps was used on both builds. The bulked up chrome gascap is just one of those billet style oil cap covers sold in all auto parts stores. The shortened gas throttle cable to end the over curve and over length was done by clipping off the barrel insert at the throttle sleeve, feeding cut cable onto a (nerf? durp?) ...heh, whatever those barrel n screw ends are called , then dremeled to cut off the screw top and turn into a barrel insert for the sleeve slot.
Attachments
-
 PA160013.JPG128.6 KB · Views: 837
 -
 PA160014.JPG129.6 KB · Views: 614
 -
 PA160015.JPG122.3 KB · Views: 892
 -
 PA160016.JPG135.4 KB · Views: 461
 -
 PA160017.JPG126.9 KB · Views: 421
 -
 PA160018.JPG125.8 KB · Views: 445
 -
 PA160019.JPG137.2 KB · Views: 511
 -
 PA160020.JPG139 KB · Views: 443
 -
 PA160021.JPG142.5 KB · Views: 393
 -
 PA160022.JPG143.7 KB · Views: 435
Last edited by a moderator:
 Is the DAX filter sufficient? Seems substantial from the pic they have ... or did you buy an auto parts store brand ?
