Update!
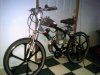
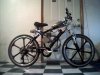
Well, I still have not cranked up my 'Rural Assault Vehicle' project yet. I'm waiting for the 3.5 in chrome headlight to come in.
I've mounted the 12v 2.2amp battery, and the 12v "Mini-Gen-Max" generator. I've also rigged a 2amp rectifier to the "Mini-Gen-Max" to provide a DC current source to charge the battery. There is no charge regulator.
I found a left handlebar switch cluster on ebay for about $15 American dollars. It includes switches for the turn signals, headlight on/off, hi/lo beam headlight, parking lights, horn, and most importantly to me is the intergrated choke lever!
I took an automotive choke activation wire removed it from its casing, and cut off the dash knob. Then threaded it through a black bicycle cable casing for looks.
Next I modified the choke lever to accept the solid choke activation wire simply by measuring the reach, and throw of the lever, and melting a small hole for the wire. A dab of "J-B Weld" secures the casing nice and tight in the socket and prevents it from sliding with the activation wire. This arrangement is semi permanent and still allows for repair and replacement of the choke activation components.
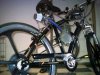
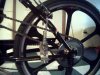
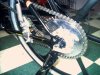
In the rear with the carb, I drilled two small holes through the choke lever tabs
for the activation wire.
The next step for the choke cable installation is CRUCIAL and must be measured correctly, and the choke wire casing has to be secured tightly close by the choke lever to prevent it from sliding with the choke activator wire.
Then use a swaged ball (hardware store, cable/chain section) on top of the lever. this allows the activator wire to push on the choke lever to open it.
Last step was to thread the activator wire through the holes, measure the action of the choke activator wire and cut any excess. With needle nose pliers bend the activator wire around the lever tab. This allows the wire to pull the choke lever up, thus closing the choke!
It took me about six hours to engineer,measure, cut and mount the choke operation device for this bicycle.
NOW. About that 'long intake'. I've setup the same carb system on my daily rider/test vehicle with the long rubber intake.
THERE ARE NO PROBLEMS WITH THE ATOMIZATION OF THE FUEL. THERE ARE NO PROBLEMS WITH ENGINE TORQUE, AND IT PULLS AS HARD AS EVER AT LOWER RPM.
However there is a difference in the way the engine runs. The rubber intake flexes in and out as the engine sucks in its fuel/air mixture. You cant feel this pulsating of the rubber hose for the engines vibration. This flexing of the rubber intake PREVENTS the engine from sucking fuel as hard as it could with a rigid intake.
This (I'll call it a delay) in the fuel intake cycle makes the throttle response SLOW. This is the CON. Read on for the PRO's.
On the Pro side, this flexing delay limits the engines RPM from over rev but ALLOWS FULL SPEED TO BE DEVELOPED BY THE ENGINE. THE LONGER INTAKE PROVIDES A LARGER VOLUME OF SPACE FOR THE FUEL/AIR MIXTURE AND ACTS AS A BOOST BOOTLE FOR THE ENGINE!!!
I can still get to my normal 25 to 35 mph speed range, but it developes slower and like I mentioned before, the throttle response is slower. It took a little getting used to, and I had to set the carb idle screw to full rpm. I changed the throttle cable and I changed the carb needle position so that affects things also. I'll play with the needle position a little more.
I plan to replace the flexable rubber intake extension with a solid 3/4 in copper intake setup. That should cure the slow throttle response, while keeping the 'boost bottle' effect without having to but an actual boost bootle! I'll add photos soon.
But personally, the difference in the engines operation dosen't bother me.