OCC Chopper Bike Build

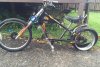
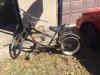
I've started work on my new build, an OCC Chopper bike I found in a dirty garage. I've already spent several hours on my projectt and I don't even have a kit!

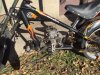
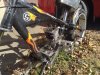
These things are not perfect for motorizing, as the engine has to be kicked left with the end result being the right rear engine mount stud is close to center of the frame. I could have dropped $40 for a pre-fabbed motormount but I simply don't have an extra penny to spend on this. I've created by own by measuring carefully and drilling holes in thick metal. It's a system of transition plate and muffler mounts that I've used before.

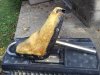
The saddle was trashed! I found some material and worked up a new cover with some homemade rivets. It wil work for a while!

The V-brakes, front and back, are good but the headset cap is trashed. I have to rig up some kind of fix to get a tight setting on the headset.

The handlebars are just weird an I don't want to use them. I'll find a simple straight bar as that will maximize function. In traffic you want narrow bars to sneak through tight spaces.

I patched the rear tube but I cannot inflate the sketchy tire because my floor pump failed. My frame pump that I carry for my push bike commutes to work has mysteriously disappeared from my backpack. It doesn't reay matter though because I bought a very cheap motorcycle tire on ebay as I am told they will fit on the fat rear rim. But, boy, this thing cannot be mounted like a bicycle tire. I am going to have to spend $20 for a motorcyce inner tube and maybe buy a few tire tools. There are some hacks on youtube - not sure how I will settle this. If I use the moto tire I will use a 40 tooth sprocket. If I have to default to the 20" bicycle tire, then it will be 36 tooth. At any rate, there's a lot of work ahead for me before this thing yanks me down the road!

Here are some pics:
 

Attachments

  • chopper1.jpg
    chopper1.jpg
    51.4 KB · Views: 1,241
  • chopper2.jpg
    chopper2.jpg
    44.7 KB · Views: 602
  • chopper3.jpg
    chopper3.jpg
    50.5 KB · Views: 802
  • chopper4.jpg
    chopper4.jpg
    63.8 KB · Views: 703
  • chopper5.jpg
    chopper5.jpg
    59.8 KB · Views: 641
View attachment 75473 OCC Chopper Build Update

It wasn't real cold in the garage to I did some more work and evaluated the status of the project. My first step was to reattach the original 24" wheel and do some tests for proper trail which means proper handling. All good! The bigger rear wheel fixes everything; the bike rolls steady and tracks well with a very good turning radius.

My efforts to bolt a bigger sprocket to the freewheel failed. Still, I attached the pedal chain and, with a little hard plastic kicker, I should be able to get the pedal chain off the rear tire. I have a design in mind. Should be a simple solution.

I noticed my motor mounts are not quite finished: I need to fit the motor and make the precise measurements to drill holes for the front motor studs. No big deal. I will probably drill holes tomorrow then add my jackshaft.

I can't get my front fork bearings properly set. Need to figure out what's going on there.

I'll need to experiment with handlebars and get a new seat post and saddle. I am almost ready to order my kit. Still haven't decided on the size of my drive sprocket.

Your front tyre is on backwards. :eek:
:p;);)
 
I have built several OCC builds. i converted one to a five speed. They are good bikes but still tro small for my 5ft 5 in frame. If you go through the extra effort to make it a five speed you will love it.
 
I would expect the problem with the headset is an ovalised head tube and cup/s. The only fix I know is (more money, sorry!) take the cups out, give the front of the head tube a couple of whacks with your persuader (ie mallet) and then whack in the heaviest thickest new headset cups. FSA The Pig Unsealed big ball headset.
 
It's to match the backwards rear tire.:D

The front tire is toast; it will never see a mile under motor power. I'll stay with 24" because the handling is so steady but I might get a top notch wheel/ disk brake set up.

You know, I thought the tread pattern on the rear Harley tire looked wrong, too, but I got that right. It has a rotation arrow and I guess I was paying attention when mounting the tire.

Ha!
 
image.jpeg
OCC Chopper Build Update:

After many different approaches, I have a rolling chassis! Pedal chain is free of the big rear wheel and the chain line is good. I used a coupling link to extend the rear axle a bit and my homemade chain tugs are in need of a bit of refinement but I have a functioning bicycle.

I was reading a bit about rake/trail knowing that this chopper handles great at low speed. I was somewhat concerned that I may have negative trail (headtube angle is 30 degrees!), but with careful measurement I find I have at least two inches of trail. This should be a great handling bike at any speed. Wheelbase is a monumental 52"!

In two weeks I'll order my kit. In the meantime I intend to fully explore my ideas to use as pocket rotor brake for the rear end. I'll also order a fat 31.8 seat post and find a nice soft saddle.

Here's a pic of my homemade chain tug:
 
OCC Chopper Build Update:

We are getting towards the finish now. My choice to put a Harley tire on the rear made my chain clearances minimal. My jackshaft has been installed and locked down and my pedal chain just barely slides by the fat tire.

With clearance critical on the motor chain side I decided to order a BBR Sprocket adapter from BikeBerry. I used blue thread lock on all fasteners and for the hub and sprocket for assurance. Had a couple of strange issues, though:

I have lots of Allen wrenches but found that none would fit, not even my 5.5mm. Did some calculations and determined the proper wrench size was 7/32"! Why? I couldn't find that size so had to zip over to the hardware store.

Tests for chain line were made with a leftover section of 415 chain I had from a previous project. Perfect fit in my tests. I tried to use a brand new 415 chain for the sprocket (also bought from BikeBerry) but it would NOT slide over the sprocket teeth. The thin links of the chain did NOT have enough clearance (slightly less than 3/16") to slip over the sprocket. So I cleaned up the older section and cut it to proper length.

Although I had intended to use half- links to make a perfect length chain, I will not be able to do that. The chain hits the bottom chain stay. I will fabricate a chain tensioner and this will solve the problem. The motor chain just clears both the stats and the big tire.

But the addition of the tensioner destroys the caliper brake I had designed for the sprocket! I'll have to come up with something for a rear brake.

Pictures of all this will be posted.

Timbone
 
image.jpeg
image.jpeg
OCC Chopper Build Update:

This time consuming monster of a project continues - still making progress!

I am trying to be as creative as possible to keep costs down. A friend gave me some great metal bracketing material and I was able to come up with a simple but effective chain tensioner. Motor chain clears both the tire and the chain stays.

Also, to get maximum clearance on the pedal chain side, I changed to a smaller rear cog by playing with spacers.


That leaves one gigantic problem to solve: rear sprocket rotor brake. I was rummaging through a hardware store and found some string stainless steel hinges in the clearance box. I was thinking that I could lock them together, make some bracketing to float them over the sprocket , and, finally, use the brake cable to pull some rubbery material into the spinning rotor.

Wow. I have spent many hours of drawing, cutting, hole drilling, testing and perfecting and this is actually very close to being a real brake system. I'll do full blown tests tomorrow before I show pics. In the meantime, I'll show you my basic idea, the two hinges being hooked together.

I've ordered a kit from a reputable vendor. Still lots of details to attend to.
 
image.jpeg image.jpeg OCC Chopper Build Update:

My attempt to fashion a simple Sprotor brake -a homemade disk brake - was a fail. I actually made a functional, string device but I was unable to get enough tension on the calipers to stop the rotor. Obviously, bike brake calipers use leverage to get a very strong grip off of s modest squeeze of the brake handles.

So, my fallback was a jackshaft brake, locked onto the jackshaft. I got a 4 1/2" band brake kit for about $33. You know, 4 1/2" doesn't sound very big to me (or to her) but when placed on the little section of available jackshaft, that sucker looked ENORMOUS! Width of the drum is 1 3/8", but you gotta add bolt heads for the hook up to the axle.

After much finagling, grinding, hole drilling and filing I finally got the drum installed. The pedal chain barely clears. The big rear tire misses by about a quarter inch. My rigged band brake bracket looks a bit funky but seems pretty solid. I have two brakes now.

Just a while ago, I prepared the slide for the NT carb (I'll upgrade to delortto clone later) and hooked up the twist throttle. I added the clutch handle and grip for the left side. That leaves mounting the engine and finishing out the perfectly sized short motor chain to the jackshaft.

The motor chain is so close to the big Harley tire. I'm still not positive I can make this work.
 
Back
Top