LoBoy Fat Tire Chopper

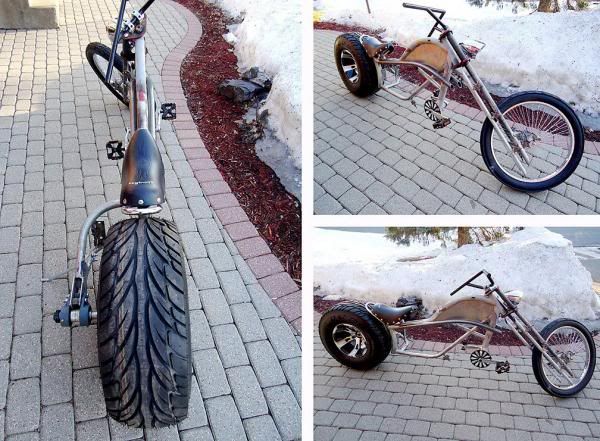
Been a while since I've posted. I've been busy building electric bikes for the past few years. This one will have a motor, so I decided to come to the place where bicycle motor heads hang out. :bowdown: I'm researching 4 strokes and I haven't came to a decision yet on the set up. I have plenty of room so it will be easy to adapt.

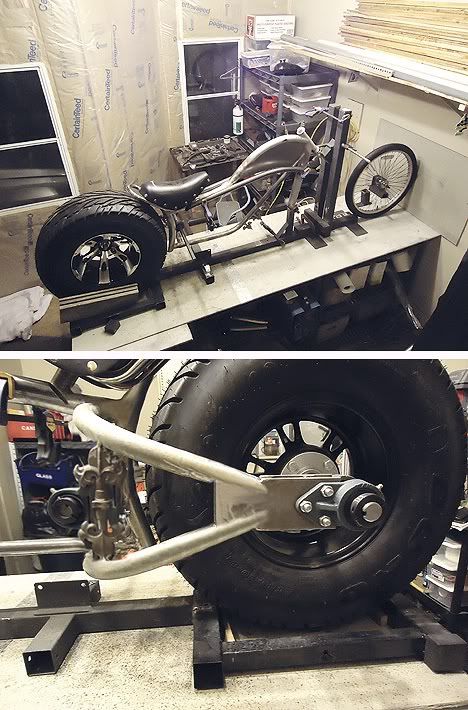
I took it on it's first roll and it is perfectly straight and smooth. I have a single sided rear axle set up to show off the insane rear tire. It's my first try at a single sided axle so I had to figure in a lot of math and calculations to get it perfectly balanced.

First Roll.
http://www.youtube.com/watch?v=Lctcd0rkW8g

Zero Steering Flop.
http://www.youtube.com/watch?v=alQKmadQsgc

comparetites.jpg


axle11.jpg
http://i284.photobucket.com/albums/ll13/grauchosbikes/motored bike/axle11.jpg

user3358_pic8913_1301959930.jpg


frontfork3.jpg


rearB.jpg


side_profile4.jpg
 
Last edited by a moderator:
You do some really nice work.

Thanks Cavi Mike!

Looks like i'll be finishing this bike with the body akes and pains of lymes disease.
Stupid deer tick puked in me. Docent that little thing know how busy I am? LOL
(Nothing 14 days of antibiotics won't take care of)

Ok... the handlebars are totally ready for paint. The main frame is also totally ready for paint.
The fork has had its final welding finished. (Strong straight and true) It was acid bathed, now ready for
primer and lots of sanding.


bars1-1.jpg


bars4.jpg


fork1a.jpg


frame1.jpg
 
This full bike is ready for paint. I built 3 bikes in between working on this one to donate for
good local causes to raise money at silent auctions. It felt good pulling this bike off of the shelf last week.

Picking up a benched project is almost like seeing an old friend after 6 months. I'll will be working on
ventilation to airbrush indoors since the weather is quickly turning cold and snowy.
All of the puzzle pieces are present and ready to move forward. The front wheel 48v1000w is also all set
to enclose in the front wheel covers.
I have a few color schemes rolling around my head. At least i'm at one of my favorite stages.

a.jpg


b.jpg


c.jpg


d.jpg


e.jpg


f.jpg
 
Graucho, if you were building chopper motorcycles you'd be competing with the OCC crowd and Jesse James in their new buildoff. I'm more into function over form, but I can sure appreciate the art and work put into your work. I saw a chopper on a ride a couple of years back that actually had a saddle for a seat with a built in holster for a Colt 45!! Good luck on the finishing touches.
 
Thanks Scootmeister, I appreciate it.

Painted and clear coated.

I made the mistake about 15 years ago by making a yearly trip down to
Southern Arizona and falling in love with the terrain and the mix of
American Indian-Mexican motif and artwork.

I have never built a theme bike. Ever. I have never named a bike either.
Being of true Atomic Zombie blood I always build my frames and main components
of my bicycles from old bikes, spare parts and whatever I have laying around that
is weldable. One day cleaning and sorting I came across A few old rusty
horse head drawer knobs, horseshoes, pitchfork, cast metal stars. The Mix of everything
sitting there mixed together gave me a visual thought. It gave me a flashback of all of my
trips down to Southern Arizona and many trips of crossing the border into Mexico.

Since its conception I had many personal bike projects going. This bike had been put on the
back burner many times. Slowly but surely the American Indian-Mexican motif is turning into
the "SOUTH OF THE BORDER LOWRIDER"

3 coats of paint. 6 coats of clear.

For my color pallet I took blue, red, yellow and black and mixed them to make brown.
15% blue
60% red
75% yellow
5% black
and then a teaspoon of brilliant silver.

It's my own color. I call it "Steel Brown". Then I mixed another accent color which is Coco Brown.
I have never painted any bike i've built with brown, so it was a treat to try a unfamiliar color pallet.
All of the pieces are coming together. Mentoring for the High School Robotics Team has just fired up
so I will start reassembly at my leisure. Besides its 10 degrees with 20 inches of snow here. No wonder
i'm dreaming of southern Arizona.


A1.jpg


A2.jpg


A3.jpg


A4.jpg


A5.jpg


A6.jpg


A7.jpg


A8.jpg


A9.jpg
 
I Started the battery cover side panels. The top photo is closest to the actual color. My overhead lights scream with 1000 watts like an operating table which makes it hard to take a true visual pic. Im working on getting the correct shape on my graphics. I have my graphics temp taped to the frame.

Then they will be mounted behind lexan clear to give them a high gloss look while looking through the lexan. Finally they will sandwich 4 SLA batteries. (48v) with my own mounting tech. I cant afford 550.00 batt's so I'll be towing around the extra weight.

Peace.


buffalo.jpg


IMG_1110.jpg


IMG_1112.jpg
[/QUOTE]
 
I picked up some lexan clear for the battery cover side panels.
I cut both sides to fit the shape of the frame. I adhered the
graphics to the inside of the lexan which gives it a high gloss
sheen when looking through the clear. It is so shinny that it's
hard to take a good photo with everything reflecting into it. Even
my ugly mug made its way into a shot. :rolleyes:

I set a few pieces of the body together to take a look. It got me
excited for the reassembly process.


1a-1.jpg


2a-1.jpg


3a-1.jpg


4a.jpg


5a-2.jpg


6a.jpg


7a.jpg
 
Here is a few fun projects to further this project.
The first project is my license plate. I changed my plates design a little from the past.
I made the graphic color "brown" to match the build instead of full color on all of my other builds.

Second... I took an old motorcycle headlight off the shelf and tore it down and made a 1400 lumen
flashlight-bike light conversion. This sucker is as bright as a car light.

License Plate
a01z.jpg


Orig Light
a02z.jpg


Light tore down with Cree P4 chip CR123A Flashlight
a03z.jpg


a04z.jpg


a05z.jpg


Paint time, and drilled out the old
wire entrance to allow finger on and off switch

a07z.jpg


Finished. Let the light scream
a06z.jpg


Lets find our way home
a08z.jpg
 
Back
Top