weefek
Well-Known Member
- Local time
- 10:03 AM
- Joined
- May 14, 2022
- Messages
- 710
(Warning probably will be kind of a long post. Rebuilding a GT5B engine for reliability).
My new bearings have finally arrived so it's time to get some work done. Still waiting for the main seals which will be here next week.
I originally bought a GT5B kit back at the beginning of May and threw it together because I needed a way to get into town. Didn't do anything primarily aside from taking off the head and jug to make sure nothing looked amiss. It didn't, and the original engine now has 278km (173 miles) on it. It's getting progressively louder (clanky) but I have a feeling it's the clutch causing these noises (clutch is addressed at the end of the post).
My goal here is reliability. I bought another GT5B kit so I could pull it entirely apart and rebuild it properly from the ground up, swap it onto my bike, and then do the same to the original motor. Not looking for performance, just reliability.
I used Al Fisherman's guide for tearing the motor down (https://motoredbikes.com/media/54-remove-clutch-drive-gear-nut.39510/) with a few minor differences, so I won't be going over that. The engine is now completely disassembled, minus the rod from the crank because there isn't a need to do so.
Finally got my replacement bearings (SKF 6202 2RSH C3) thanks to @ImpulseRocket89 for the recommendations on which exact bearings to buy.

That being said, time for some work to get done. This thread will be a journal of sorts for this job and hopefully will help somebody in the future.
First, the case halves. Completely taken apart. Took a dremel to any excess flashing left behind. These engines are decent build quality but definitely not perfect. Original bearings and engine had random metal shavings in random places, the bearings felt gritty, and generally bothered my OCD.
Took a small wire wheel to internal surfaces, and mating surfaces. Used 600 grit wet paper on the bearing mounting surfaces and the seal mounting surfaces just to clean them up.


Brake cleaned and wiped out. I'm going to wait to install the bearings until the main seals arrive.
Next, head work. I already cleaned up the new head, but needed to install it on my existing bike engine because the head gasket wasn't sealing very well. So I took the original head and did the same thing.
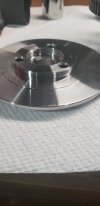
Wire wheeled the combustion chamber, good enough for me. I have no reason or need to spend time polishing the crap out of it.
To me the main thing is making sure the mating surfaces are flat. Used the same 600 wet with a pane of glass that I used to use for CPU heatsinks back in the day.

About 20% of the way there. You can see the pitting from casting.

The key to this is to rotate 90 degrees whenever the 'lines' from the previous sanding are gone. Around 20 seconds or so for each 90 degree turn.
Good enough:

Then, I did the same to the jug. Head gasket mating surface, and exhaust and intake mating surfaces.

I highly doubt I took enough material off to make any difference with regards to timing / compression ratio. I literally just made sure the surfaces were flat, and then stopped.

Still need to take a bit more off the intake, you can see bottom right there's still a low spot.
I also lapped the "intake manifold" which was a lot flatter than the port on the head was. I also took a dremel to the inside of the "intake manifold" to clear out some flashing left over from casting. I fear some of the small pieces of casting flash can and will flake off eventually , leading to small metal pieces being introduced to the engine eventually / over time.


With regards to the piston, I removed the rings. Checked the retainer pins to make sure they're tight. There was a lot of manufacturing garbage in the ring lands so I'm glad I removed them and took the time to clean the piston up. I deburred / sanded the wrist pin holes and transfer port slots with the 600 wet sand paper. There was a pretty good edge on them. Now they're nice and smooth. Still have to do a final cleaning on the piston and rings before install.

Next, the jug. The port openings weren't terrible, but there was extra flashing. I removed the excess material. I DID NOT open the ports up horizontally or vertically, just removed the excess material. First with a dremel bit, and second with the 600 grit wet paper. They're nice a smooth now. I still need to polish them up a little bit with the scotbrite stuffed in the drill chuck trick, but that will probably happen tomorrow.

The transfer ports don't look the best, but the chamfers from the factory are all in and not out, so I just lightly sanded the edges w/ the 600 wet, removed any excess flashing, and called it a day.
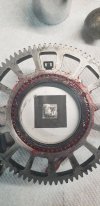
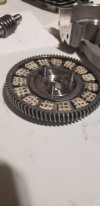
I'm also rebuilding the clutch. The stock clutches on these are sloppy as hell. At least 2mm of play in the stock bearings. I took the clutch apart, and am waiting on the 1/8" G25 stainless bearings I ordered from ebay to arrive before I put it back together using bearing grease. I don't know if it's apparent in the pictures but there was a decent amount of surface rust on the parts. I have a feeling these are leftover parts from the original GT5A runs back in 2010ish. They look like they've been sitting on a shelf for awhile. The gear teeth themselves also had some surface rust, so I took a small dremel wire wheel to all the surfaces, then lightly sanded w/600 wet the surfaces that the bearing balls sit on.
I bought these red pads from amazon but I don't think I'm going to use them. The width / height is so inconsistent and they don't really fit the openings properly so I think I will clean up the original clutch pads and throw them back in.

The next part of this story, once the main seals arrive, will be reassembly of the case halves. I will update when that process occurs.
My new bearings have finally arrived so it's time to get some work done. Still waiting for the main seals which will be here next week.
I originally bought a GT5B kit back at the beginning of May and threw it together because I needed a way to get into town. Didn't do anything primarily aside from taking off the head and jug to make sure nothing looked amiss. It didn't, and the original engine now has 278km (173 miles) on it. It's getting progressively louder (clanky) but I have a feeling it's the clutch causing these noises (clutch is addressed at the end of the post).
My goal here is reliability. I bought another GT5B kit so I could pull it entirely apart and rebuild it properly from the ground up, swap it onto my bike, and then do the same to the original motor. Not looking for performance, just reliability.
I used Al Fisherman's guide for tearing the motor down (https://motoredbikes.com/media/54-remove-clutch-drive-gear-nut.39510/) with a few minor differences, so I won't be going over that. The engine is now completely disassembled, minus the rod from the crank because there isn't a need to do so.
Finally got my replacement bearings (SKF 6202 2RSH C3) thanks to @ImpulseRocket89 for the recommendations on which exact bearings to buy.
That being said, time for some work to get done. This thread will be a journal of sorts for this job and hopefully will help somebody in the future.
First, the case halves. Completely taken apart. Took a dremel to any excess flashing left behind. These engines are decent build quality but definitely not perfect. Original bearings and engine had random metal shavings in random places, the bearings felt gritty, and generally bothered my OCD.
Took a small wire wheel to internal surfaces, and mating surfaces. Used 600 grit wet paper on the bearing mounting surfaces and the seal mounting surfaces just to clean them up.
Brake cleaned and wiped out. I'm going to wait to install the bearings until the main seals arrive.
Next, head work. I already cleaned up the new head, but needed to install it on my existing bike engine because the head gasket wasn't sealing very well. So I took the original head and did the same thing.
Wire wheeled the combustion chamber, good enough for me. I have no reason or need to spend time polishing the crap out of it.
To me the main thing is making sure the mating surfaces are flat. Used the same 600 wet with a pane of glass that I used to use for CPU heatsinks back in the day.
About 20% of the way there. You can see the pitting from casting.
The key to this is to rotate 90 degrees whenever the 'lines' from the previous sanding are gone. Around 20 seconds or so for each 90 degree turn.
Good enough:
Then, I did the same to the jug. Head gasket mating surface, and exhaust and intake mating surfaces.
I highly doubt I took enough material off to make any difference with regards to timing / compression ratio. I literally just made sure the surfaces were flat, and then stopped.
Still need to take a bit more off the intake, you can see bottom right there's still a low spot.
I also lapped the "intake manifold" which was a lot flatter than the port on the head was. I also took a dremel to the inside of the "intake manifold" to clear out some flashing left over from casting. I fear some of the small pieces of casting flash can and will flake off eventually , leading to small metal pieces being introduced to the engine eventually / over time.
With regards to the piston, I removed the rings. Checked the retainer pins to make sure they're tight. There was a lot of manufacturing garbage in the ring lands so I'm glad I removed them and took the time to clean the piston up. I deburred / sanded the wrist pin holes and transfer port slots with the 600 wet sand paper. There was a pretty good edge on them. Now they're nice and smooth. Still have to do a final cleaning on the piston and rings before install.
Next, the jug. The port openings weren't terrible, but there was extra flashing. I removed the excess material. I DID NOT open the ports up horizontally or vertically, just removed the excess material. First with a dremel bit, and second with the 600 grit wet paper. They're nice a smooth now. I still need to polish them up a little bit with the scotbrite stuffed in the drill chuck trick, but that will probably happen tomorrow.
The transfer ports don't look the best, but the chamfers from the factory are all in and not out, so I just lightly sanded the edges w/ the 600 wet, removed any excess flashing, and called it a day.
I'm also rebuilding the clutch. The stock clutches on these are sloppy as hell. At least 2mm of play in the stock bearings. I took the clutch apart, and am waiting on the 1/8" G25 stainless bearings I ordered from ebay to arrive before I put it back together using bearing grease. I don't know if it's apparent in the pictures but there was a decent amount of surface rust on the parts. I have a feeling these are leftover parts from the original GT5A runs back in 2010ish. They look like they've been sitting on a shelf for awhile. The gear teeth themselves also had some surface rust, so I took a small dremel wire wheel to all the surfaces, then lightly sanded w/600 wet the surfaces that the bearing balls sit on.
I bought these red pads from amazon but I don't think I'm going to use them. The width / height is so inconsistent and they don't really fit the openings properly so I think I will clean up the original clutch pads and throw them back in.
The next part of this story, once the main seals arrive, will be reassembly of the case halves. I will update when that process occurs.
")