J
JFleck
Guest
Hello All,
Here's my build for the torque arm for any electric motor. I am in the process
of installing a 48V electric hub motor on my bike. many of these kits
don't come with a torque arm, so here's a quick tutorial to make
your own.
TOOLS: you will need a drill, hack saw or cut off wheel, round file and a flat file.
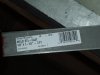
1. Start with some steel stock that can be purchased at Home Depot or any local
hardware store. I got this one at Home Depot for $4.00 I think. This is 1/8in thick
steel, nice and sturdy and easy to work with.

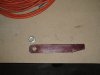
2. Cut off the amount needed, keeping in mind that the leverage
comes from how long the piece is. I cut mine to 8in. Take one of the
washers that came with your kit and use it as a template for your hole.
drill 2 or more pilot holes making sure they are inside of your drawn hole,
then use your files to shape out the hole.

As you get closer to the drawn hole start trying to fit check the torque
arm. you want to have as snug a fit as you can.

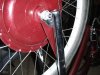
3. When you get your hole filed to size where it is nice and snug, install it on your hub.

I installed mine on the inside of the fork, basically replacing the
washer that would be there.

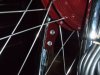
4. Mount your wheel and from the other side I mounted the
torque arm with 2 size 10 self taping screws. you can also use hose
clamps or other methods to attach the arm.

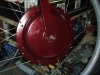
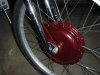
5. The final mount will look something like this, I painted and shaped
my torque arm a bit to match my bike and paint, but you can make the
install look as clean or dirty as you want to . . .

Hopefully this is a helpful tutorial to those of you taking
the "ELECTRIC" route for your bike . . .
Take Care All,
JaSoN
Here's my build for the torque arm for any electric motor. I am in the process
of installing a 48V electric hub motor on my bike. many of these kits
don't come with a torque arm, so here's a quick tutorial to make
your own.
TOOLS: you will need a drill, hack saw or cut off wheel, round file and a flat file.
1. Start with some steel stock that can be purchased at Home Depot or any local
hardware store. I got this one at Home Depot for $4.00 I think. This is 1/8in thick
steel, nice and sturdy and easy to work with.
2. Cut off the amount needed, keeping in mind that the leverage
comes from how long the piece is. I cut mine to 8in. Take one of the
washers that came with your kit and use it as a template for your hole.
drill 2 or more pilot holes making sure they are inside of your drawn hole,
then use your files to shape out the hole.
As you get closer to the drawn hole start trying to fit check the torque
arm. you want to have as snug a fit as you can.
3. When you get your hole filed to size where it is nice and snug, install it on your hub.
I installed mine on the inside of the fork, basically replacing the
washer that would be there.
4. Mount your wheel and from the other side I mounted the
torque arm with 2 size 10 self taping screws. you can also use hose
clamps or other methods to attach the arm.
5. The final mount will look something like this, I painted and shaped
my torque arm a bit to match my bike and paint, but you can make the
install look as clean or dirty as you want to . . .
Hopefully this is a helpful tutorial to those of you taking
the "ELECTRIC" route for your bike . . .
Take Care All,
JaSoN