MoonKS
Member
That took all of about 15 minutes and was super easy! Thanks for the info that enabled me to do this.
I took pictures along the way in case another noob like me comes along and is wondering what everything looks like.
In the photos you will notice the black spacer is cracked along the bottom - this is a brand new Whizzer and it came that way - doesn't look like it will cause any issues at the moment. The same thing with the restrictor plate itself - stress cracks around one of the holes where the bolt goes through.
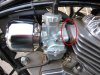
All I did was remove the carb - held on by two 10mm nuts to two threaded posts. Removing one nut was tricky as there is a part of the carb that does not allow it to come all the way off without a little work.
Once both nuts were removed the carb was not moving. I used a rubber mallet very gently to give it an initial nudge. Then I was very careful as I had to force it off...gently so as not to damage the threads on the posts.
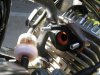
Once I had it off I used a small jewelers screwdriver to gently pry each layer off - the black spacer - the gasket - the restrictor plate - then the last gasket.
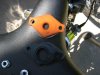
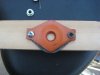
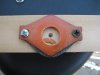
I hand screwed the restrictor plate to a block of wood - hand screwed to make sure I didn't damage it by making it too tight with a drill - and I wanted it to be steady when I widened the opening.
I used a brand new 11/16 in. spade bit - it is 17.46 mm and just about the right size. I did it very slowly - slow RPMs and made sure everything was steady.
When all was done I took a small jewelers file and went along the edges to widen it to exactly 18mm - this took about 5 minutes - and it also smoothed the edges and removed any pieces of the restrictor that were hanging on the edge of the newly drilled hole.
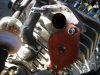
I wiped off the restrictor with a clean patch of cloth - as well as doing the same near the dirty inlet to the engine. Then I simply slipped them on in the reverse order I took everything off - except I used some blue loctite on the threaded stems. As a matter of fact, it was Blue Locktite Sunday - I went around and used it on a bunch of screws and bolts that I noticed were vibrating loose.
Again, thank you all for the tips and information. I hope my post and pictures will be able to help someone like you all helped me.
Oh, and there was quite the performance improvement - about 10 MPH faster - I had the speedo at 43 MPH - just what I was hoping for!
Best regards,
Matthew
I took pictures along the way in case another noob like me comes along and is wondering what everything looks like.
In the photos you will notice the black spacer is cracked along the bottom - this is a brand new Whizzer and it came that way - doesn't look like it will cause any issues at the moment. The same thing with the restrictor plate itself - stress cracks around one of the holes where the bolt goes through.
All I did was remove the carb - held on by two 10mm nuts to two threaded posts. Removing one nut was tricky as there is a part of the carb that does not allow it to come all the way off without a little work.
Once both nuts were removed the carb was not moving. I used a rubber mallet very gently to give it an initial nudge. Then I was very careful as I had to force it off...gently so as not to damage the threads on the posts.
Once I had it off I used a small jewelers screwdriver to gently pry each layer off - the black spacer - the gasket - the restrictor plate - then the last gasket.
I hand screwed the restrictor plate to a block of wood - hand screwed to make sure I didn't damage it by making it too tight with a drill - and I wanted it to be steady when I widened the opening.
I used a brand new 11/16 in. spade bit - it is 17.46 mm and just about the right size. I did it very slowly - slow RPMs and made sure everything was steady.
When all was done I took a small jewelers file and went along the edges to widen it to exactly 18mm - this took about 5 minutes - and it also smoothed the edges and removed any pieces of the restrictor that were hanging on the edge of the newly drilled hole.
I wiped off the restrictor with a clean patch of cloth - as well as doing the same near the dirty inlet to the engine. Then I simply slipped them on in the reverse order I took everything off - except I used some blue loctite on the threaded stems. As a matter of fact, it was Blue Locktite Sunday - I went around and used it on a bunch of screws and bolts that I noticed were vibrating loose.
Again, thank you all for the tips and information. I hope my post and pictures will be able to help someone like you all helped me.
Oh, and there was quite the performance improvement - about 10 MPH faster - I had the speedo at 43 MPH - just what I was hoping for!
Best regards,
Matthew