Another Columbia Build...Pic Heavy

So i ordered this bike over a month ago once i saw it online, knowing i would want to build it eventually when i had time. Well now i have time, and i see others are building this bike too, most notably Mr. KC; so thats good. Bikes looking good so far, did a rear gas tank rather than make an awesome one or use the stock one. IMG_0837 copy.jpg.Made the rear gas tank rack partly from the rack that came with the tank and partly from the brackets that were on the original rack, (cut and drilled to size).tank2.jpg. Besides needing the offset intake, the only problem I'm now having is with the lower mount. mount1.jpg
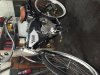
.I made this mount out of the large mount that came with the kit with some modified spacers, but I'm not digging the fit too much. Might consider making something new or buying a mount from SBP. mount 3.jpg. Once i get the intake in ill finish the build.
 

Attachments

  • IMG_0844.jpg
    IMG_0844.jpg
    85.2 KB · Views: 555
Thanks a lot Jim! Glad to hear you like it. Canvas bags would look great, if i were keeping it, i would throw them on too. Yeah, my rear wheel falls in the same spot, i guess adding a link to the chain could bring it back, but it doesn't seem like it should be a problem.

Gotcha!

I don't know how you guys can make them to sell... I mean, I'm so fussy, if I sold mine, I'd have to take a loss! But, the first, is always the most expensive, isn't it?!

I debated, whether to send my two canvas bags back and find some smaller ones, but they are just perfect in every other way, so I figured out, with snaps, how to make the bags actually two different sizes.... they'll be expandable! So, they will go from the 14X14 inches to a "more in scaled-down " 10"W X 12" tall. And, since they will be normally snapped-up.... they will lay much flatter against the side of the bike. This bike has been a "take three steps forward..... and one step backwards" project, since day one, but it's fun to try to take lemons and make margaritas out of them!

This morning, I rolled the Caswell resin around in my tank..... (also, my arms, my hair, the floor the table and every tool I had within reach!!!!! ) But, it's done. The Caswell company recommends for use with today's ethanol, the tank should cure for not less than 5 - 7 days! I'm leaving town for a week, so that will be perfect! The left over resin was so hot in the plastic container, I could not hold it and it melted the bottom! That's some serious chemical reaction!!!!
 
I don't know how you guys can make them to sell... I mean, I'm so fussy, if I sold mine, I'd have to take a loss!
But, the first, is always the most expensive, isn't it?!
It's not that hard to be fussy once you set your standard and get the tools to help.

Sure the first of anything different is expensive as I well know and lost money on several builds, but overall I do fine without skimping.

This bike has been a "take three steps forward..... and one step backwards" project, since day one, but it's fun to try to take lemons and make margaritas out of them!

Funny you should mention that, I am a 1/3rd of the way through my Spring lemon harvest and lemonade is frig staple they really don't make very good margaritas', you need limes for that and I don't have a lime tree.

This morning, I rolled the Caswell resin around in my tank..... (also, my arms, my hair, the floor the table and every tool I had within reach!!!!! ) But, it's done.
The left over resin was so hot in the plastic container, I could not hold it and it melted the bottom! That's some serious chemical reaction!!!!

I warned ya not to trifle with that stuff, it does not play friendly with anything ;-}
I used glass jars.
 
Sure the first of anything different is expensive as I well know and lost money on several builds, but overall I do fine without skimping.

I have fun "babbling" about things, and am sometimes misunderstood..... I would never think you "skimp" on anything on your builds....I've seen them! You're a pro.... I am NOT! My education while building this, has cost me about 25% more than it would, than if I knew what I was doing. My tank is the best example. I WOULD NEVER USE THAT TECHNIQUE AGAIN. But, I enjoyed the "art" of doing it that way. It just had far too many steps to make it viable. (but being a stubborn Scotsman, I wasn't going to quit, until it was finished and it cost me a bundle. If I did it again, I'd pop rivet an aluminum box together and seal it.... (but, I wouldn't be quite as proud of it)

I warned ya not to trifle with that stuff, it does not play friendly with anything ;-} I used glass jars.

Your warnings and advise about the resin, did not go unheeded. Before I did the pour, I must have looked very serious ...... I even had my procedure choreographed. But, all the preparation can't keep that stuff ...... off stuff!! And, I almost found out the hard way; You don't pour it in and drain it and just go see a movie.... Fortunately, after a couple hours, I had the foresight to check all of the threaded inlets. With just a film of resin left in the petcock and filler bungs...... I was close to panic, trying to free the half solid resin out of those female threads. Fortunately, I caught it early enough! It shows no mercy!

I'm happy to say that I spilled a small glop on the cement floor and this morning, I scraped it off and it made a wonderful test piece!! It was VERY flexible yet "bullet-proof." VERY IMPRESSIVE and it sure give me a lot of peace of mind to have it in the tank that took so many hours to build. (in a land fill, that tank will last longer than the rest of the bike)
 
Back
Top