HoughMade 71- done for now?

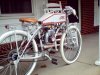
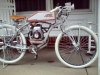
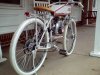
Higher resolution pics coming, but these will get the point across....I'm tired, but not tired in the bike.

Wanted to have a better background (a sunny Indiana corn field), but its pretty rainy here. That also means I ain't taking for its first ride fully completed- some day I'll ride in the wet- but not the first ride!

I welcome questions about what I did and how.
 

Attachments

  • Bike-9 099-2.jpg
    Bike-9 099-2.jpg
    114.4 KB · Views: 1,716
  • Bike-9 100-2.jpg
    Bike-9 100-2.jpg
    110.4 KB · Views: 1,572
  • Bike-9 101-2.jpg
    Bike-9 101-2.jpg
    103.9 KB · Views: 1,012
The springer forks look unusual. Were they part of the Huffy Santa Fe?
Also I've not heard of anyone being able to use Felt Quick Brick 3" tyres with a Honda/Grubee cos of chain slapping on tyre but no doubt you'll be the first.
I like how you've hidden the grubee tray behind the HoughMade plate. Did you stove enamel that paint cos it looks like it's baked on with a hard gloss finish? How did you do the dark linework stripes on the frame?
About 28 years ago I painted a frame red and dried the paint in a home made oven made with plywood and lined with cooking foil with two electric twin bar heaters inside. It didn't reach oven temperatures but it dried the paint to a really hard gloss and looked lovely. I've often thought of trying it again except I don't have any twin bar heaters cos I don't need them here.


Quick Bricks are 26x2.125- Thick Bricks are 26x3

Forgot to mention the Springer- the original fork was just a standard look "modern" tubular cruiser fork. The springer I used was from Aztlan, a lowrider bike parts house. It was chrome, but I etched it in HCl toilet bowl cleaner for several days (in addition to copious sanding) so the paint would stick.

The paint is tractor and implement paint and seems to be a very good quality. Some of the smaller parts I did indeed bake in the oven (when my wife was gone) - about 180 degrees for a couple of hours.

The stripes are vinyl car pinstripes which, with the use of a single edge razor blade, I altered to look a bit more custom. I used to do that all the time on trucks I sold when I managed a dealership years ago.

I would like to have baked the frame, but in lieu of that, I let it cure in excess of 3 weeks before I assembled. Your setup sounds like the ticket!
 
HoughMade,

When you disassembled the cowling and pull start on the engine to paint it, did you have any problems? My Honda just came in last night, but I'm probably not going to strap it to the bike for a while. Wanted to use the time to maybe jazz up the engine similar to the way you did and need to know if there's anything I should expect.
 
Remove three nuts, unclip any wires that are attached, and it is off. No problems. The pull start comes off first, then the housing, but unlike something like an old Briggs, the pull start is self contained and the spring will not take off when it is simply removed. Very easy, really.
 
Remove three nuts, unclip any wires that are attached, and it is off. No problems. The pull start comes off first, then the housing, but unlike something like an old Briggs, the pull start is self contained and the spring will not take off when it is simply removed. Very easy, really.

excellent! exactly what I was worried about... thanks!
 
HoughMade,

your bike made TheKneeslider.com as an example of the craft.

CONGRATULATIONS, that really is a topnotch build.

steve

Thanks for the heads up. Wow, I made kneeslider and I didn't even know it.
http://thekneeslider.com/archives/2008/10/14/honda-50-powered-vintage-bicycle-project/

I have recently exchanged e-mails for an article at another website. When it gets posted, I will link to it.

I just built this thing for fun and to fit my personal vision...didn't expect internet acclaim.

HoughMade, When you take your bike down to Oz on the speakers circuit You can park it in my garage for safekeeping.
 
Well after some modifications, it's done...again...but I am already contemplating more refinements.

First, the rear view. Here, you can see the new saddlebags, tail light and turn signals. The right saddlebag hold the 12v 7ah SLA battery and fuses (not fusing the charger jack originally led to a Lucas Electric inspired smoke out and new wiring). The left saddle bag hold my stuff- my motorcycle permit, lock, glasses, etc.

In the first 2 pics, you can also see the spring loaded chain tensioner I made. It works flawlessly. The tail light uses an LED 1157 replacement bulb with 4 extra LEDS for the brake lights. The turn signals use the LEDs out of 1156 LED replacement bulbs- how these were built is covered elsewhere in the site.

Finally, I replaced the springs on the seat. The original springs were pitted and fatigued. I had painted them, but they compressed so much, the paint was constantly getting messed up. Plus, they were so fatigued that I bottomed out very easily- very uncomfortable at times. I found brand new chromed springs on- you guessed it- eBay. they are not direct fit, but did not take much modification to work. I am very happy with them- no bottoming, no paint to mess up.
 

Attachments

  • DSC00747-2.jpg
    DSC00747-2.jpg
    151.9 KB · Views: 335
  • DSC00754-2.jpg
    DSC00754-2.jpg
    154.9 KB · Views: 313
  • DSC00751-2.jpg
    DSC00751-2.jpg
    159.2 KB · Views: 322
Last edited by a moderator:
Next, on the front you can see some changes since the last "formal" pics.

I added front turn signals also (amber LEDs). Also, I added a horn. It is more of a "clacker". It is an originals '40s vintage I bought on eBay.

I also added the front "roll" bag. This now holds my tool roll which used to be under the seat. I found this roll at Walmart and could not resist it. I originally mounted it with straps, but given the uneven weight of the tools, it would not hang straight...this bothered me. I used very strong clamps on the handlebars and made solid mounts for the roll. I used a similar clamp to mount the horn. The clamps are actually clamps used to mount an electrical grounding wire of large gauge to a grounding rod of between 3/4" and 1"- the handlebars being 7/8", they fit well.

I also changed the light mount to make room for the roll. It is higher and further back. I like it and personally, I think it looks more pre-WWI than before. It also mounts the light more solidly.

Finally, I fabricated a steel, boxed mount to attach the front brake caliper. It has no flex and is much, much stronger than what I used to have. Before, the mount flexed and I was afraid to dial in the amount of front brake bias needed to provide for maximal braking. Now, I have the brakes adjusted to call upon the front brakes the proper 75% and it stops quickly and reliably. I never, ever use the coaster now.
 

Attachments

  • DSC00748-2.jpg
    DSC00748-2.jpg
    135.1 KB · Views: 313
  • DSC00749-2.jpg
    DSC00749-2.jpg
    161 KB · Views: 323
  • DSC00755-2.jpg
    DSC00755-2.jpg
    188 KB · Views: 329
Back
Top